# Creating recurring events which use a calendar for registration.
> Source: https://support.associationsphere.com/creating-recurring-events-which-use-a-calendar-for-registration | Updated: 2026-09-08T02:58:44Z
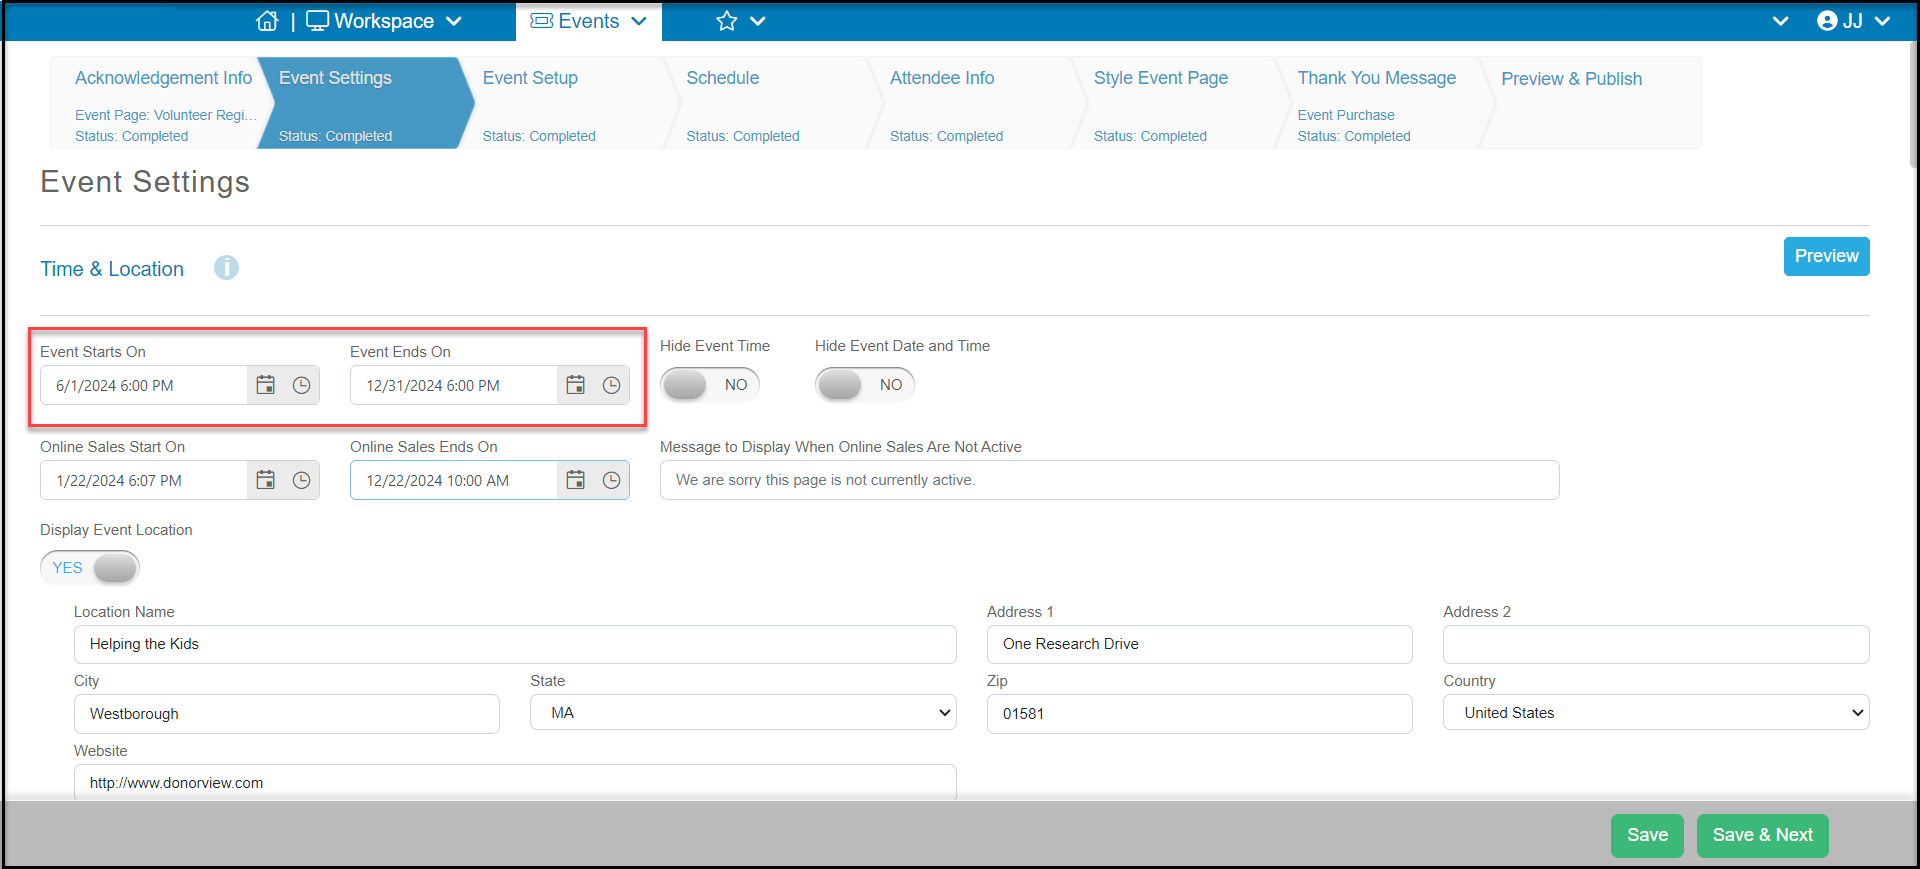
1. For a recurring or multi-day event in which you wish the registrant to use a calendar to select the days and activities, on the Event Settings tab of the event page wizard, you will complete the Time & Date at the top of the page. Because you can edit the days available using the Schedule tab, you may want to consider limiting the duration for your recurring event to a few months. This will also limit how far in advance constituents can sign up for the sessions. Durations should not exceed 420 days if you wish this event to be included on your event calendar.
2. Our example will be a volunteer event with multiple activities available on various days.
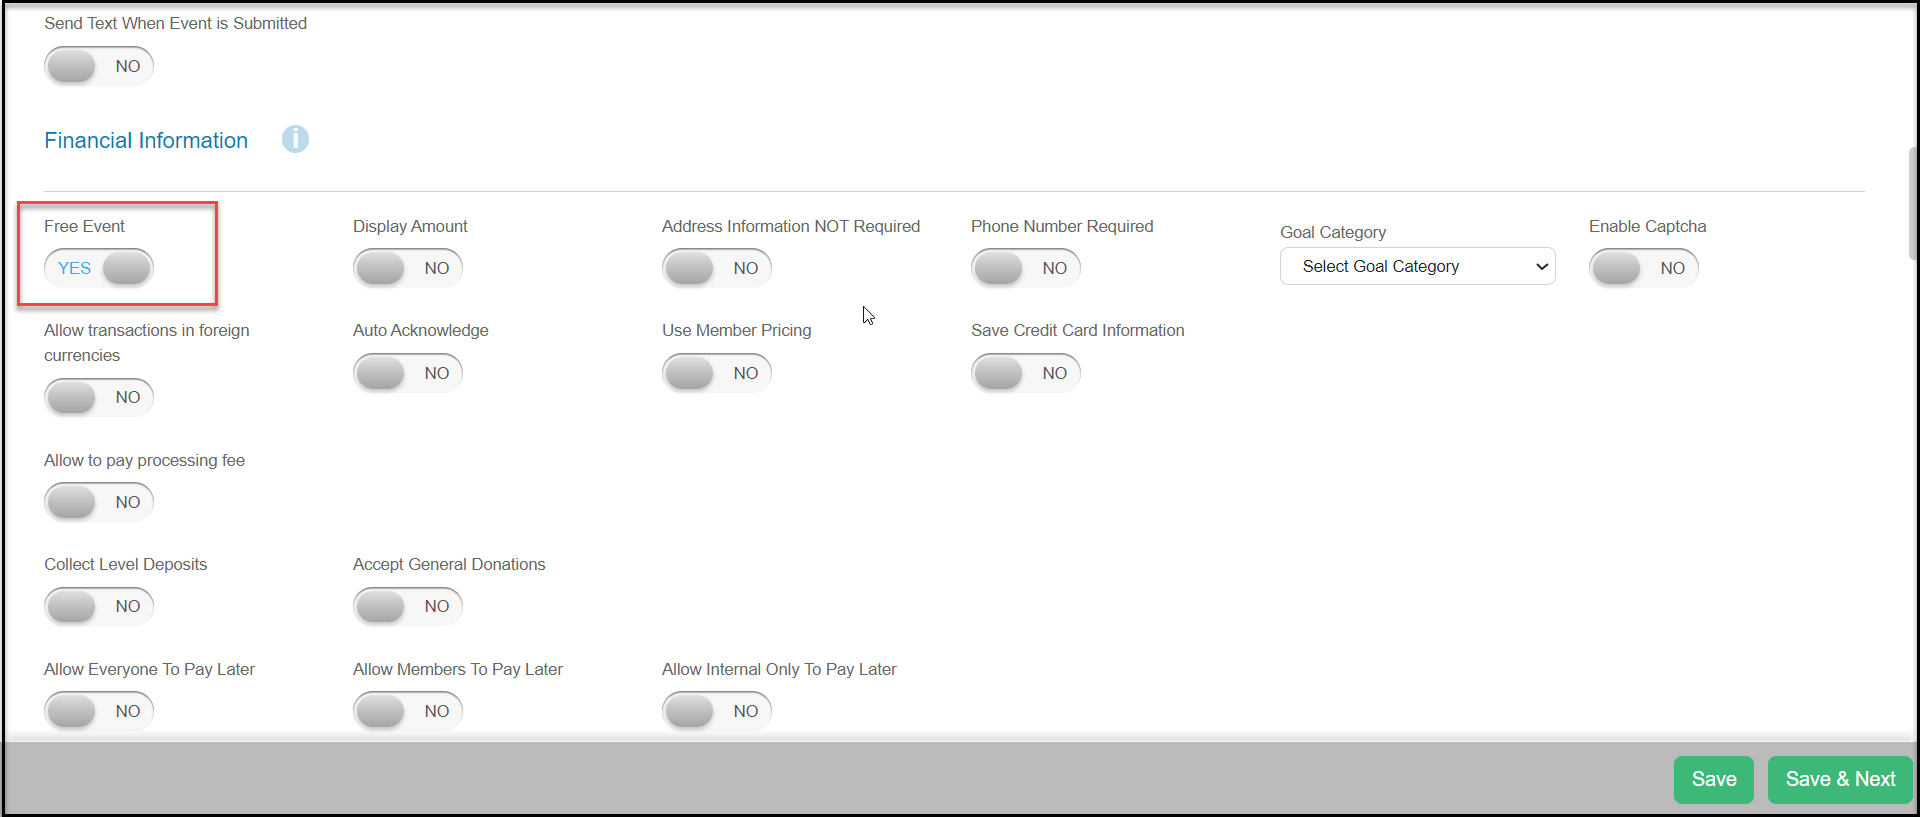
 3. If the event is free, in the Financial Information section toggle the **Free Event** button to **YES**. This will hide the amount field on each ticket level.
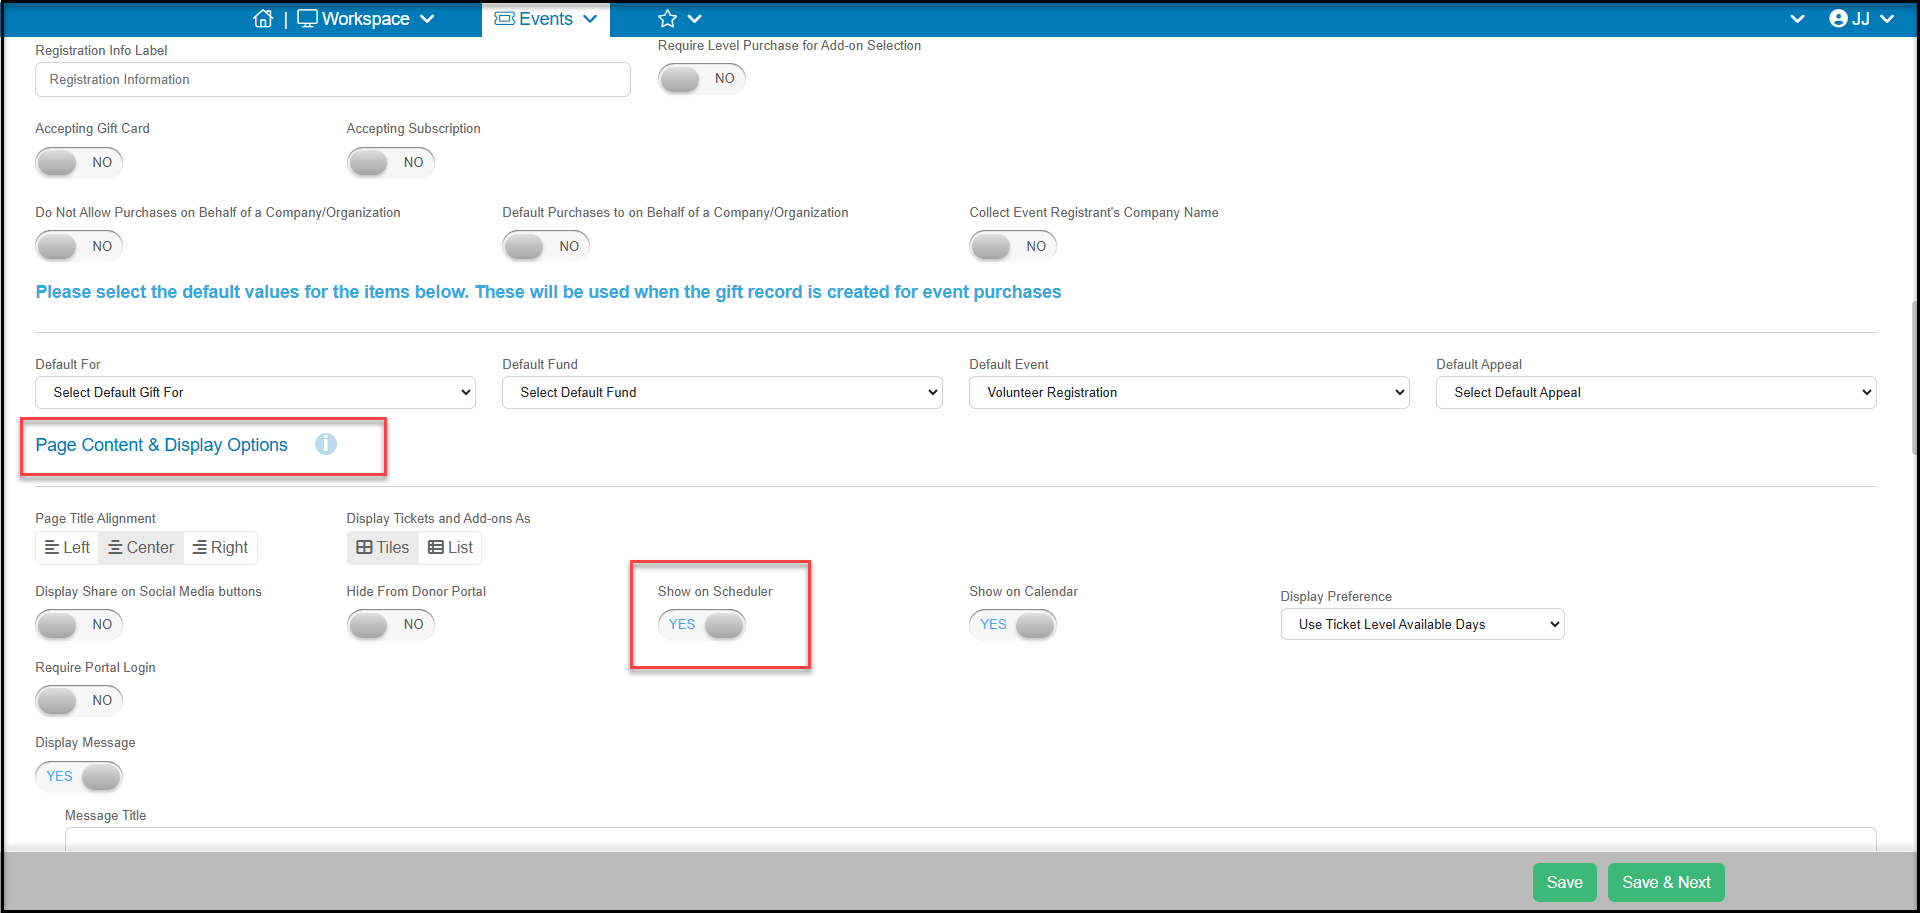
 4. If you would like to be able to use the Events Scheduler to do internal registrations, you can mark **Show on Scheduler** to **YES**. Remember that the internal scheduler does**NOT**allow you to enter any transactions. So if your recurring event has a fee associated with registration, you will still need to use the Event Page for all your registrations.
 5. In the Ticketing section, toggle **Display Quantity**to **YES** to show how many positions or spots are available on any day for each ticket level.
6. For option 1 where we will allow registrants to choose specific days from the calendar, toggle **Recurring Event** to **YES**.
- You can customize the label of the shopping cart under the **Shopping Cart Caption.**
- If you want volunteers to be able to sign up for only one shift per day, toggle **Allow only 1 ticket level/day** to **YES**.
- The **Generate only 1 ticket** feature can be marked **YES** if you want to enable a multi-day registration feature.
- The **Allow Multi-day Registration** toggle allows registrants to select a level, then choose the days to participate instead of using the standard calendar where the day is chosen first, then the level.
- Multi-day registration can also be restricted for internal use only, meaning that feature would only be visible to internal users who are logged into the software and using the same browser to view the page. Toggle **Internal Only** to **YES** to keep the multi-day registration hidden from the public view.
5. In the Ticketing section, toggle **Display Quantity**to **YES** to show how many positions or spots are available on any day for each ticket level.
6. For option 1 where we will allow registrants to choose specific days from the calendar, toggle **Recurring Event** to **YES**.
- You can customize the label of the shopping cart under the **Shopping Cart Caption.**
- If you want volunteers to be able to sign up for only one shift per day, toggle **Allow only 1 ticket level/day** to **YES**.
- The **Generate only 1 ticket** feature can be marked **YES** if you want to enable a multi-day registration feature.
- The **Allow Multi-day Registration** toggle allows registrants to select a level, then choose the days to participate instead of using the standard calendar where the day is chosen first, then the level.
- Multi-day registration can also be restricted for internal use only, meaning that feature would only be visible to internal users who are logged into the software and using the same browser to view the page. Toggle **Internal Only** to **YES** to keep the multi-day registration hidden from the public view.
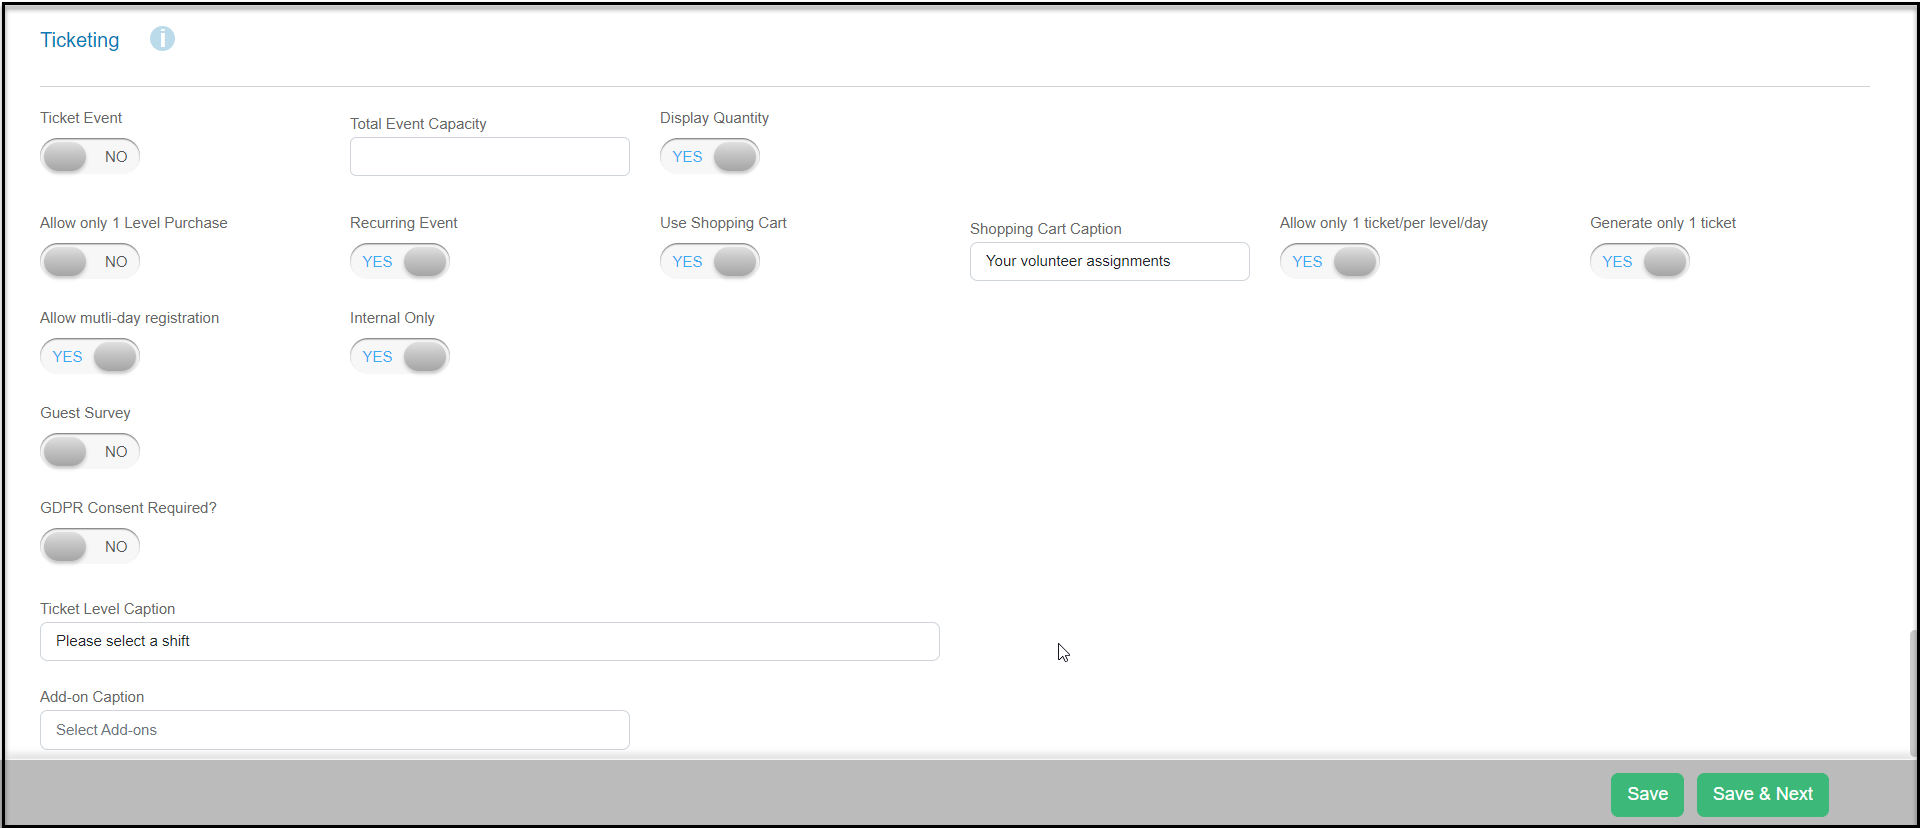 7. In the Event Setup tab, you will add the different activities by clicking on**+Add Level**.
8. Note that if you have many activities that occur on the same day of the week, but occur at different times, like a morning shift and an afternoon shift, be sure to create a separate level for each. The calendar only allows you to select the day, not the time of day.
7. In the Event Setup tab, you will add the different activities by clicking on**+Add Level**.
8. Note that if you have many activities that occur on the same day of the week, but occur at different times, like a morning shift and an afternoon shift, be sure to create a separate level for each. The calendar only allows you to select the day, not the time of day.
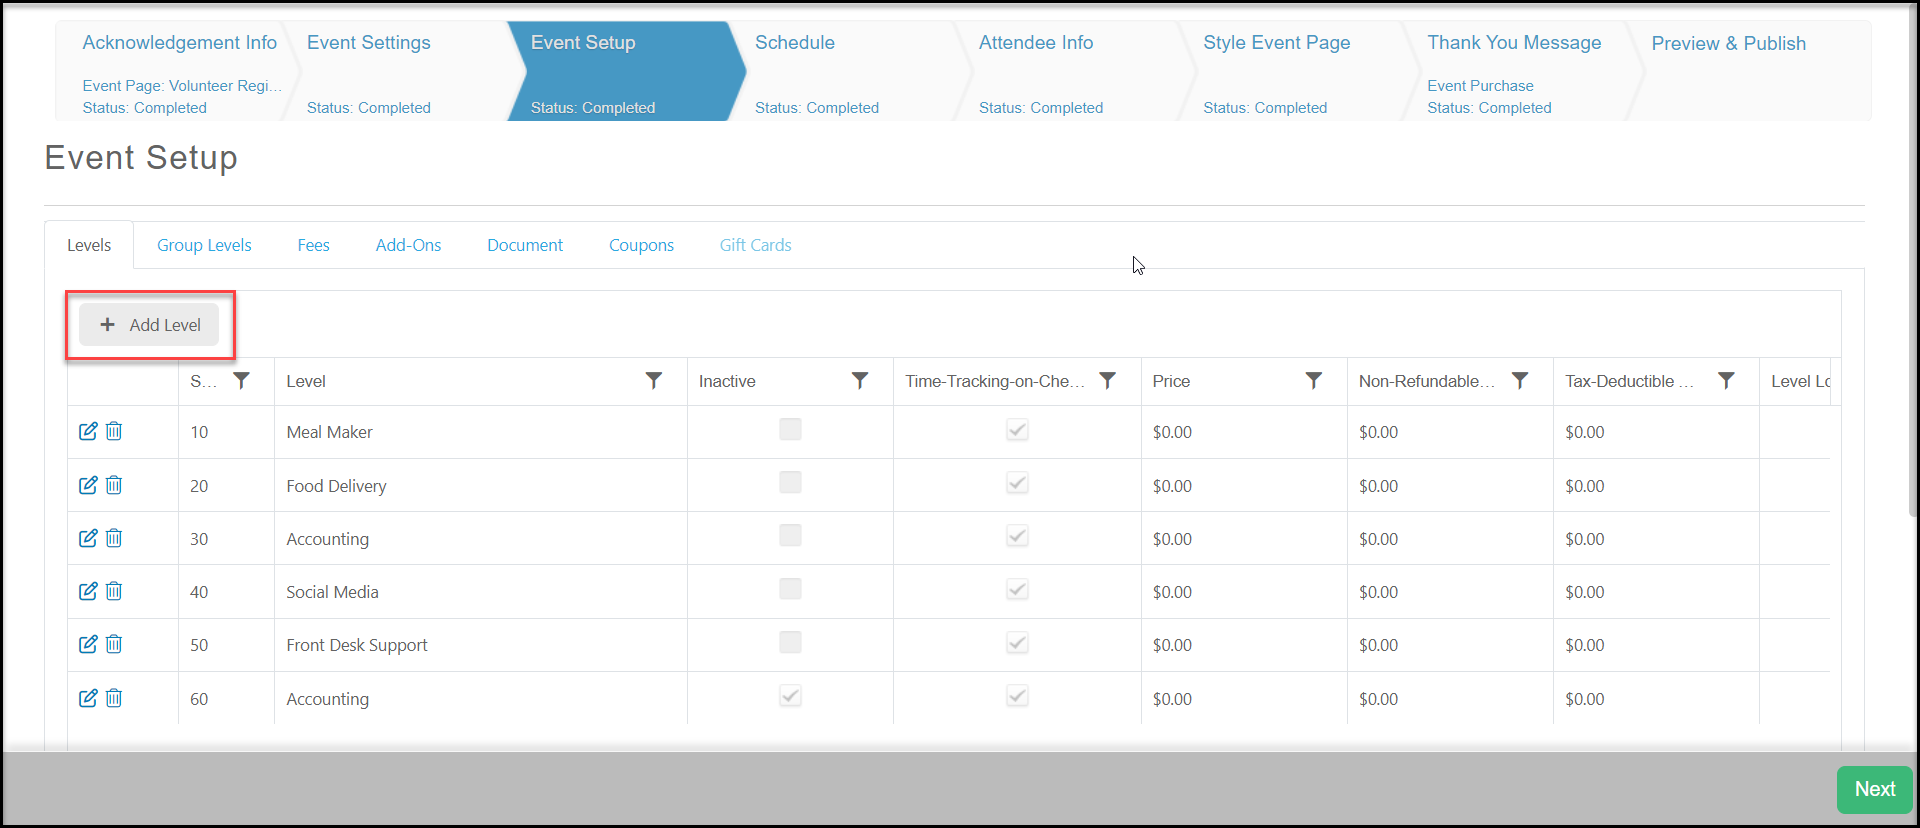 9. Add the details about the shift and activities to be performed in the **Description** field.
10. If the event was marked as a free event, the **Price**, **Non-Refundable Fee**, and **Tax-Deductible Amount** fields are not available. If this is an event with a price, you can enter it here.
11. You'll enter the quantity of spots available in the **Qty Avail.** field. You should always enter some quantity in here, even it is some very high number. This will help with the Scheduler tab when customizing which days are available, and which are not.
12. In the**Level Purch. Limit** field you can limit how many registrations can be made for this level. You should enter "1" if you do not want your constituents to sign up for anyone other than themselves. If you want to allow people to register more than one person one the same form, you can enter a maximum number or leave blank for unlimited additional guests.
13. In the **# of Attendees per Purchase** field, you typically enter "1" to indicate that each registration is for a single person.
14. You should leave the **Minimum Quantity** field blank unless the registrant must sign up more than one person at a time in order to select this shift.
15. Enter the**Start Time**and **End Time** for this shift.
9. Add the details about the shift and activities to be performed in the **Description** field.
10. If the event was marked as a free event, the **Price**, **Non-Refundable Fee**, and **Tax-Deductible Amount** fields are not available. If this is an event with a price, you can enter it here.
11. You'll enter the quantity of spots available in the **Qty Avail.** field. You should always enter some quantity in here, even it is some very high number. This will help with the Scheduler tab when customizing which days are available, and which are not.
12. In the**Level Purch. Limit** field you can limit how many registrations can be made for this level. You should enter "1" if you do not want your constituents to sign up for anyone other than themselves. If you want to allow people to register more than one person one the same form, you can enter a maximum number or leave blank for unlimited additional guests.
13. In the **# of Attendees per Purchase** field, you typically enter "1" to indicate that each registration is for a single person.
14. You should leave the **Minimum Quantity** field blank unless the registrant must sign up more than one person at a time in order to select this shift.
15. Enter the**Start Time**and **End Time** for this shift.
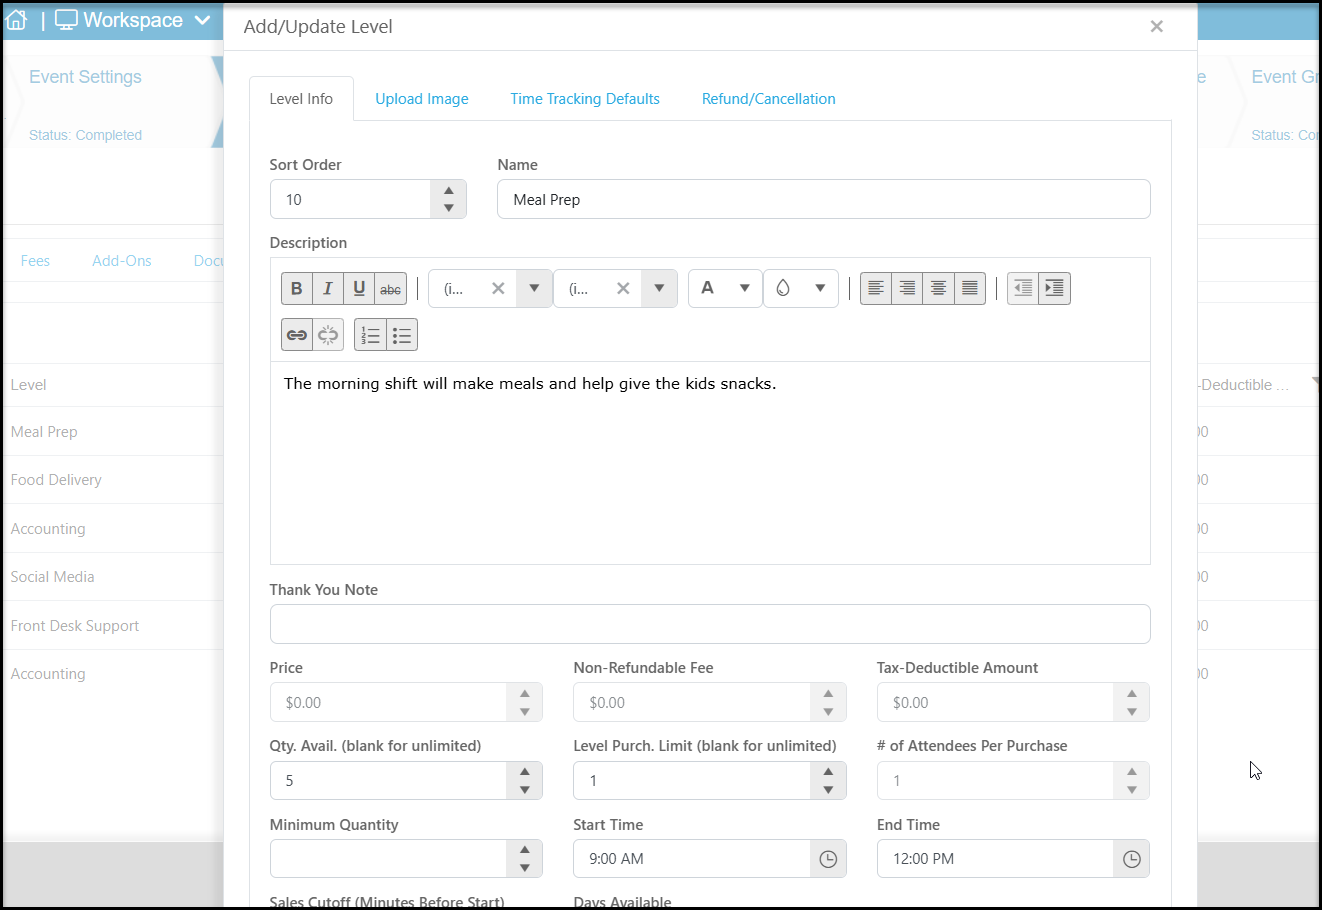 16. If you wish to apply a time cutoff for registration, enter the number of minutes prior to the start of the shift in the **Sales Cutoff (Minutes Before Start)**field. For example, if you only wish to accept registrations within 60 minutes of the scheduled Start Time, then enter “60” in this field. The level will not be shown on the event page after the sales cutoff time.
17. Enter the days of the week this level will be available in **Days Available**. You can select multiple days. Using the scheduler, you will be able to adjust which days in each month or for the duration of your event the level will be available.
18. In most cases, **Sponsorship Level** is left blank, for recurring events.
19. If this level is going to be assigned to a**Level Location,** you can choose it from the drop down list.
20. You can also assign volunteers automatically to a **Constituent Category** and **Subscribe to Email List** in those fields.
21. The **Default For, Fund, Event, Appeal**are used for reporting on the Gifts grid, so if you would like to assign revenue categories to this specific level that are different than those assigned for the page, you can enter them here.
22. If this level will be assigned to a specific person for check in, you can select the user from the**Person Responsible** drop down list.
23. If this level should not be included on your event page, you can set**Inactive**to **YES** to hide this level. This will not affect any previous registrations.
24. If you wish this level to be visible to internal users only, you can make it an **Offline Level**by setting this to YES.
25. If you would like to restrict who can sign up for a specific level, you could also add an access code by toggling **Use Access Code** to **YES** and then creating a code in the **Access Code**field**.**
26. If this level is available only for members, you can activate the **Member Only Level**and select which membership page will be displayed if their membership is not found.
27. Check **Notify when level is sold out**and enter the email addresses to receive the notification if desired.
28. Click **Update** to save your changes.
16. If you wish to apply a time cutoff for registration, enter the number of minutes prior to the start of the shift in the **Sales Cutoff (Minutes Before Start)**field. For example, if you only wish to accept registrations within 60 minutes of the scheduled Start Time, then enter “60” in this field. The level will not be shown on the event page after the sales cutoff time.
17. Enter the days of the week this level will be available in **Days Available**. You can select multiple days. Using the scheduler, you will be able to adjust which days in each month or for the duration of your event the level will be available.
18. In most cases, **Sponsorship Level** is left blank, for recurring events.
19. If this level is going to be assigned to a**Level Location,** you can choose it from the drop down list.
20. You can also assign volunteers automatically to a **Constituent Category** and **Subscribe to Email List** in those fields.
21. The **Default For, Fund, Event, Appeal**are used for reporting on the Gifts grid, so if you would like to assign revenue categories to this specific level that are different than those assigned for the page, you can enter them here.
22. If this level will be assigned to a specific person for check in, you can select the user from the**Person Responsible** drop down list.
23. If this level should not be included on your event page, you can set**Inactive**to **YES** to hide this level. This will not affect any previous registrations.
24. If you wish this level to be visible to internal users only, you can make it an **Offline Level**by setting this to YES.
25. If you would like to restrict who can sign up for a specific level, you could also add an access code by toggling **Use Access Code** to **YES** and then creating a code in the **Access Code**field**.**
26. If this level is available only for members, you can activate the **Member Only Level**and select which membership page will be displayed if their membership is not found.
27. Check **Notify when level is sold out**and enter the email addresses to receive the notification if desired.
28. Click **Update** to save your changes.
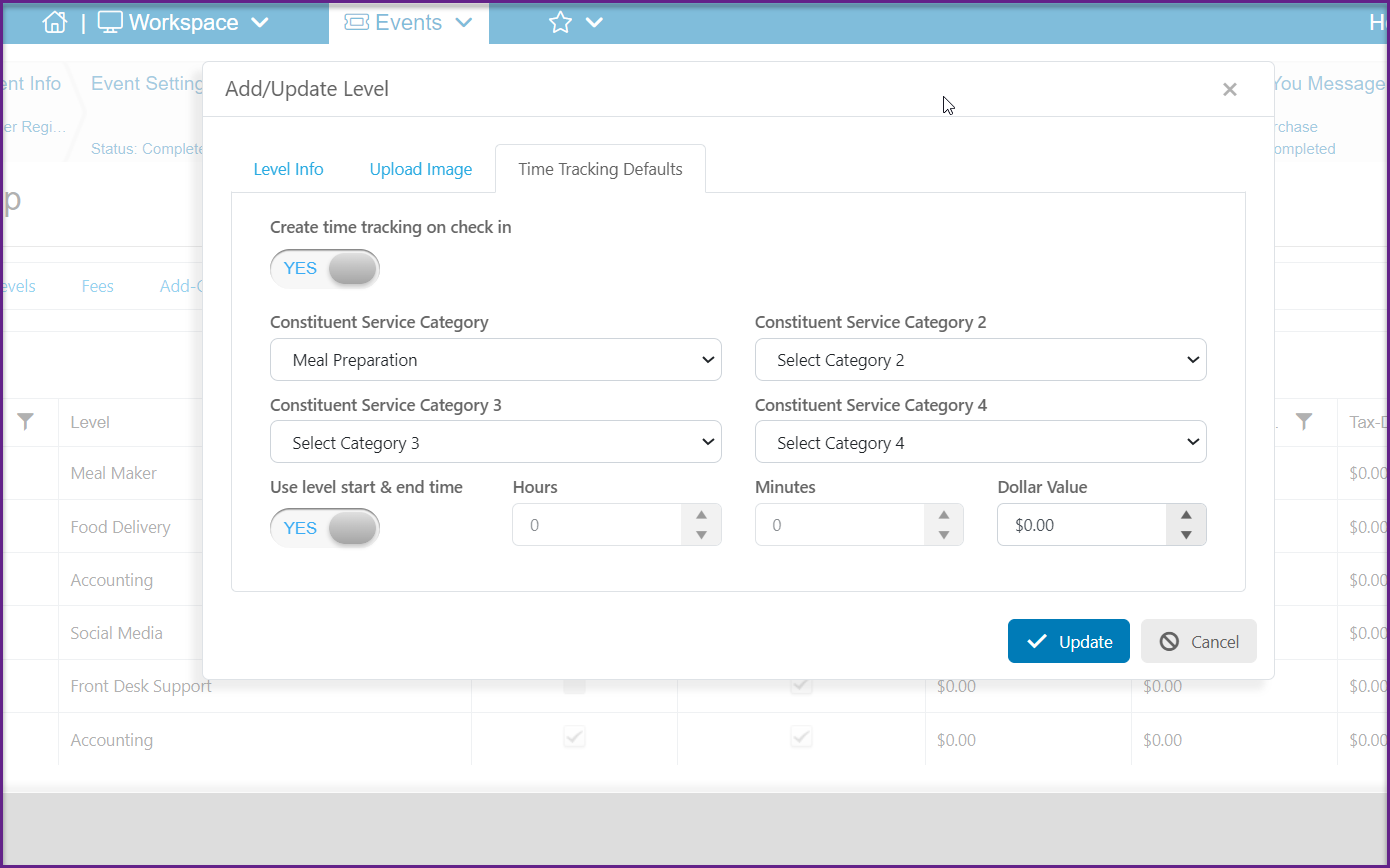
 29. If you would like to automatically assign volunteer hours or credit units when the attendee or volunteer is checked in to the event, you can provide Time Tracking Defaults under that tab.
- Toggle **Create time tracking on check in**to **YES**.
- You can assign the **Service Categories** as desired.
- By default, you would need to check in and check out the volunteer on the Attendance grid to calculate the number of hours and minutes they worked.
- If you prefer to pre-populate the service time just based on checking in, toggle the **Use level start & end time** to **YES** to used the **Start Time** and **End Time** entered in the Level Info. You also can just enter the **Hours - Minutes - Dollar Value** to pre-populate those times.
30. Click **Update** to save the information.
29. If you would like to automatically assign volunteer hours or credit units when the attendee or volunteer is checked in to the event, you can provide Time Tracking Defaults under that tab.
- Toggle **Create time tracking on check in**to **YES**.
- You can assign the **Service Categories** as desired.
- By default, you would need to check in and check out the volunteer on the Attendance grid to calculate the number of hours and minutes they worked.
- If you prefer to pre-populate the service time just based on checking in, toggle the **Use level start & end time** to **YES** to used the **Start Time** and **End Time** entered in the Level Info. You also can just enter the **Hours - Minutes - Dollar Value** to pre-populate those times.
30. Click **Update** to save the information.
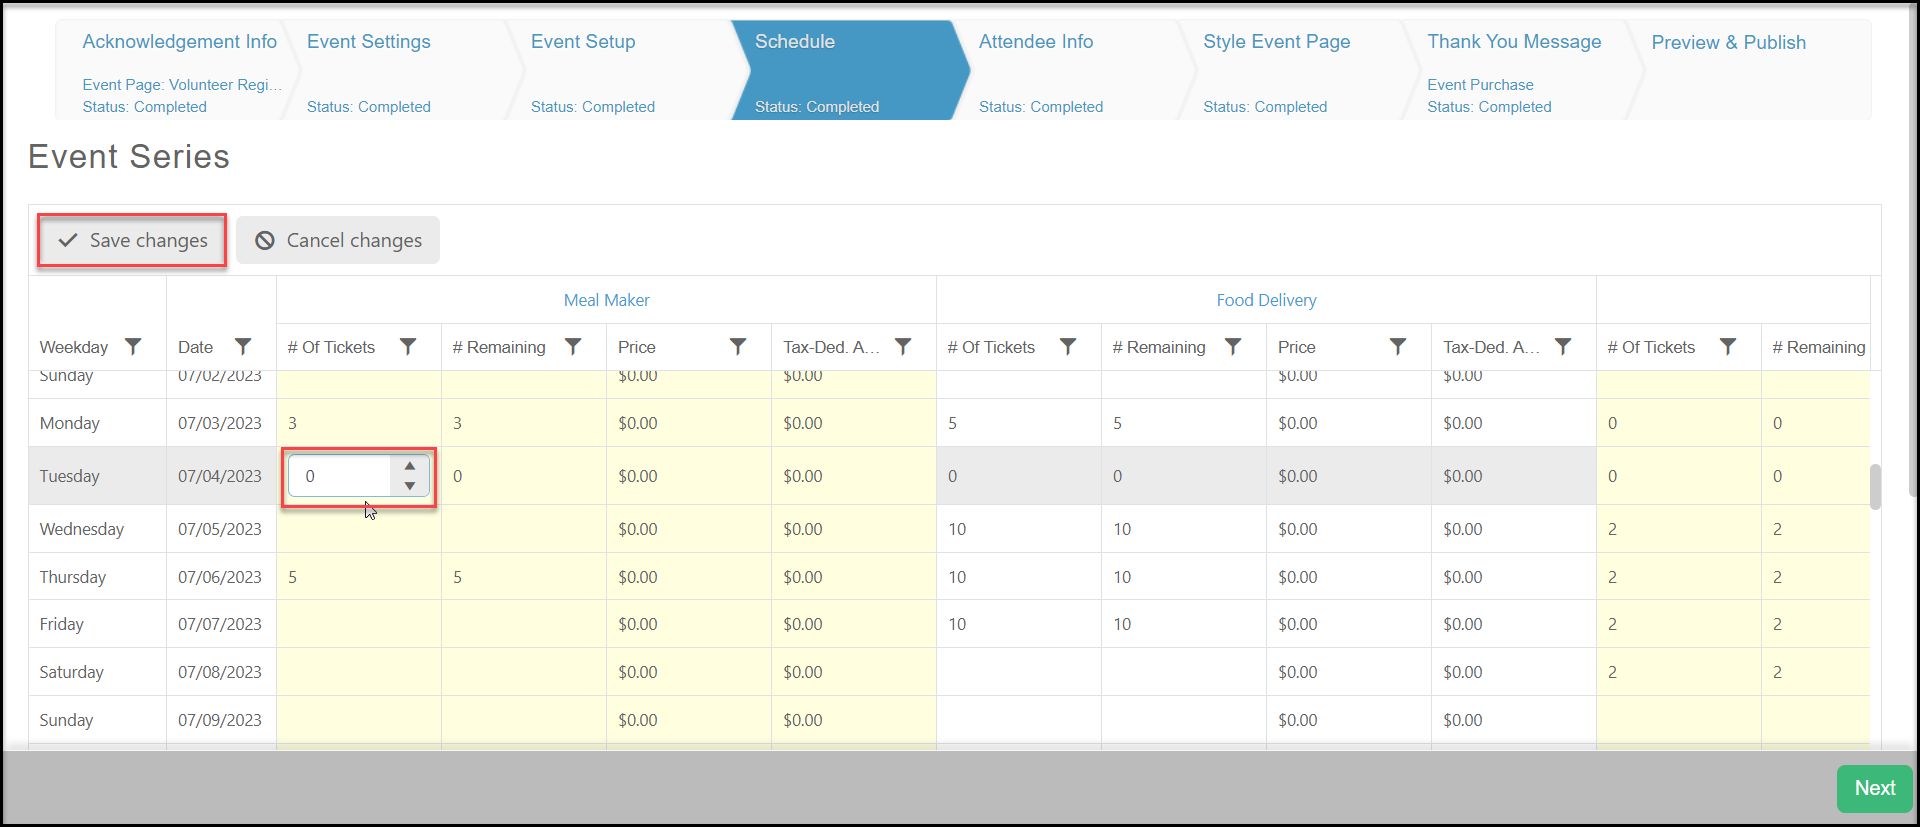
 31. Recurring events will activate a new tab called Schedule. This tab allows you to customize the number of positions (tickets) available on any given day. For example, if you have a recurring event that will happen over several months and there is a holiday in that time frame when your organization will be closed, you can customize how many spots are available.
32. This grid can be filtered and sorted like other grids in the software.
33. The example below shows that the organization will be closed for Independence Day on July 4th.
34. Clicking on the **# of Tickets** on that day, you can reduce the number of spots available to 0.
35. On any given day, you can reduce the number of spots available, but you cannot increase them.
36. Click on **Save changes** to save the schedule.
31. Recurring events will activate a new tab called Schedule. This tab allows you to customize the number of positions (tickets) available on any given day. For example, if you have a recurring event that will happen over several months and there is a holiday in that time frame when your organization will be closed, you can customize how many spots are available.
32. This grid can be filtered and sorted like other grids in the software.
33. The example below shows that the organization will be closed for Independence Day on July 4th.
34. Clicking on the **# of Tickets** on that day, you can reduce the number of spots available to 0.
35. On any given day, you can reduce the number of spots available, but you cannot increase them.
36. Click on **Save changes** to save the schedule.
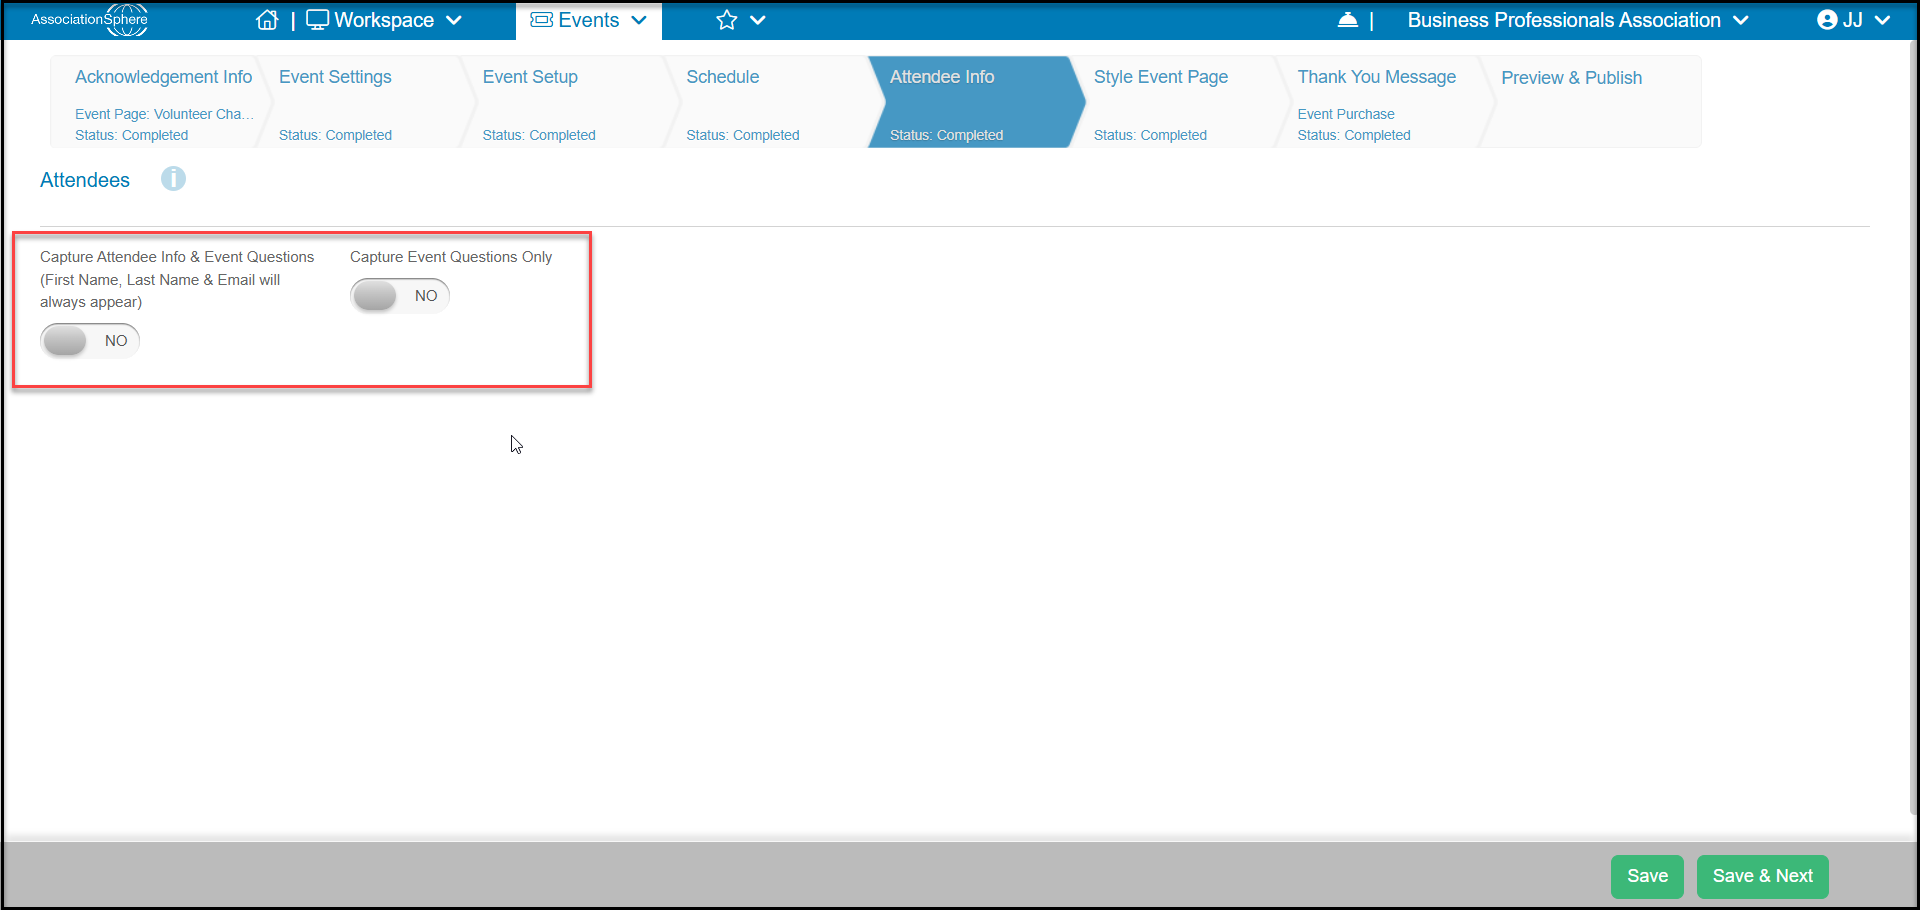
 37. Use the Attendee Info tab cautiously. **Capture Attendee Info** is generally left to NO for recurring events because the registrant will need to enter the name and address for each session they select from the calendar. If you do allow registrants to register for themselves and others, you can set this to **YES** and create any custom Attendee Fields required. You can learn more about the Attendee Info tabs features in this article "What is the Attendee Info tab used for?"
38. If you need to capture general questions, you can use the **Capture Event Questions Only**option.
39. Click **Save & Next** when complete.
37. Use the Attendee Info tab cautiously. **Capture Attendee Info** is generally left to NO for recurring events because the registrant will need to enter the name and address for each session they select from the calendar. If you do allow registrants to register for themselves and others, you can set this to **YES** and create any custom Attendee Fields required. You can learn more about the Attendee Info tabs features in this article "What is the Attendee Info tab used for?"
38. If you need to capture general questions, you can use the **Capture Event Questions Only**option.
39. Click **Save & Next** when complete.
 40. You can continue customizing the style and thank you message. When you get to the Preview & Publish step, your page will be ready to share.
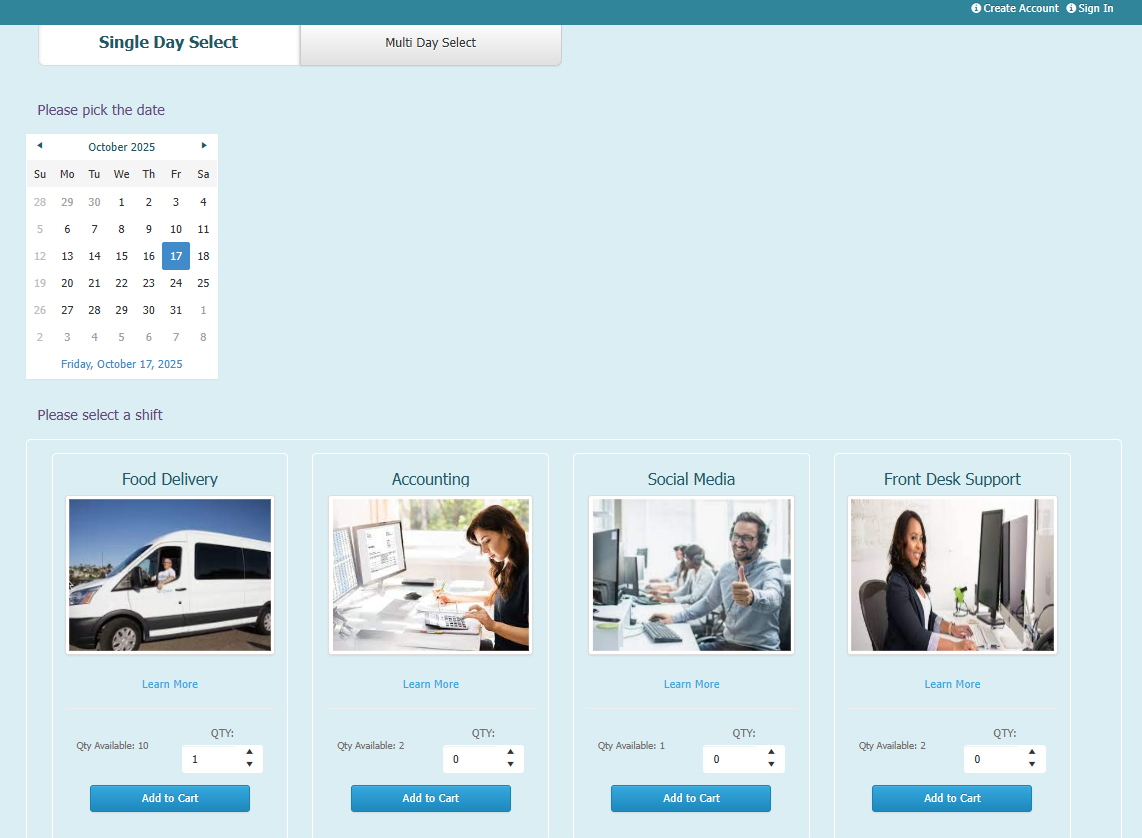
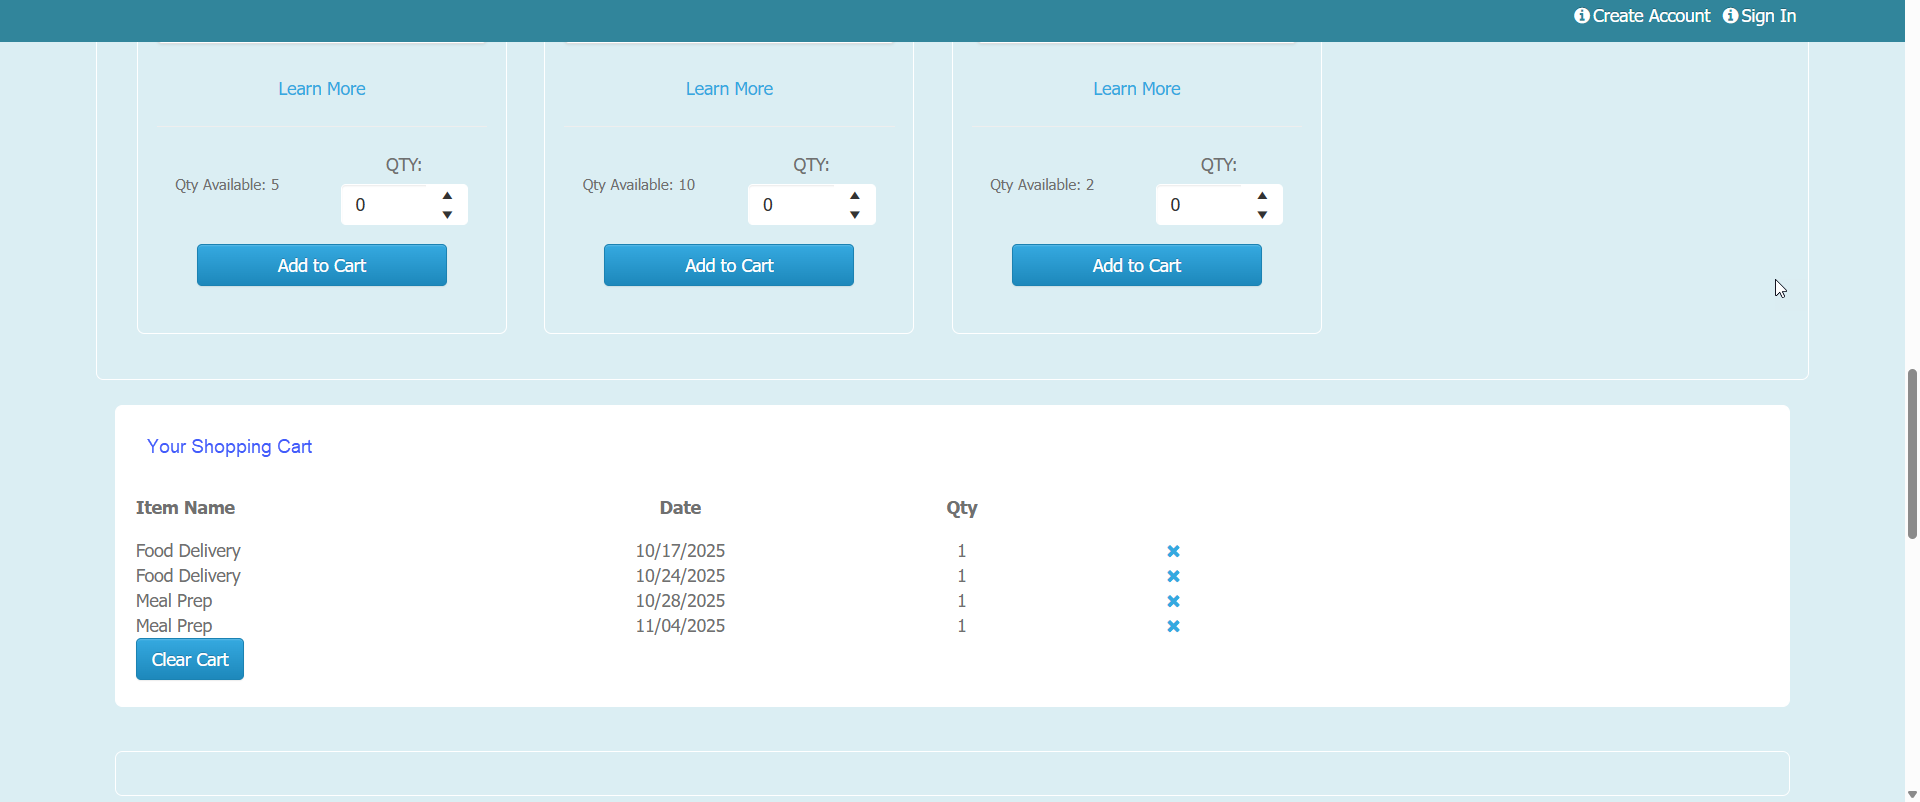
41. On the registration page, under the **Single Day Select**option, the registrant chooses the day on the calendar to reveal what shifts (levels) are available on that day.
42. They will make their selection by entering a quantity in the **QTY** field, then click **Add to Cart**.
40. You can continue customizing the style and thank you message. When you get to the Preview & Publish step, your page will be ready to share.
41. On the registration page, under the **Single Day Select**option, the registrant chooses the day on the calendar to reveal what shifts (levels) are available on that day.
42. They will make their selection by entering a quantity in the **QTY** field, then click **Add to Cart**.
 43. They can continue selecting days and levels and each is recorded in their shopping cart. They can click the “x” to remove a selection.
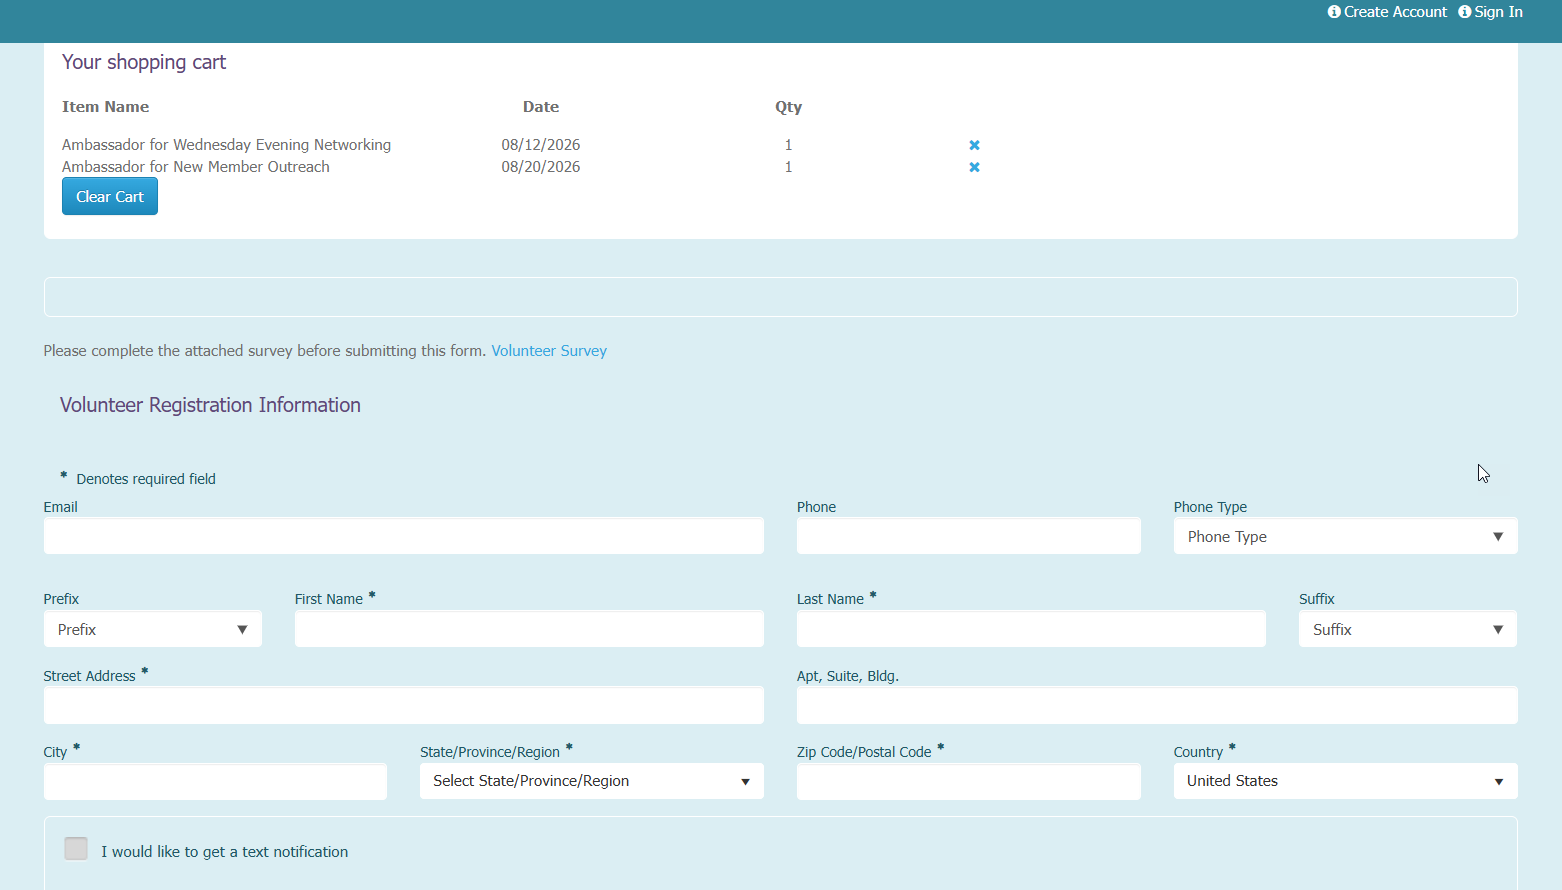
44. When finished, the person completing the form will enter their information at the bottom of the page and click **Submit** to complete the registration.
43. They can continue selecting days and levels and each is recorded in their shopping cart. They can click the “x” to remove a selection.
44. When finished, the person completing the form will enter their information at the bottom of the page and click **Submit** to complete the registration.
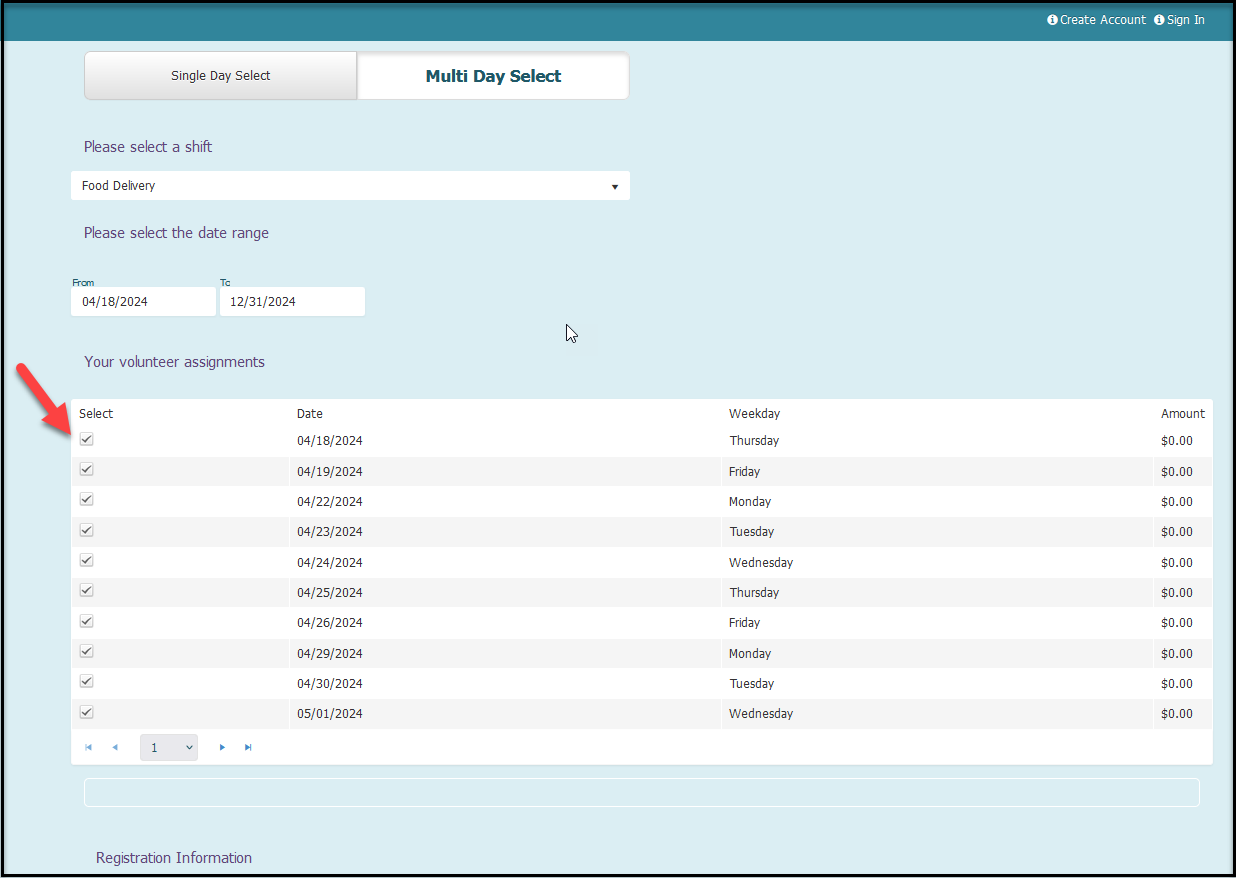
 45. If you activated the **Multi Day Select** option, instead of seeing a calendar, the registrant will select a ticket level (activity) and then see all the days available.
46. If you have a very long time frame, the registrant may need to toggle through the pages or edit the **From** and **To** fields to make their selections.
47. The registrant would UNCHECK any of the days they did not wish to register for.
45. If you activated the **Multi Day Select** option, instead of seeing a calendar, the registrant will select a ticket level (activity) and then see all the days available.
46. If you have a very long time frame, the registrant may need to toggle through the pages or edit the **From** and **To** fields to make their selections.
47. The registrant would UNCHECK any of the days they did not wish to register for.
 48. When finished, the person completing the form will enter their information at the bottom of the page and click **Submit** to complete the registration.
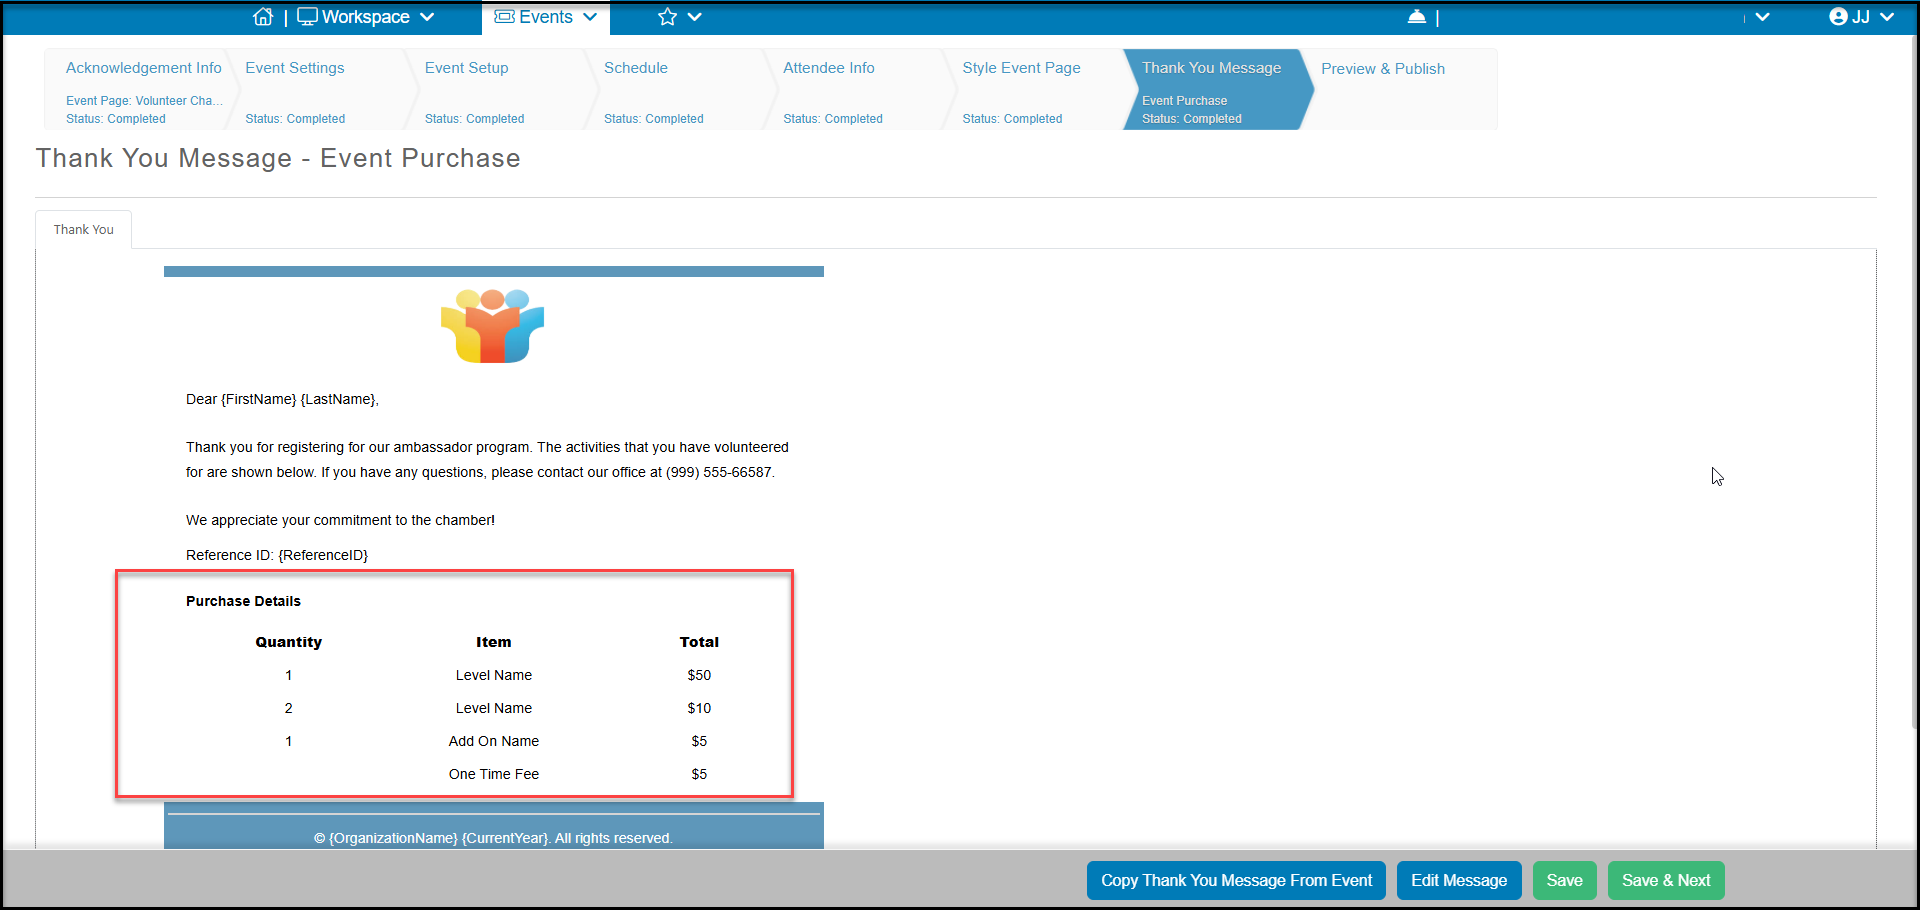
 49. Once the registration is submitted the Registrant will receive a thank you email with a list of the levels they have registered for. Registrants and attendees for events can be viewed and managed in the Events Module.
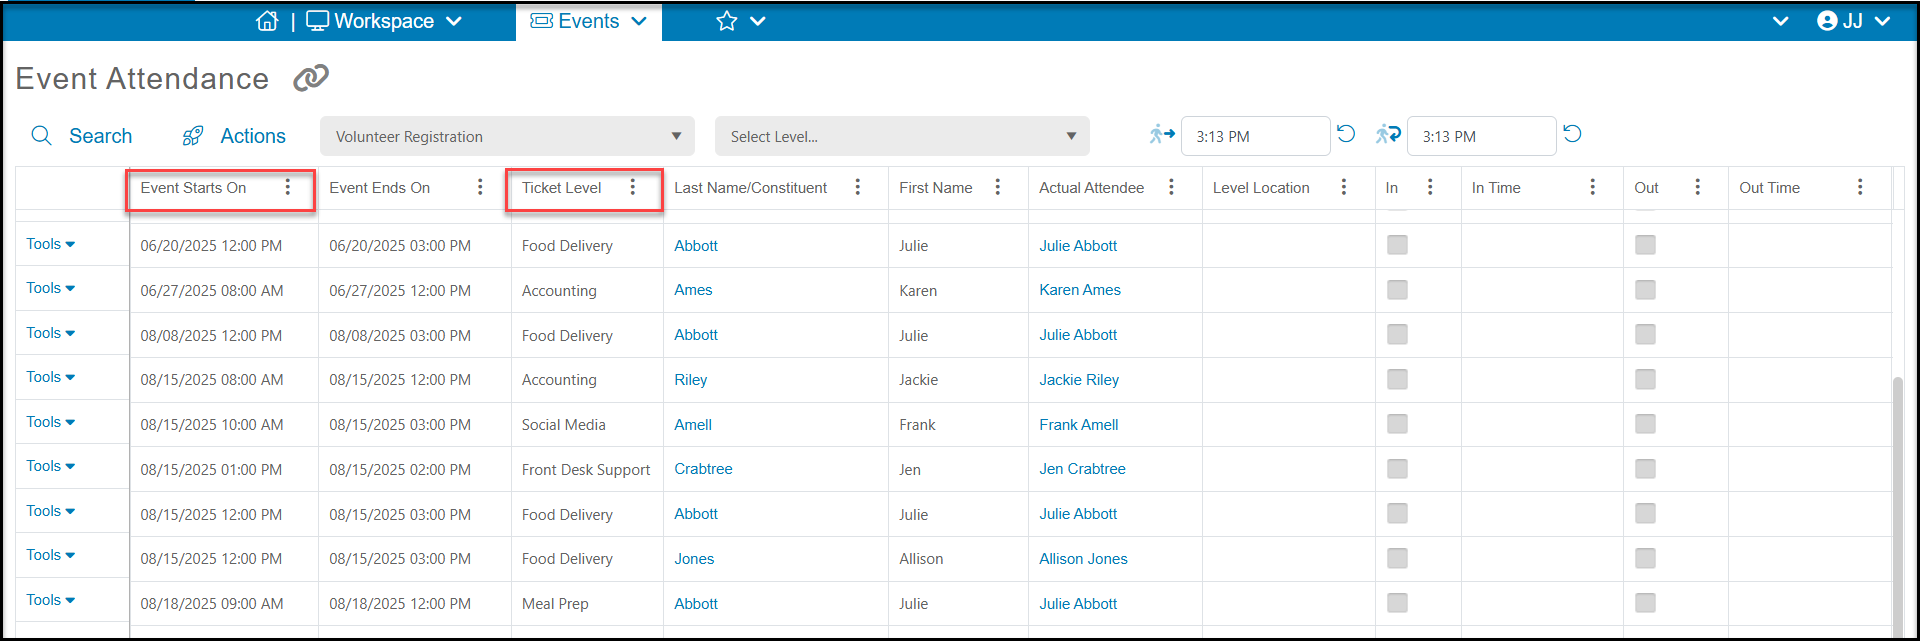
 50. In either the single day or multi-day registration, on the Event Attendance grid, you will be able to see each constituent, the **Ticket Level** (activity) they registered for as well as which date they signed up for under the **Event Starts On**date column.
51. You can add filters to this column to show only registrations for specific days to date ranges for check in.
50. In either the single day or multi-day registration, on the Event Attendance grid, you will be able to see each constituent, the **Ticket Level** (activity) they registered for as well as which date they signed up for under the **Event Starts On**date column.
51. You can add filters to this column to show only registrations for specific days to date ranges for check in.