# How do I create a Pledge?
> Source: https://support.associationsphere.com/how-do-i-create-a-pledge | Updated: 2026-09-03T13:41:21Z
A pledge is a commitment by a constituent to contribute cash or in-kind items in the future. They can be made via a one-time payment or paid over time, like a $1000 pledge paid in four quarterly payments. There are multiple ways to create a new pledge.
First determine if this pledge will be:
- Option 1 - A recurring pledge paid with a credit card and the constituent has an email address for payment acknowledgment automation
- Option 2 - A one-time pledge payment (only one expected payment) or a recurring pledge paid by check
- Option 3 - A recurring pledge paid by credit card, but constituent does not have an email address, so acknowledgements must be mailed
**Option 1 - Recurring Pledges Paid with a Credit Card for Constituents with an Email Address**
1. For recurring pledges paid with a credit card, if you would like to take advantage of automated thank you messages for each payment, you should use a Donation Page with recurring payment options included. You can learn more about building donation pages in the articles in the Donation Pages folder.
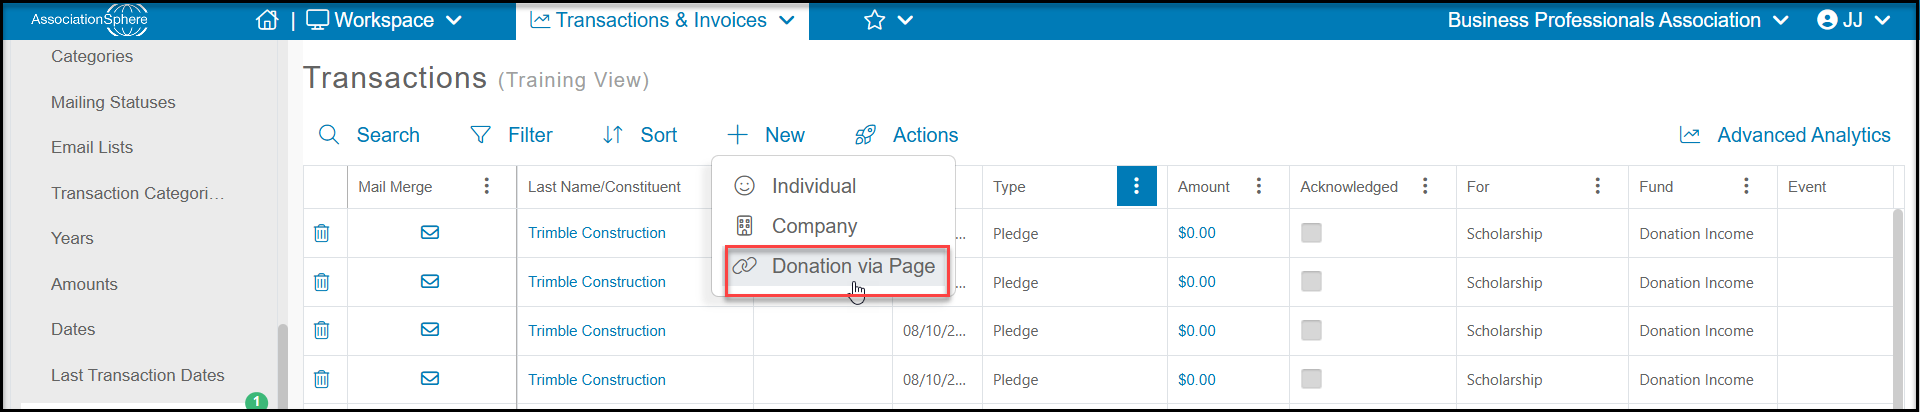
2. Once you have a Donation Page created, you can select it from the Transactions grid by clicking on **+New,** the **Donation via Page** or from the constituent's Transactions tab by clicking on **Add**, then **Donation via Page**.
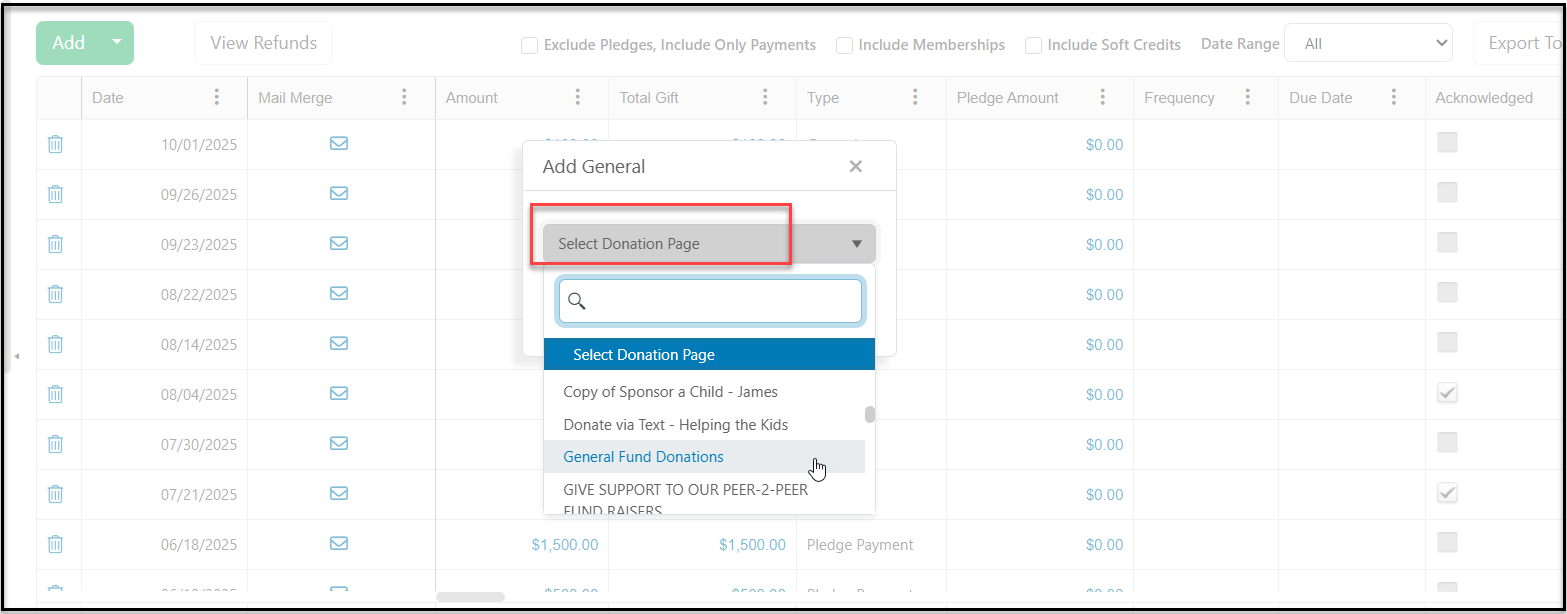
3. With either option you will need to select which Donation Page to launch to enter your transaction.
 4. This example uses a donation page created with the Advanced Page Designer with a progressive template. If you are using stacked template (where all fields show on one page) or used the Simple Page Designer for your page, the images may appear slightly different, but the fields and steps are the same.
5. Once the page is open, if you did not use a constituent's profile to launch the page, you can search for an existing constituent using the search bar at the top of the page. You can select the existing constituent to populate their contact information on the Contact Info step. If this is a brand new constituent, you will be able to enter their information in the Contact Info area.
4. This example uses a donation page created with the Advanced Page Designer with a progressive template. If you are using stacked template (where all fields show on one page) or used the Simple Page Designer for your page, the images may appear slightly different, but the fields and steps are the same.
5. Once the page is open, if you did not use a constituent's profile to launch the page, you can search for an existing constituent using the search bar at the top of the page. You can select the existing constituent to populate their contact information on the Contact Info step. If this is a brand new constituent, you will be able to enter their information in the Contact Info area.
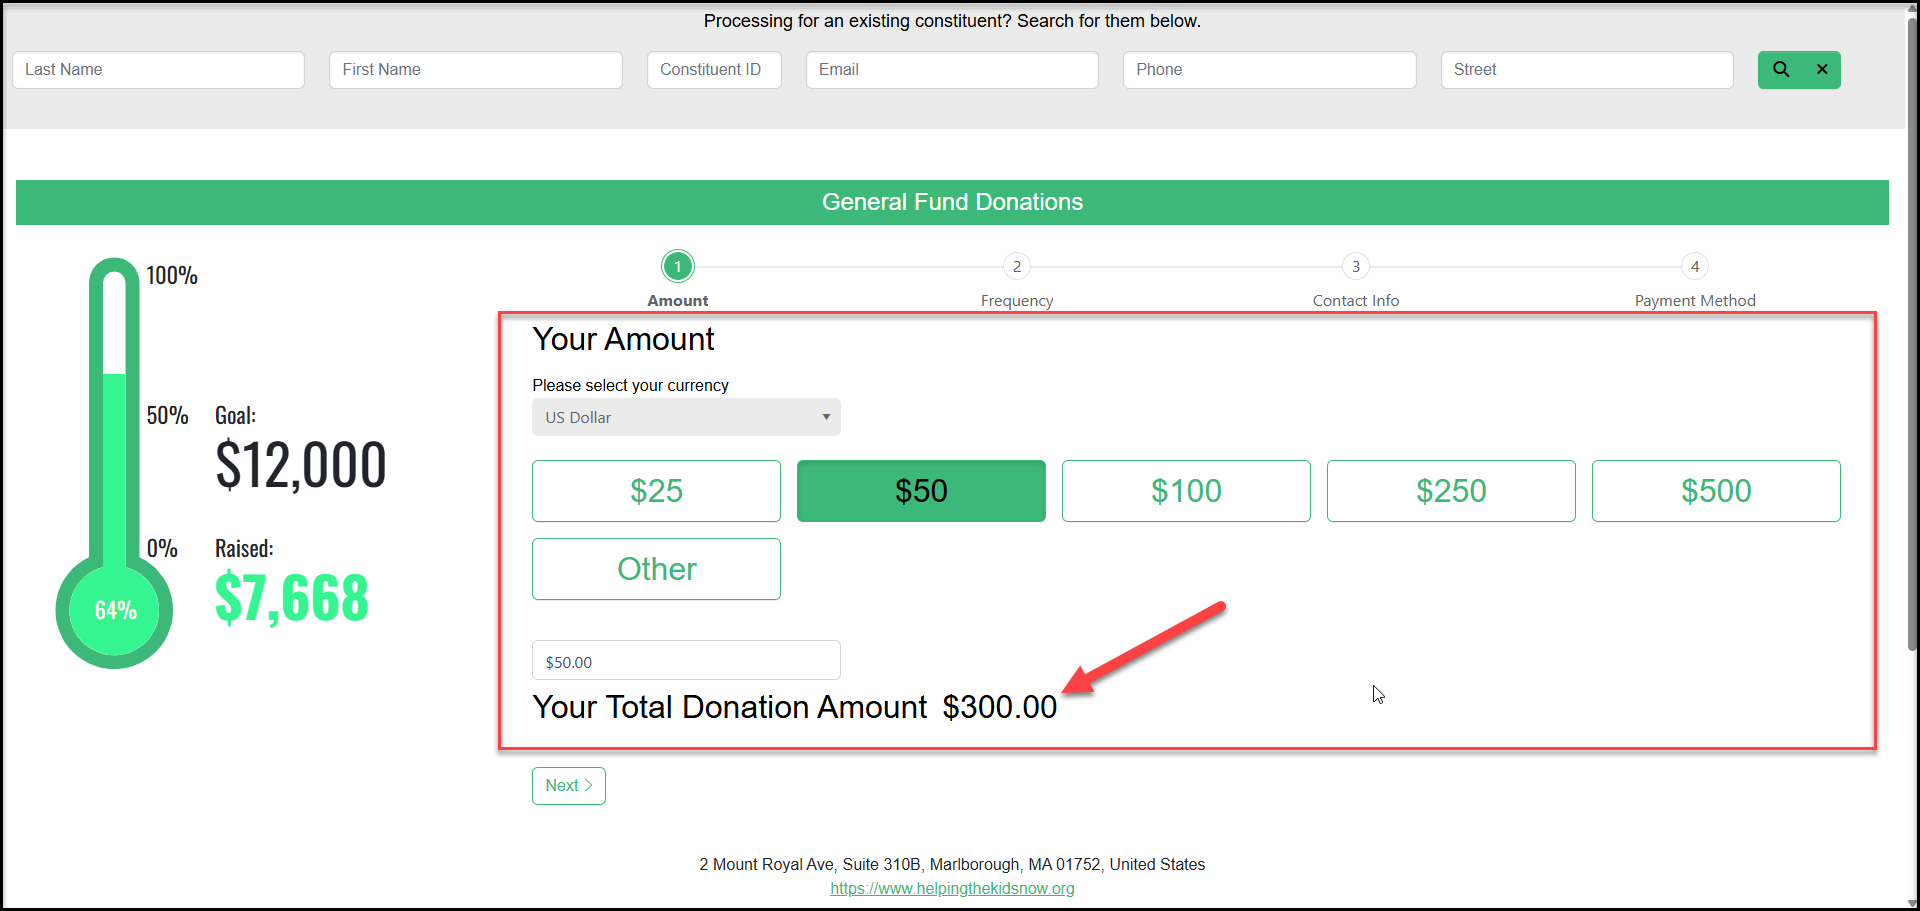
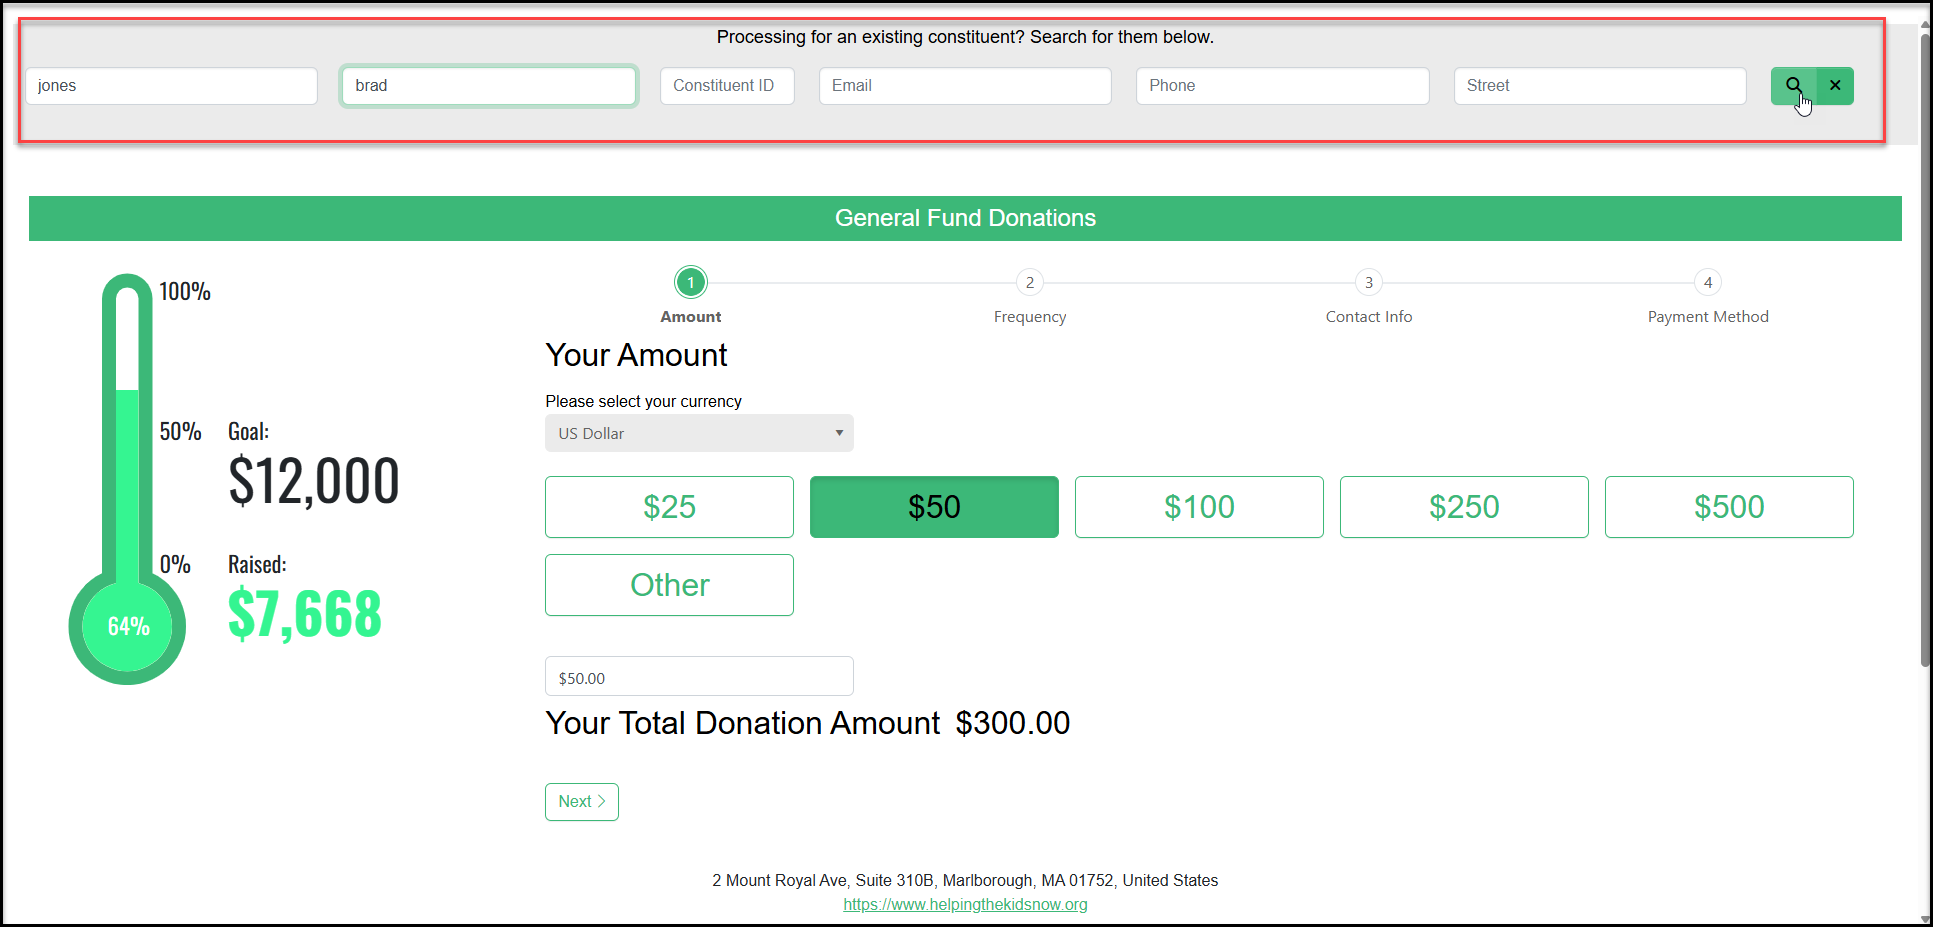 6. Next, you will select the amount that will be paid with each payment (not the total amount). The Total Donation Amount will reflect the number of payments and frequency you established as a default for your page, but you will be able to edit this in Step 2. Click **Next** to proceed to the next step.
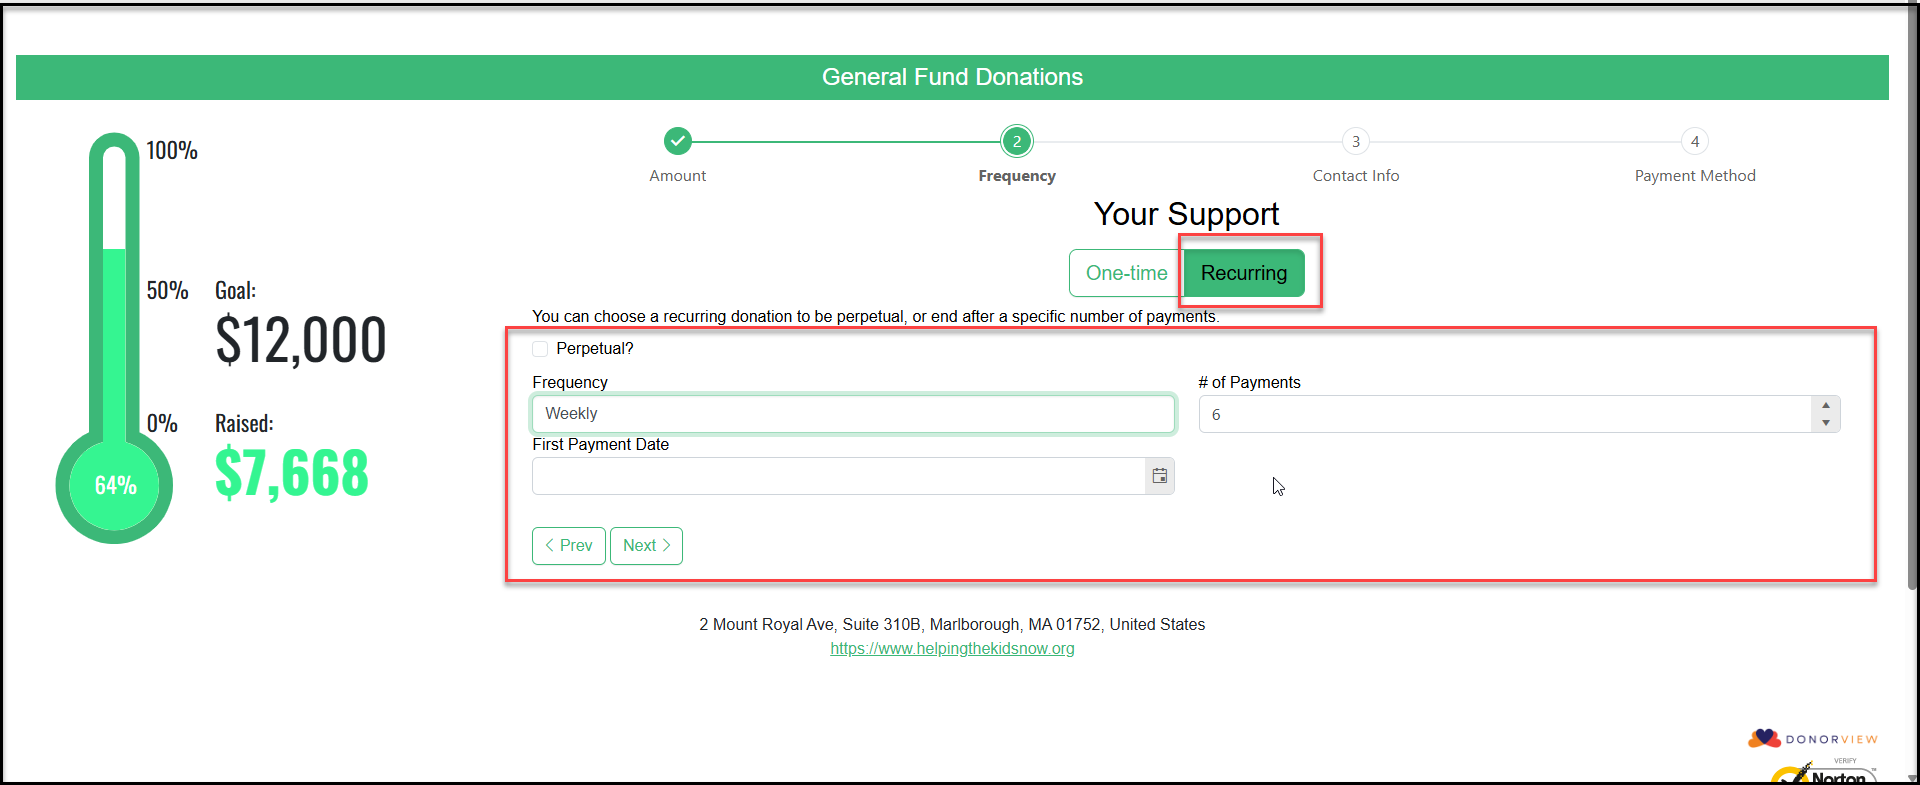
 7. On Step 2, choose whether this will be a **Perpetual**pledge, meaning the pledge will automatically renew with the same frequency or have a definitive **#of Payments**. Note that perpetual pledges will initially add a maximum of 60 pledge payments due or extend out only to the expiration date of the credit card entered. If the credit card is still valid or is updated prior to the last date of the initial pledge, it will auto renew and add the additional payments due.
8. Choose the **Frequency** of the pledge payments.
9. And select the **First Payment Date.**You can choose today and collect a first payment immediately, or choose a date in the future using the calendar icon.
10. Click **Next**to enter or confirm the Contact Info.
7. On Step 2, choose whether this will be a **Perpetual**pledge, meaning the pledge will automatically renew with the same frequency or have a definitive **#of Payments**. Note that perpetual pledges will initially add a maximum of 60 pledge payments due or extend out only to the expiration date of the credit card entered. If the credit card is still valid or is updated prior to the last date of the initial pledge, it will auto renew and add the additional payments due.
8. Choose the **Frequency** of the pledge payments.
9. And select the **First Payment Date.**You can choose today and collect a first payment immediately, or choose a date in the future using the calendar icon.
10. Click **Next**to enter or confirm the Contact Info.
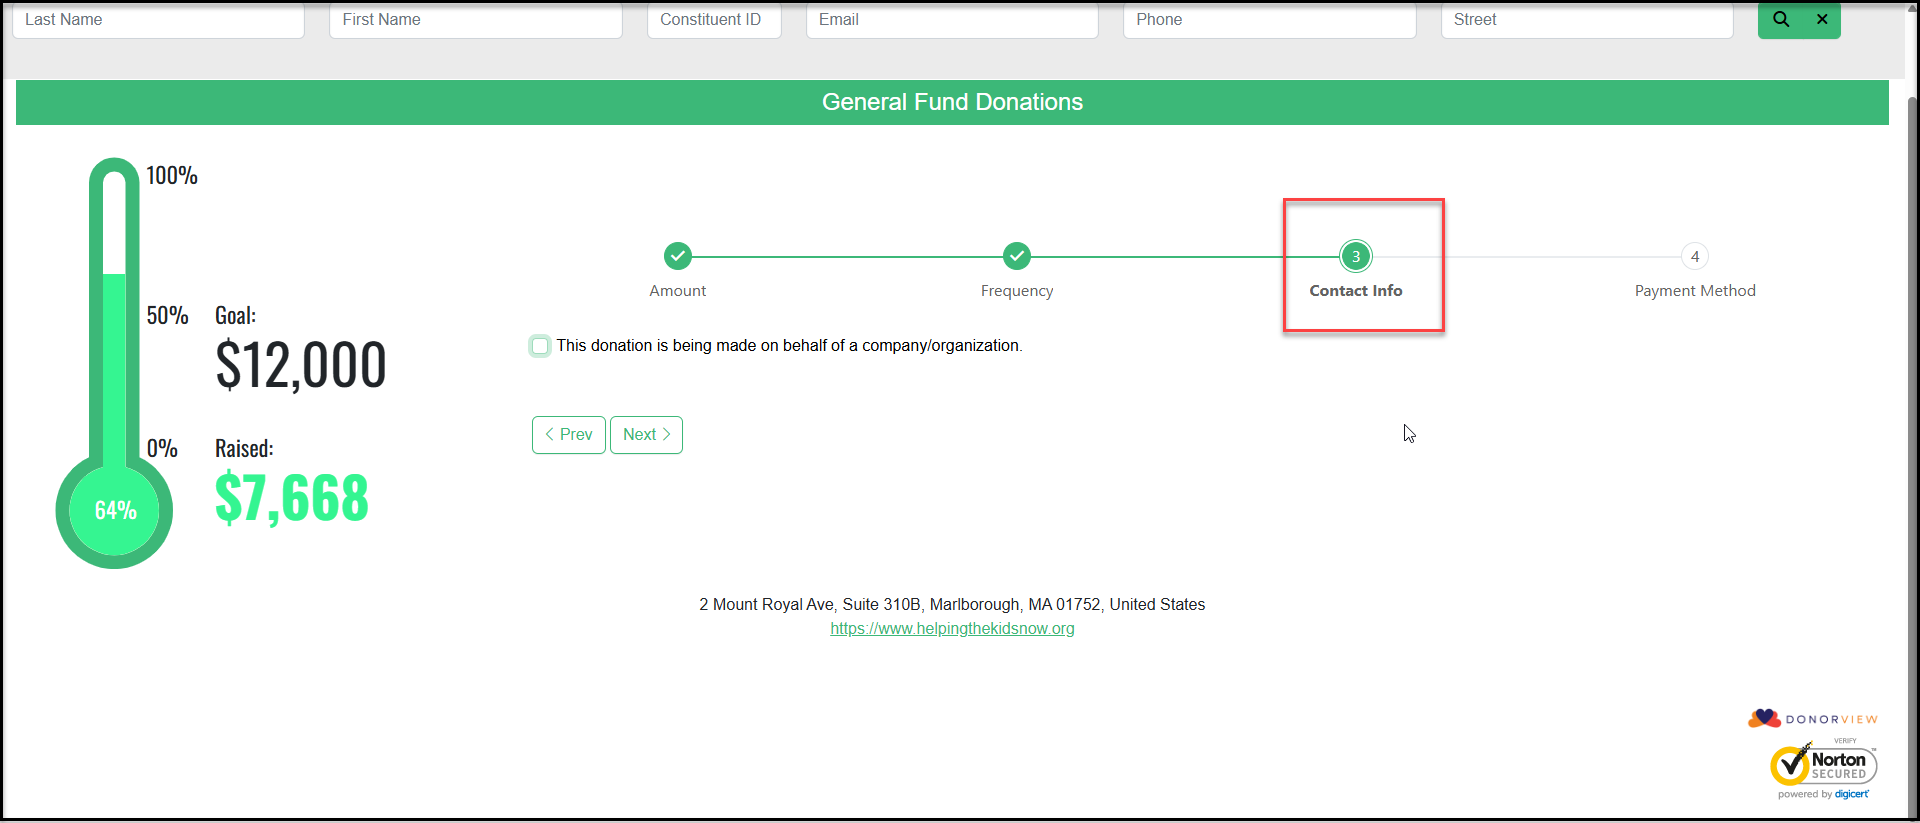
 11. If you have already selected an existing constituent, you will not need to enter any information into Contact Info and can click Next to choose the Payment Method.
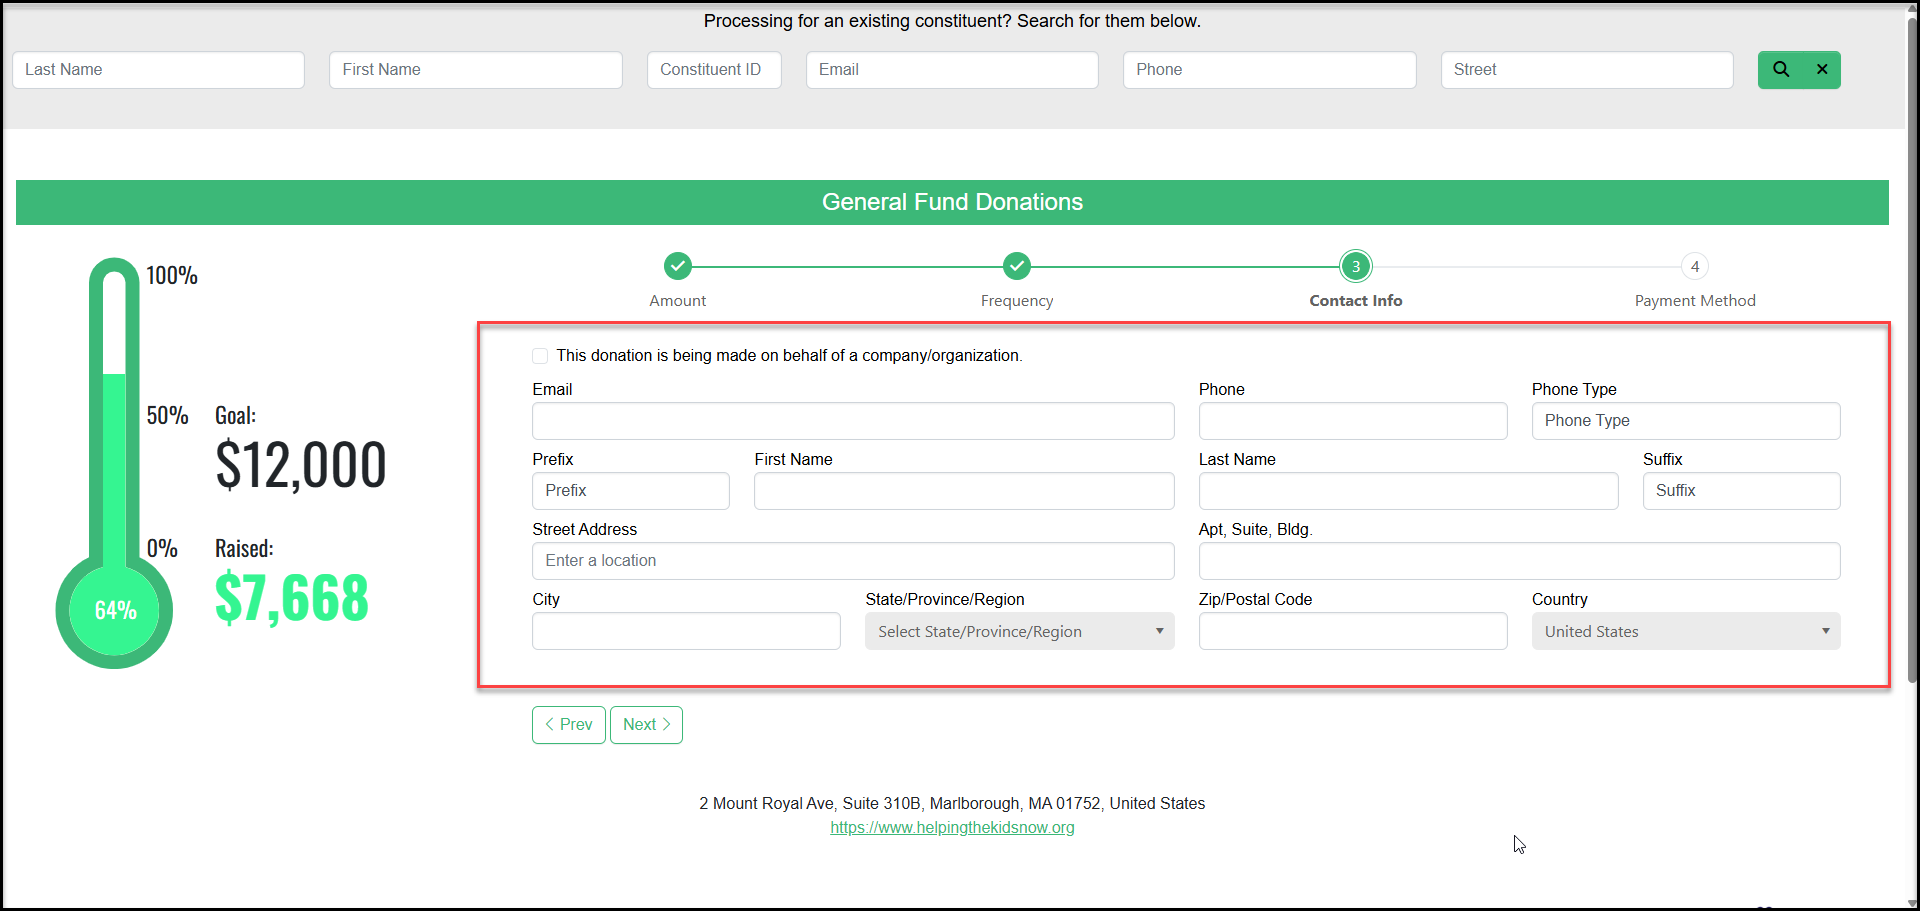
 12. If this is a pledge for a new constituent, you can enter the contact info. Note that an **Email Address** will be required along with**First Name, Last Name, Street Address, City, State, Zip/Postal Code** and **Country.**
13. Click **Next** to go to the last step to enter the credit card information.
12. If this is a pledge for a new constituent, you can enter the contact info. Note that an **Email Address** will be required along with**First Name, Last Name, Street Address, City, State, Zip/Postal Code** and **Country.**
13. Click **Next** to go to the last step to enter the credit card information.
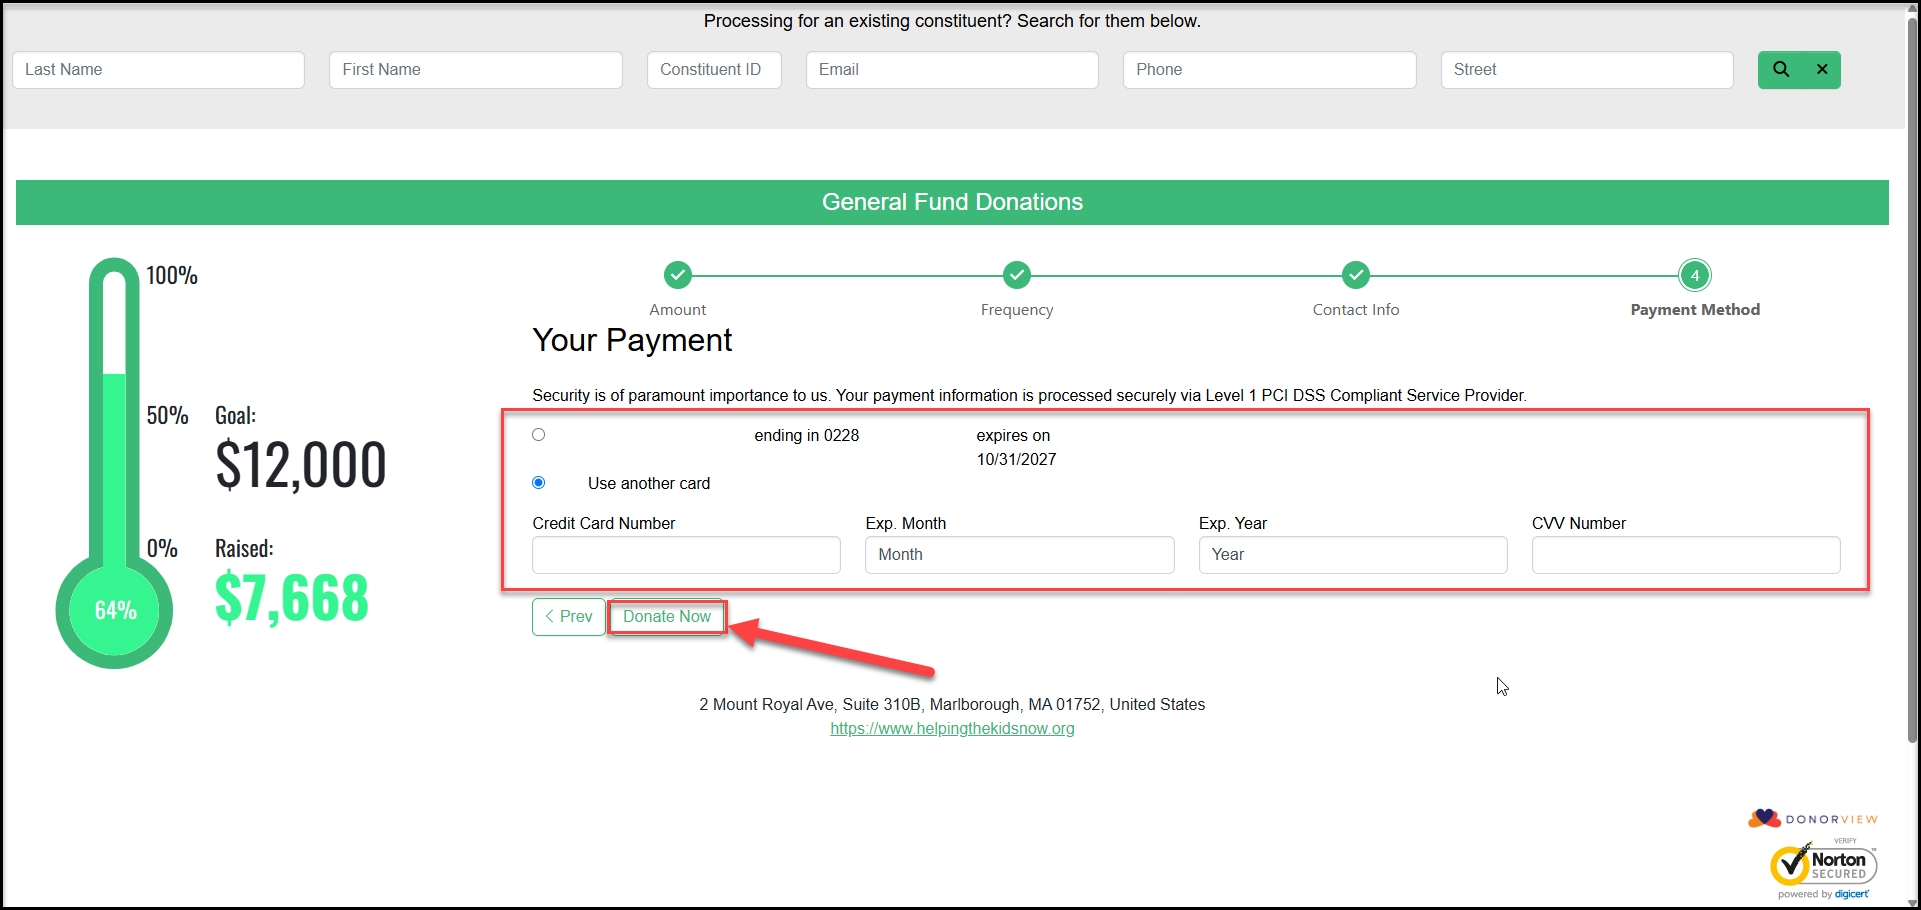
 14. If you selected an existing constituent, you can choose a payment method they have on file. Or, for new constituents or constituents using a different card, you can enter a new card number with the **Credit Card Number, Exp Month, Exp Year** and**CVV Number** fields. Click on **Donate Now** to complete the transaction and initiate the pledge.
 15. The constituent will receive an automatic thank you message for initiating the pledge.
16. On the payment schedule established, the software will auto-charge the credit card and send another email acknowledgement for the payment.
**Option 2 - One-time and Recurring Pledges Paid by Check**
For constituents who are making a one-time pledge or are doing a recurring pledge and wish to pay their pledge with a check, use the steps below.
1. From the main grids (Constituents, Transactions, Interactions or Documents), you can highlight the constituent, click on the **+ New** button at the top of the grid and select **Transaction.**
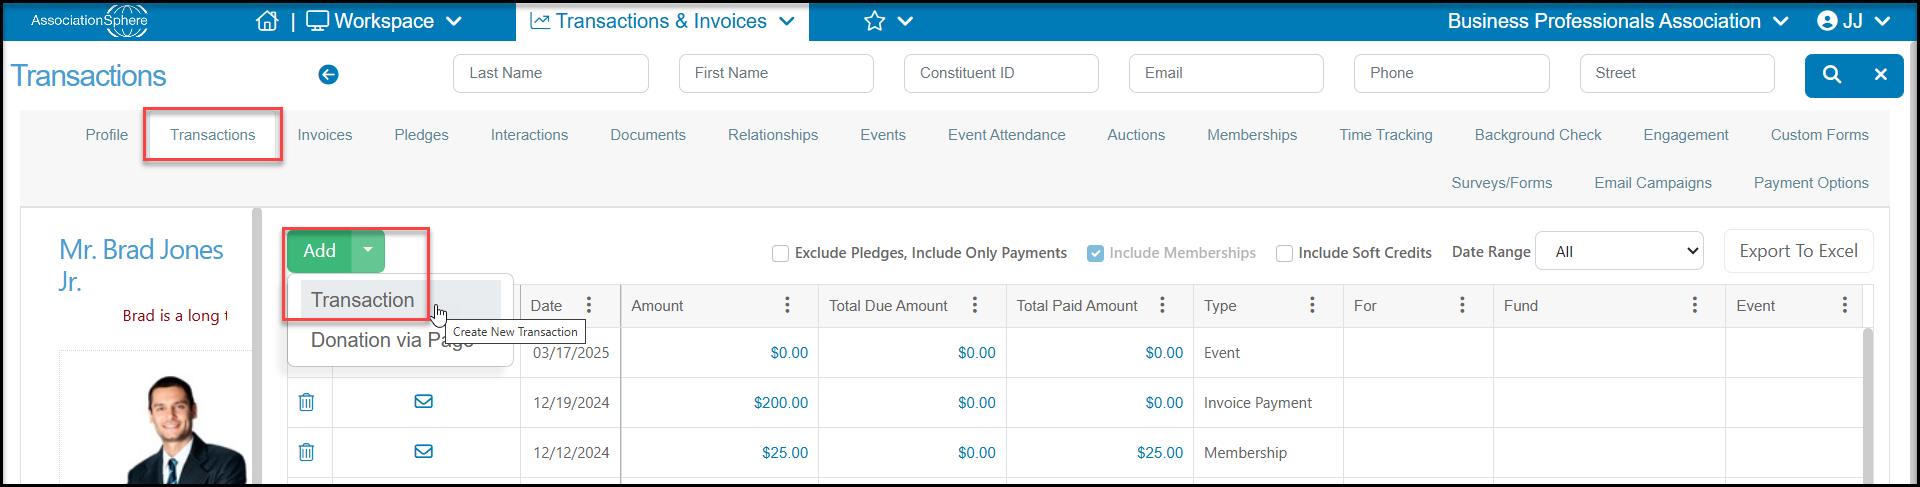
2. From within a constituent record, you can click on their Transactions tab. Click on the **Add** button, then **Transaction.**
15. The constituent will receive an automatic thank you message for initiating the pledge.
16. On the payment schedule established, the software will auto-charge the credit card and send another email acknowledgement for the payment.
**Option 2 - One-time and Recurring Pledges Paid by Check**
For constituents who are making a one-time pledge or are doing a recurring pledge and wish to pay their pledge with a check, use the steps below.
1. From the main grids (Constituents, Transactions, Interactions or Documents), you can highlight the constituent, click on the **+ New** button at the top of the grid and select **Transaction.**
2. From within a constituent record, you can click on their Transactions tab. Click on the **Add** button, then **Transaction.**
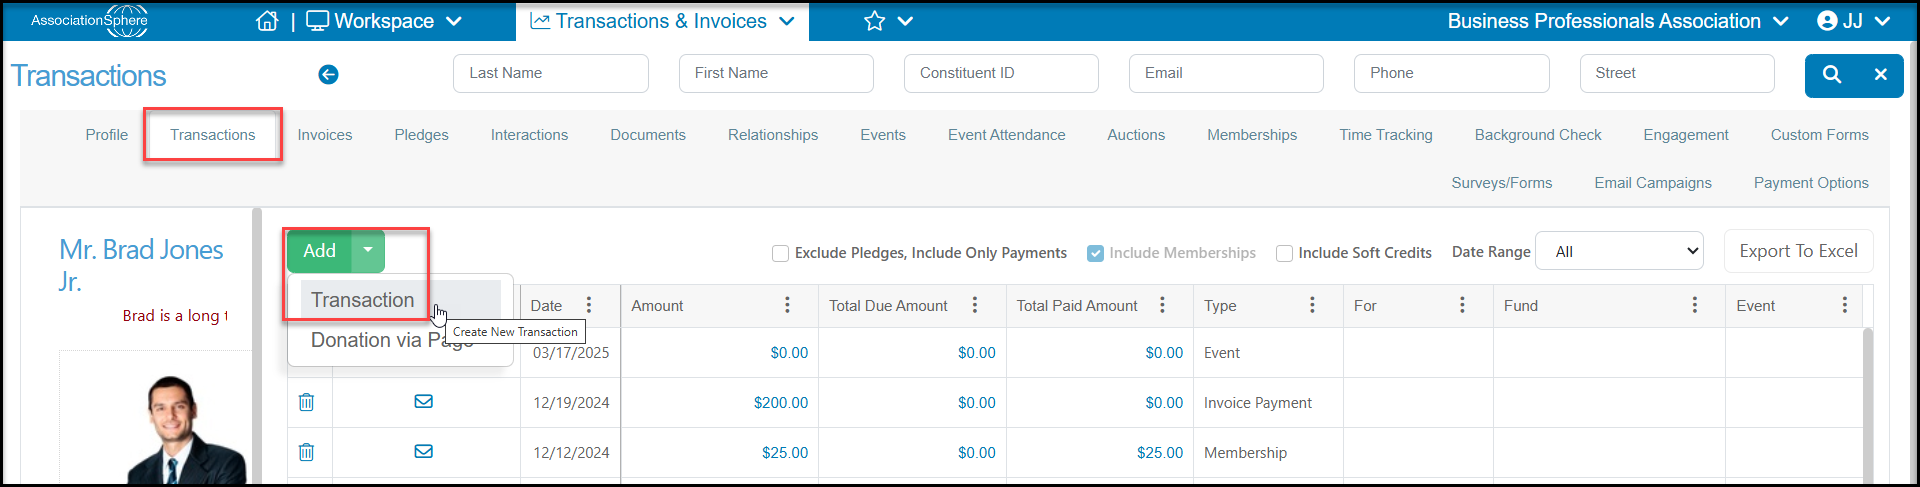 3. Starting from either the Transactions grid or a constituents Transactions tab will open the Transaction Entry page.
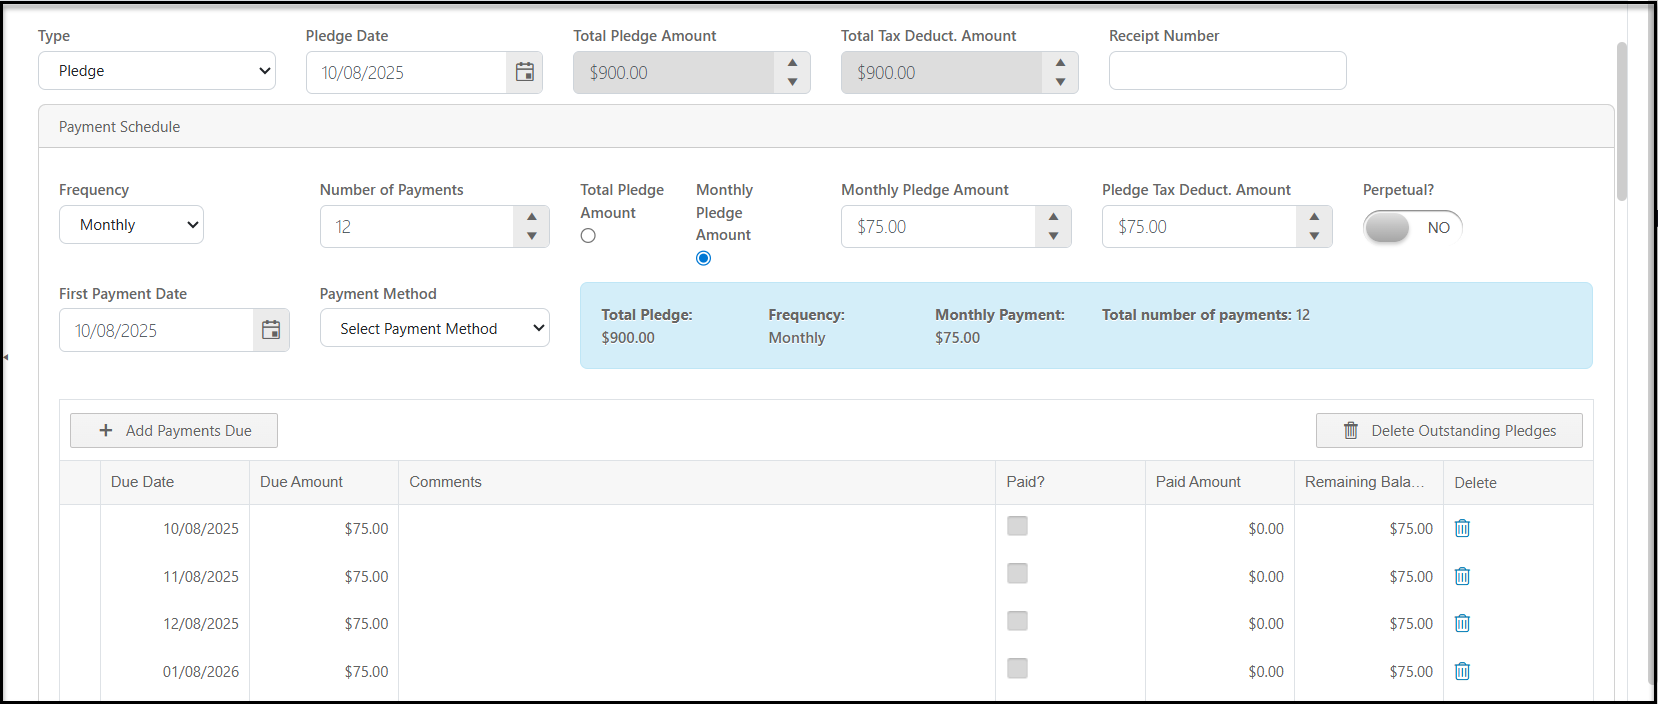
4. Select the **Type** "Pledge." This will update the entry page to add a pledge schedule.
5. The **Pledge Date** is the date the pledge is initiated. It defaults to today's date, but you can update it as necessary. In general, this should not be a date in the future, it should reflect the day the pledge is recorded or committed to your organization. You are able to enter the due date for the pledge payment below.
6. The **Total Pledge Amount** and **Total Tax Deductible Amount** are auto-filled once you create the pledge schedule.
7. You can enter a **Receipt Number** if desired.
8. **Frequency** is a drop down list to identify the frequency of the payments. If the contribution is expected to be fulfilled with just one payment, select One Time. This list is not editable and includes the choices One Time, Weekly, Bi-Weekly, Monthly, Quarterly, Semi-Annually (twice a year), or Yearly.
9. **Number of Payments**- enter how many payments the constituent has committed to. For example 3 yearly payments or 12 monthly payments. This will provide a start and end date for the pledge if applicable.
10. Choose either to enter the **Total Pledge Amount**OR the **"Frequency" Pledge Amount** that is paid for each payment. This option will change depending on the Frequency you have selected. For example, if you have selected a frequency of Monthly, the option will say Monthly Pledge Amount. Enter the amount in the next box.
11. The **Pledge Tax Deduct. Amount** will default to the same amount, but you can edit it as desired.
12. Once you have entered the amount fields, you will notice that the **Total Pledge Amount**and**Total Tax Deduct. Amount** fields above are auto-filled.
13. If the constituent wishes their pledge to continue on perpetually, marking **Perpetual**to YES it will signal the software to add the same frequency and payment amounts again to the pledge when it reaches the last pledge payment.
14. Enter the **First Payment Date** you would like the first payment to begin.
3. Starting from either the Transactions grid or a constituents Transactions tab will open the Transaction Entry page.
4. Select the **Type** "Pledge." This will update the entry page to add a pledge schedule.
5. The **Pledge Date** is the date the pledge is initiated. It defaults to today's date, but you can update it as necessary. In general, this should not be a date in the future, it should reflect the day the pledge is recorded or committed to your organization. You are able to enter the due date for the pledge payment below.
6. The **Total Pledge Amount** and **Total Tax Deductible Amount** are auto-filled once you create the pledge schedule.
7. You can enter a **Receipt Number** if desired.
8. **Frequency** is a drop down list to identify the frequency of the payments. If the contribution is expected to be fulfilled with just one payment, select One Time. This list is not editable and includes the choices One Time, Weekly, Bi-Weekly, Monthly, Quarterly, Semi-Annually (twice a year), or Yearly.
9. **Number of Payments**- enter how many payments the constituent has committed to. For example 3 yearly payments or 12 monthly payments. This will provide a start and end date for the pledge if applicable.
10. Choose either to enter the **Total Pledge Amount**OR the **"Frequency" Pledge Amount** that is paid for each payment. This option will change depending on the Frequency you have selected. For example, if you have selected a frequency of Monthly, the option will say Monthly Pledge Amount. Enter the amount in the next box.
11. The **Pledge Tax Deduct. Amount** will default to the same amount, but you can edit it as desired.
12. Once you have entered the amount fields, you will notice that the **Total Pledge Amount**and**Total Tax Deduct. Amount** fields above are auto-filled.
13. If the constituent wishes their pledge to continue on perpetually, marking **Perpetual**to YES it will signal the software to add the same frequency and payment amounts again to the pledge when it reaches the last pledge payment.
14. Enter the **First Payment Date** you would like the first payment to begin.
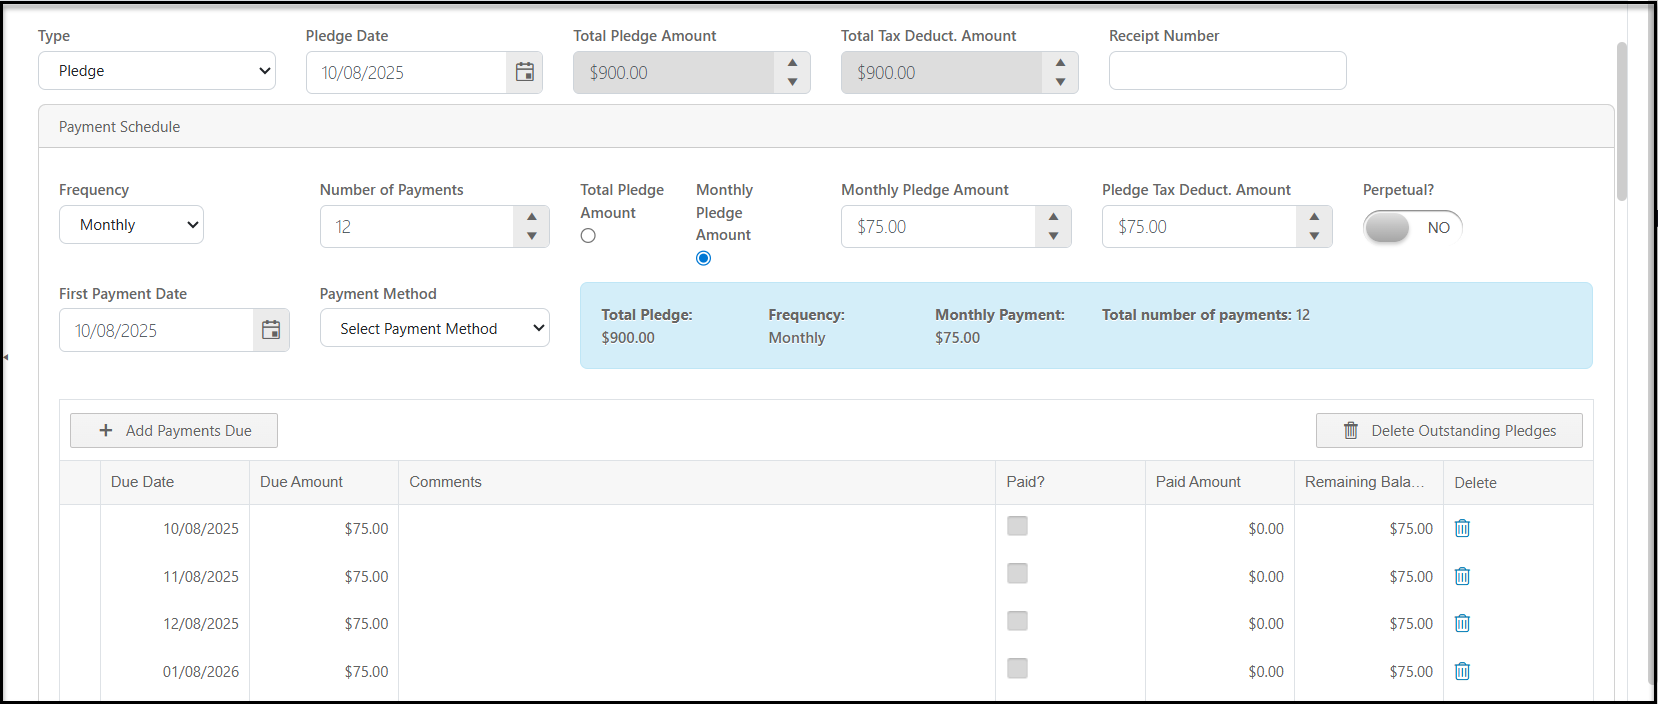 15. For checks and cash payments, leave the**Payment Method** field in the default "**Select Payment Method**." This field is only used for auto-credit card payments and allows you to select the credit card to use for the payment.
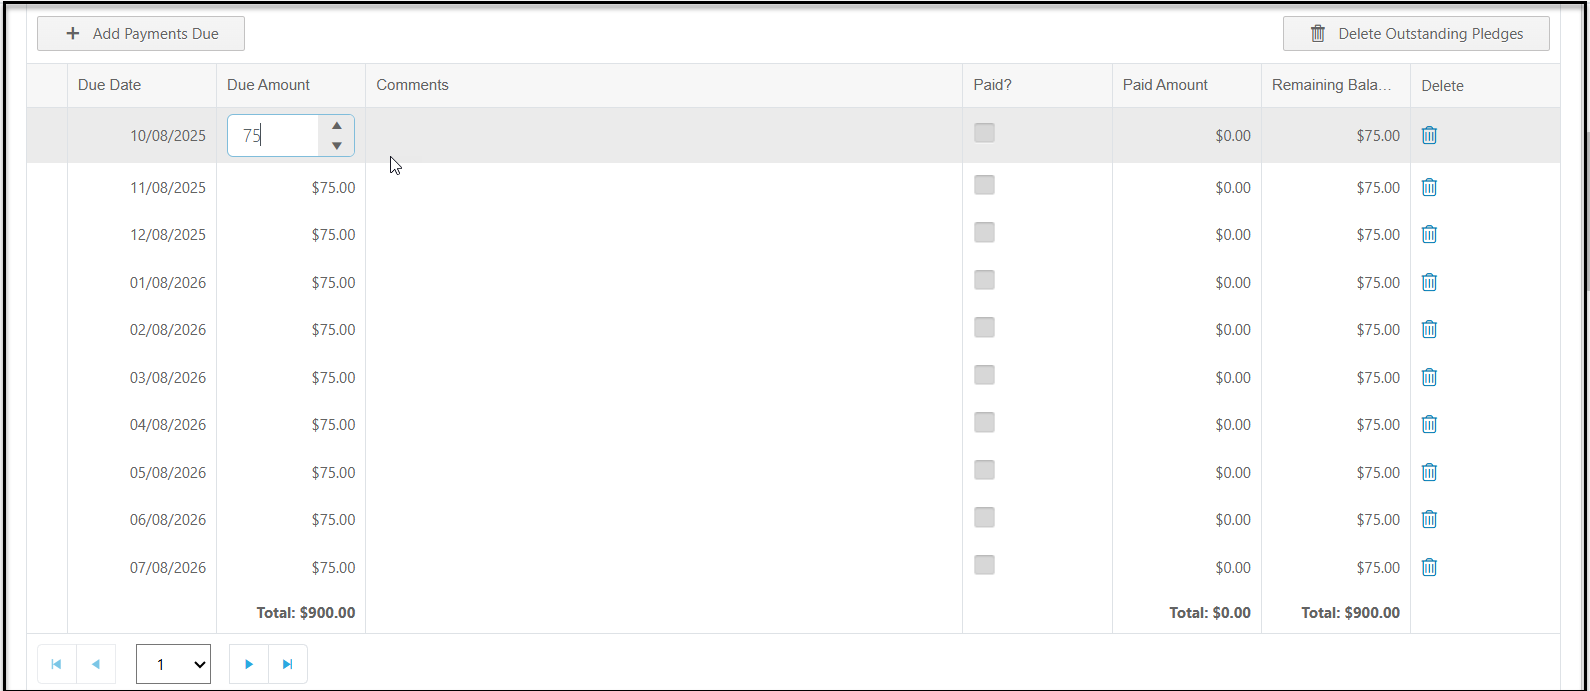
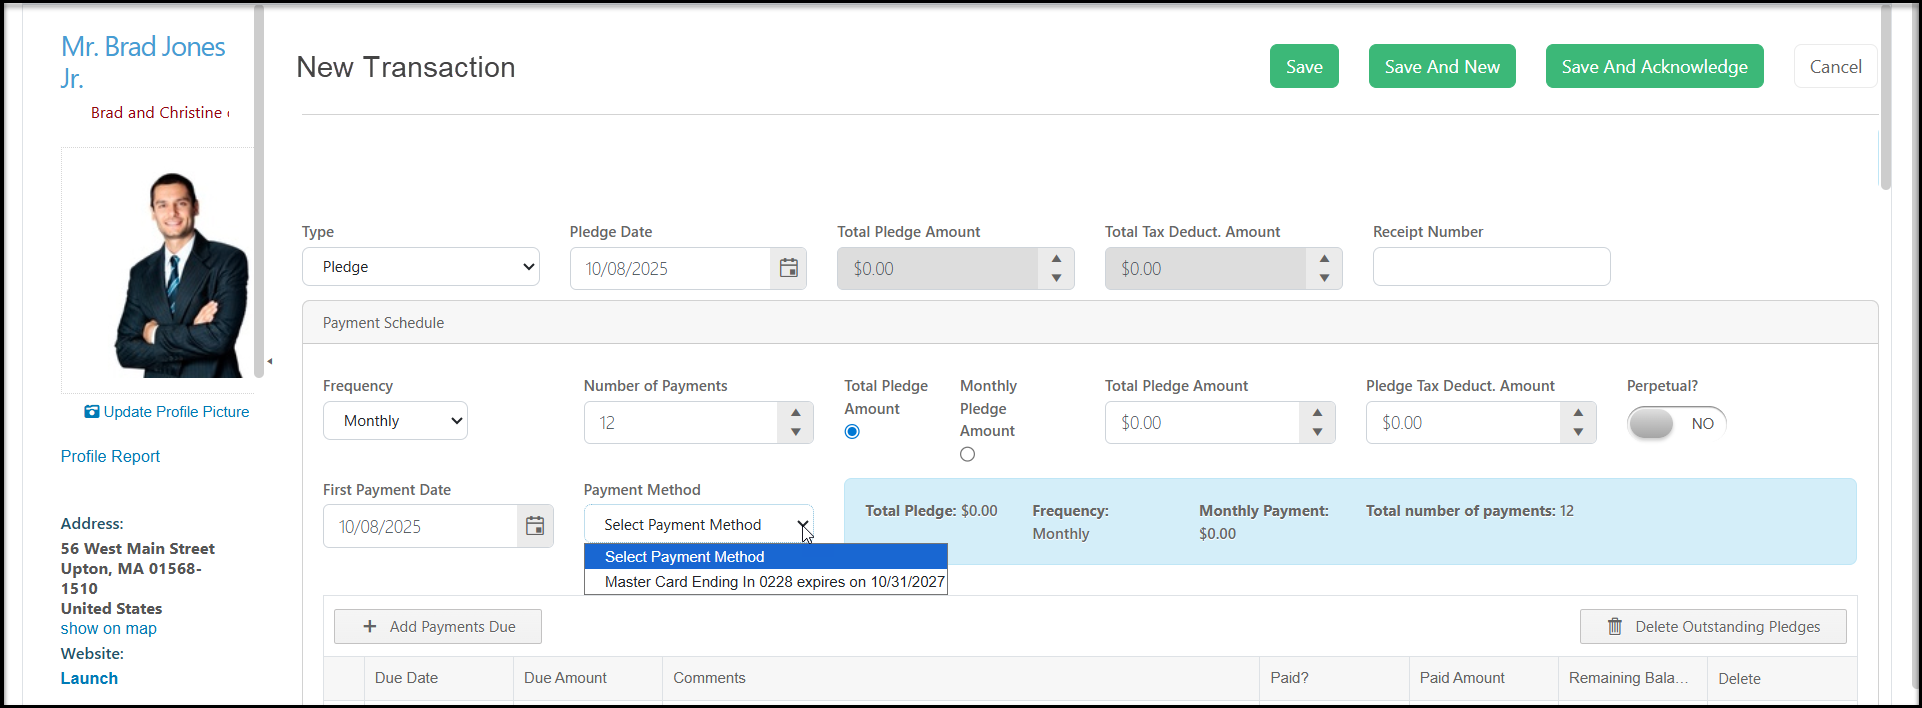 16. By making the Payment Schedule selections above, the software will create a list of pledge payments due for this pledge. It is important to note that the software will create a "pledge" transaction for each of the upcoming payments due on the Transactions grid and the constituent's Transactions tab.
17. The individual pledge payments are editable. So you can edit the **Due Amount** or **Due Date** for any of the payments in the list. You can also delete a payment using the trash can icon on the left side of the list. Any updates you make will be reflected in the Total Pledge Amount and Total Tax Deduct. Amount fields as appropriate.
16. By making the Payment Schedule selections above, the software will create a list of pledge payments due for this pledge. It is important to note that the software will create a "pledge" transaction for each of the upcoming payments due on the Transactions grid and the constituent's Transactions tab.
17. The individual pledge payments are editable. So you can edit the **Due Amount** or **Due Date** for any of the payments in the list. You can also delete a payment using the trash can icon on the left side of the list. Any updates you make will be reflected in the Total Pledge Amount and Total Tax Deduct. Amount fields as appropriate.
 18. Below the pledge payment schedule are the same fields found in a regular general donation entry. You can identify the pledge as already**Acknowledged**by marking it YES and entering the information for how and when it was acknowledged. If desired. Save And Acknowledge does not work for pledges. You need to use the Pledges grid and the Mail Merge Pledge Template letters to acknowledge new pledges.
19. The revenue category fields, **Categories, For, Fund, Event, Appeal, Location**, and **Fundraising Goal Category**, that you assign the pledge will also be assigned to all future pledge payments. Every payment that is entered will have those fields auto-populated based on what was entered with the original pledge.
18. Below the pledge payment schedule are the same fields found in a regular general donation entry. You can identify the pledge as already**Acknowledged**by marking it YES and entering the information for how and when it was acknowledged. If desired. Save And Acknowledge does not work for pledges. You need to use the Pledges grid and the Mail Merge Pledge Template letters to acknowledge new pledges.
19. The revenue category fields, **Categories, For, Fund, Event, Appeal, Location**, and **Fundraising Goal Category**, that you assign the pledge will also be assigned to all future pledge payments. Every payment that is entered will have those fields auto-populated based on what was entered with the original pledge.
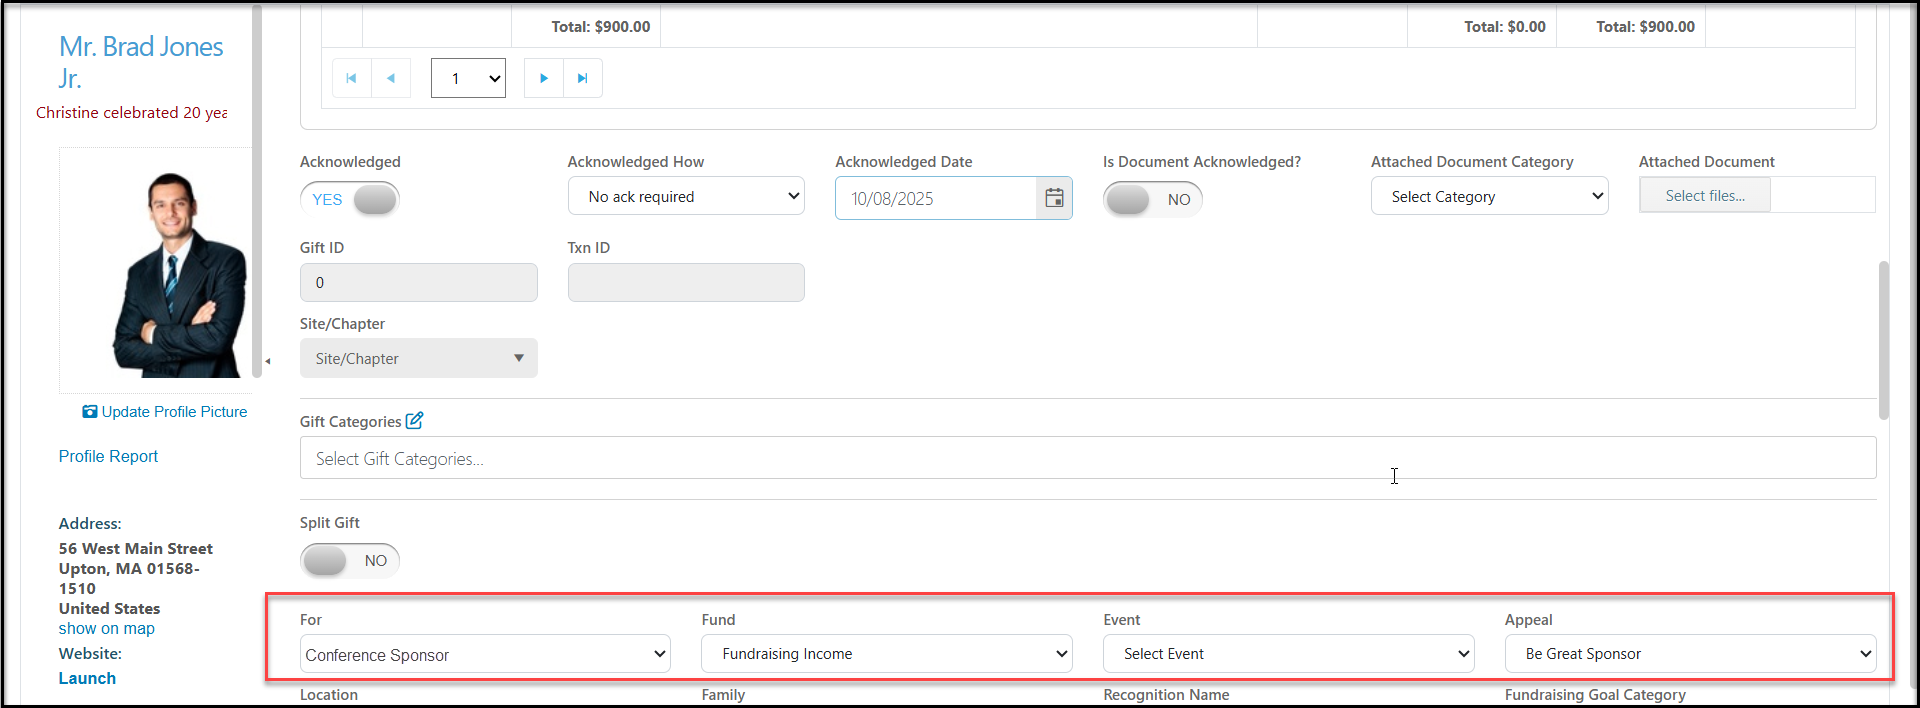 20. After completing the remaining fields as appropriate, chose **Save** to save your new pledge. As mentioned above, new pledges should be acknowledged from the Pledges grid if a letter is needed to acknowledge the commitment.
**Option 3 -****A Recurring Pledge Paid by Credit Card, but Constituent Does Not Have an Email Address**
1. For constituents who wish to have their credit card charged automatically, but do not have an email address on file, you begin by ensuring the constituent has a credit card on file by going to their Payment Options tab.
2. If they have a card on file and it is the one the constituent wishes to use, you can proceed to step 7 below.
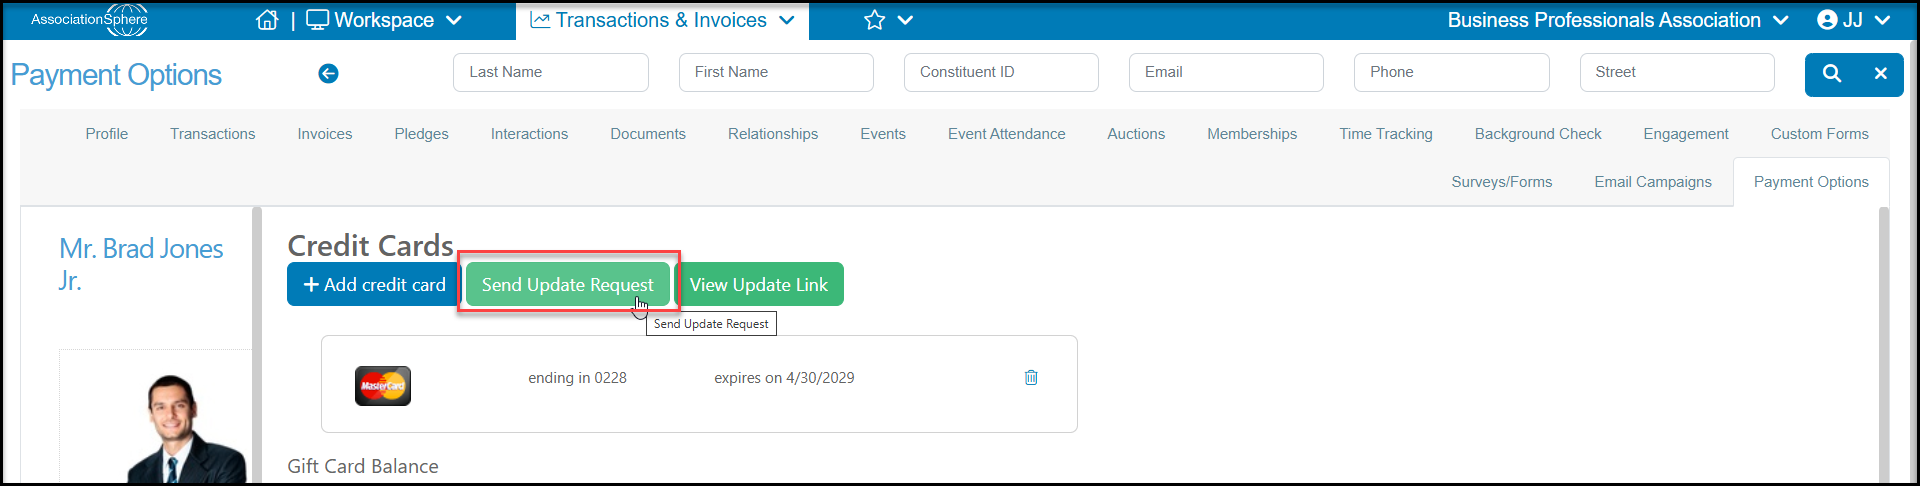
3. If they do not have any credit cards listed, click on **Add Credit Card.**
20. After completing the remaining fields as appropriate, chose **Save** to save your new pledge. As mentioned above, new pledges should be acknowledged from the Pledges grid if a letter is needed to acknowledge the commitment.
**Option 3 -****A Recurring Pledge Paid by Credit Card, but Constituent Does Not Have an Email Address**
1. For constituents who wish to have their credit card charged automatically, but do not have an email address on file, you begin by ensuring the constituent has a credit card on file by going to their Payment Options tab.
2. If they have a card on file and it is the one the constituent wishes to use, you can proceed to step 7 below.
3. If they do not have any credit cards listed, click on **Add Credit Card.**
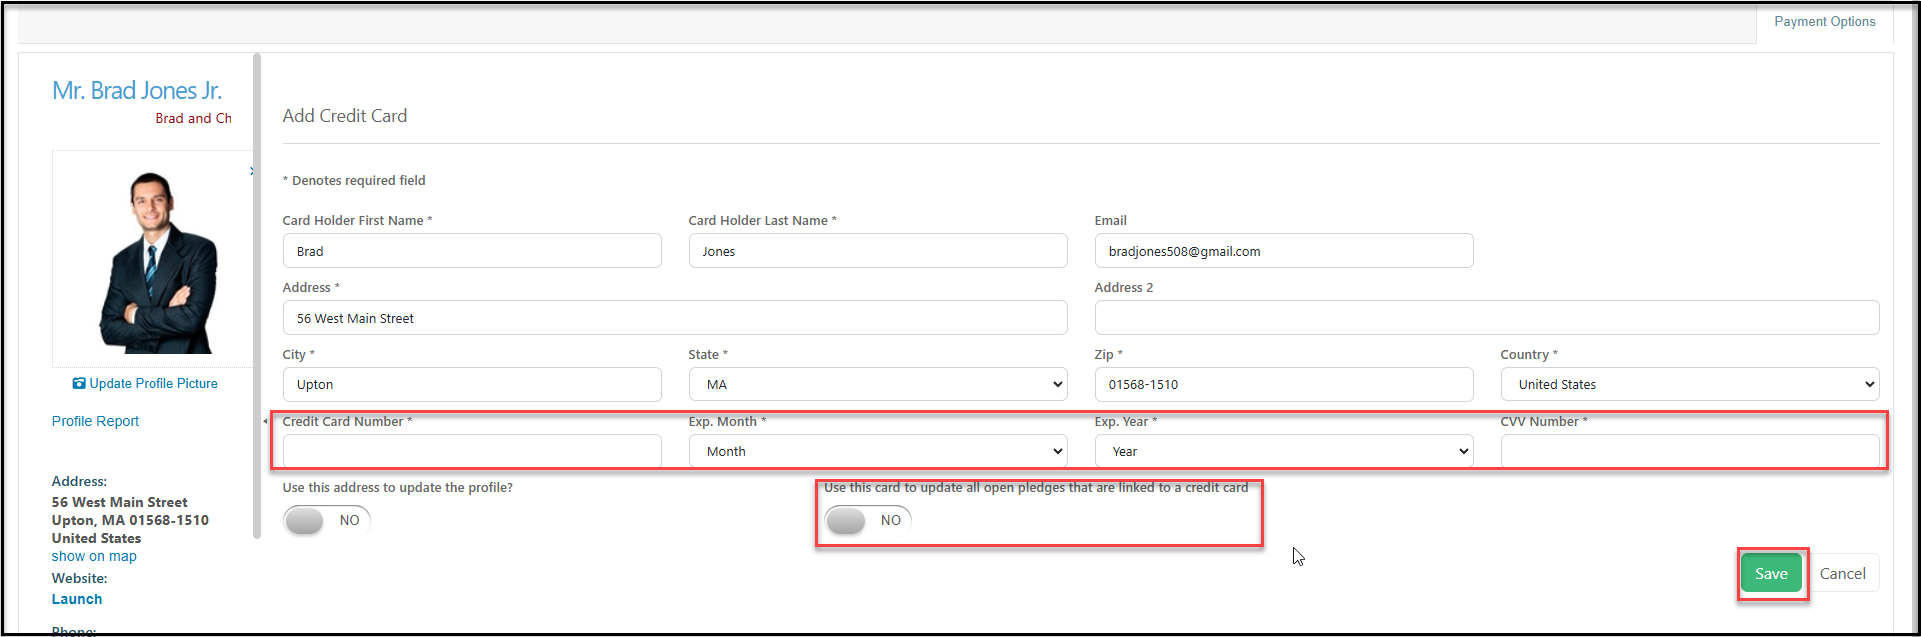
 4. On the Add Credit Card window, verify the constituents address is correct and enter the **Card Number, Exp Month, Exp Year** and **CVV Number**.
5. If they have other pledges and wish the use the new card to update all their pledges, you can mark YES next to **Use this card to update all open pledges that are linked to a credit card**.
6. Click **Save** to save the credit card information.
4. On the Add Credit Card window, verify the constituents address is correct and enter the **Card Number, Exp Month, Exp Year** and **CVV Number**.
5. If they have other pledges and wish the use the new card to update all their pledges, you can mark YES next to **Use this card to update all open pledges that are linked to a credit card**.
6. Click **Save** to save the credit card information.
 7. From within a constituent record, you can click on their Transactions Tab. Click on the **Add**button, then **Transaction** at the top.
 8. Starting from either the Transactions grid or a constituents Transactions tab will open the Transactions Entry page.
9. Select the **Type** "**Pledge**." This will update the entry page to add a pledge schedule.
10. The **Pledge Date** is the date the pledge is initiated. It defaults to today's date, but you can update it as necessary. In general, this should not be a date in the future, it should reflect the day the pledge is recorded or committed to your organization. You are able to enter the due date for the pledge payment below.
11. The **Total Pledge Amount**and**Total Tax Deductible Amount**are auto-filled once you create the pledge schedule.
12. You can enter a **Receipt Number** if desired.
13. **Frequency** is a drop down list to identify the frequency of the payments. If the contribution is expected to be fulfilled with just one payment, select One Time. This list is not editable and includes the choices One Time, Weekly, Bi-Weekly, Monthly, Quarterly, Semi-Annually (twice a year), or Yearly.
14. **Number of Payments** - enter how many payments the constituent has committed to. For example 3 yearly payments or 12 monthly payments. This will provide a start and end date for the pledge if applicable.
15. Choose either to enter the **Total Pledge Amount** OR the **"Frequency" Pledge Amount** that is paid for each payment. This option will change depending on the Frequency you have selected. For example, if you have selected a frequency of Monthly, the option will say Monthly Pledge Amount. Enter the amount in the next box.
16. The **Pledge Tax Deduct. Amount** will default to the same amount, but you can edit it as desired.
17. Once you have entered the amount fields, you will notice that the **Total Pledge Amount** and**Total Tax Deduct. Amount** fields above are auto-filled.
18. If the constituent wishes their pledge to continue on perpetually, marking**Perpetual**to **YES** it will signal the software to add the same frequency and payment amounts again to the pledge when it reaches the last pledge payment.
19. Enter the **First Payment Date** you would like the first payment to begin.
8. Starting from either the Transactions grid or a constituents Transactions tab will open the Transactions Entry page.
9. Select the **Type** "**Pledge**." This will update the entry page to add a pledge schedule.
10. The **Pledge Date** is the date the pledge is initiated. It defaults to today's date, but you can update it as necessary. In general, this should not be a date in the future, it should reflect the day the pledge is recorded or committed to your organization. You are able to enter the due date for the pledge payment below.
11. The **Total Pledge Amount**and**Total Tax Deductible Amount**are auto-filled once you create the pledge schedule.
12. You can enter a **Receipt Number** if desired.
13. **Frequency** is a drop down list to identify the frequency of the payments. If the contribution is expected to be fulfilled with just one payment, select One Time. This list is not editable and includes the choices One Time, Weekly, Bi-Weekly, Monthly, Quarterly, Semi-Annually (twice a year), or Yearly.
14. **Number of Payments** - enter how many payments the constituent has committed to. For example 3 yearly payments or 12 monthly payments. This will provide a start and end date for the pledge if applicable.
15. Choose either to enter the **Total Pledge Amount** OR the **"Frequency" Pledge Amount** that is paid for each payment. This option will change depending on the Frequency you have selected. For example, if you have selected a frequency of Monthly, the option will say Monthly Pledge Amount. Enter the amount in the next box.
16. The **Pledge Tax Deduct. Amount** will default to the same amount, but you can edit it as desired.
17. Once you have entered the amount fields, you will notice that the **Total Pledge Amount** and**Total Tax Deduct. Amount** fields above are auto-filled.
18. If the constituent wishes their pledge to continue on perpetually, marking**Perpetual**to **YES** it will signal the software to add the same frequency and payment amounts again to the pledge when it reaches the last pledge payment.
19. Enter the **First Payment Date** you would like the first payment to begin.
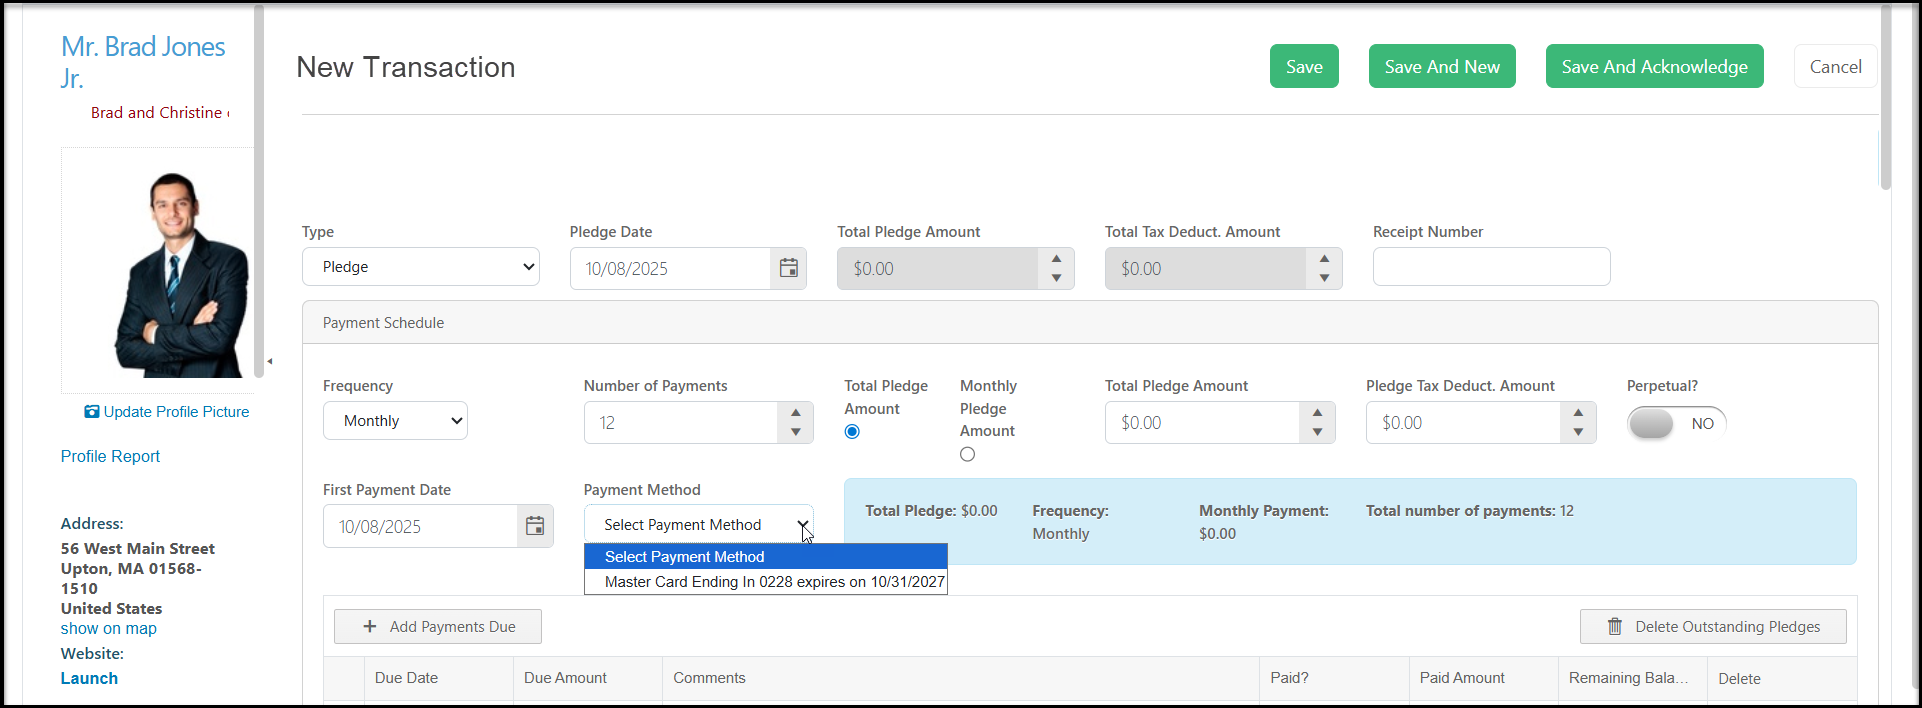
 20. In the **Payment Method** field select the credit card to use for the payments.
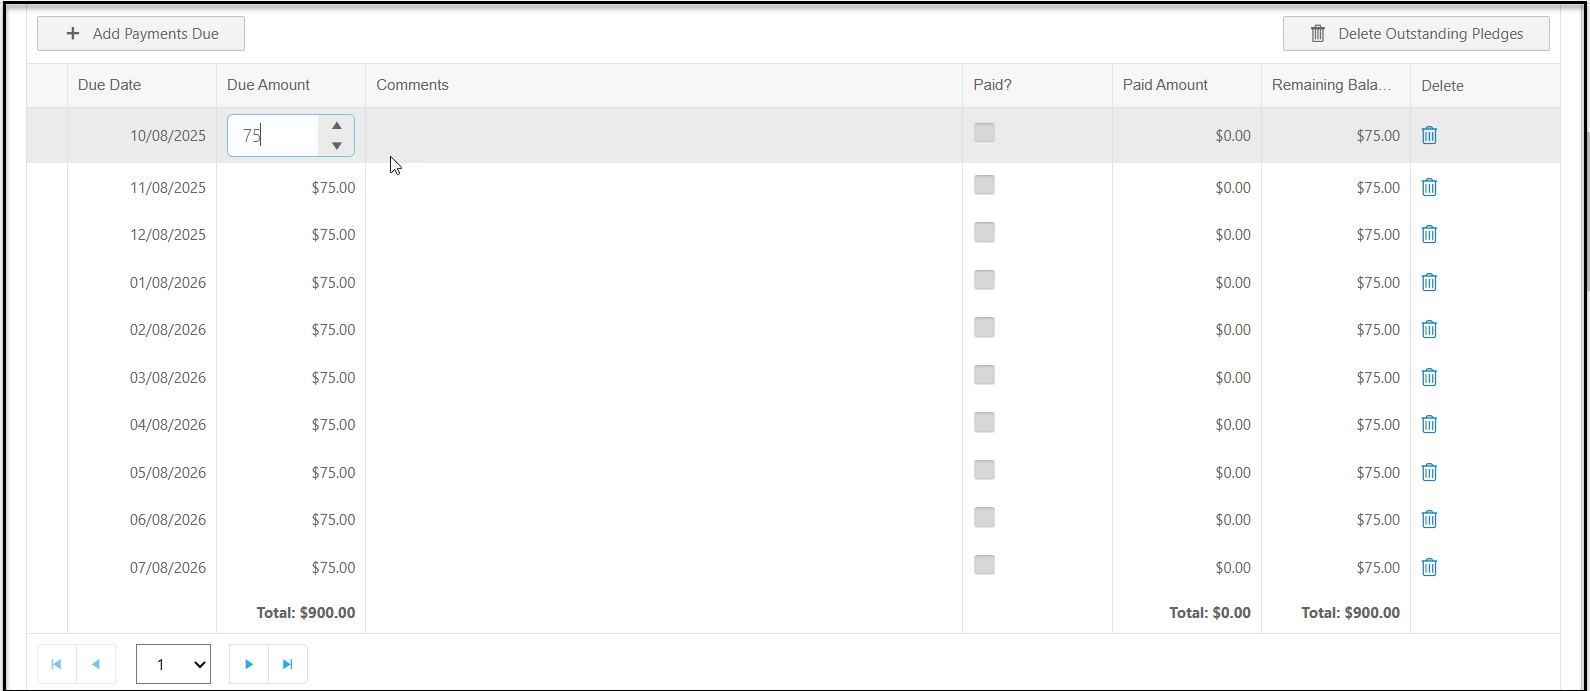
 21. By making the Payment Schedule selections above, the software will create a list of pledge payments due for this pledge. It is important to note that the software will create a "pledge" transaction for each of the upcoming payments due on the Transactions grid and the constituent's Transactions tab.
22. The individual pledge payments are editable. So you can edit the **Due Amount**or **Due Date**for any of the payments in the list. You can also delete a payment using the trash can icon on the left side of the list. Any updates you make will be reflected in the **Total Pledge Amount**and **Total Tax Deduct. Amount**fields as appropriate.
21. By making the Payment Schedule selections above, the software will create a list of pledge payments due for this pledge. It is important to note that the software will create a "pledge" transaction for each of the upcoming payments due on the Transactions grid and the constituent's Transactions tab.
22. The individual pledge payments are editable. So you can edit the **Due Amount**or **Due Date**for any of the payments in the list. You can also delete a payment using the trash can icon on the left side of the list. Any updates you make will be reflected in the **Total Pledge Amount**and **Total Tax Deduct. Amount**fields as appropriate.
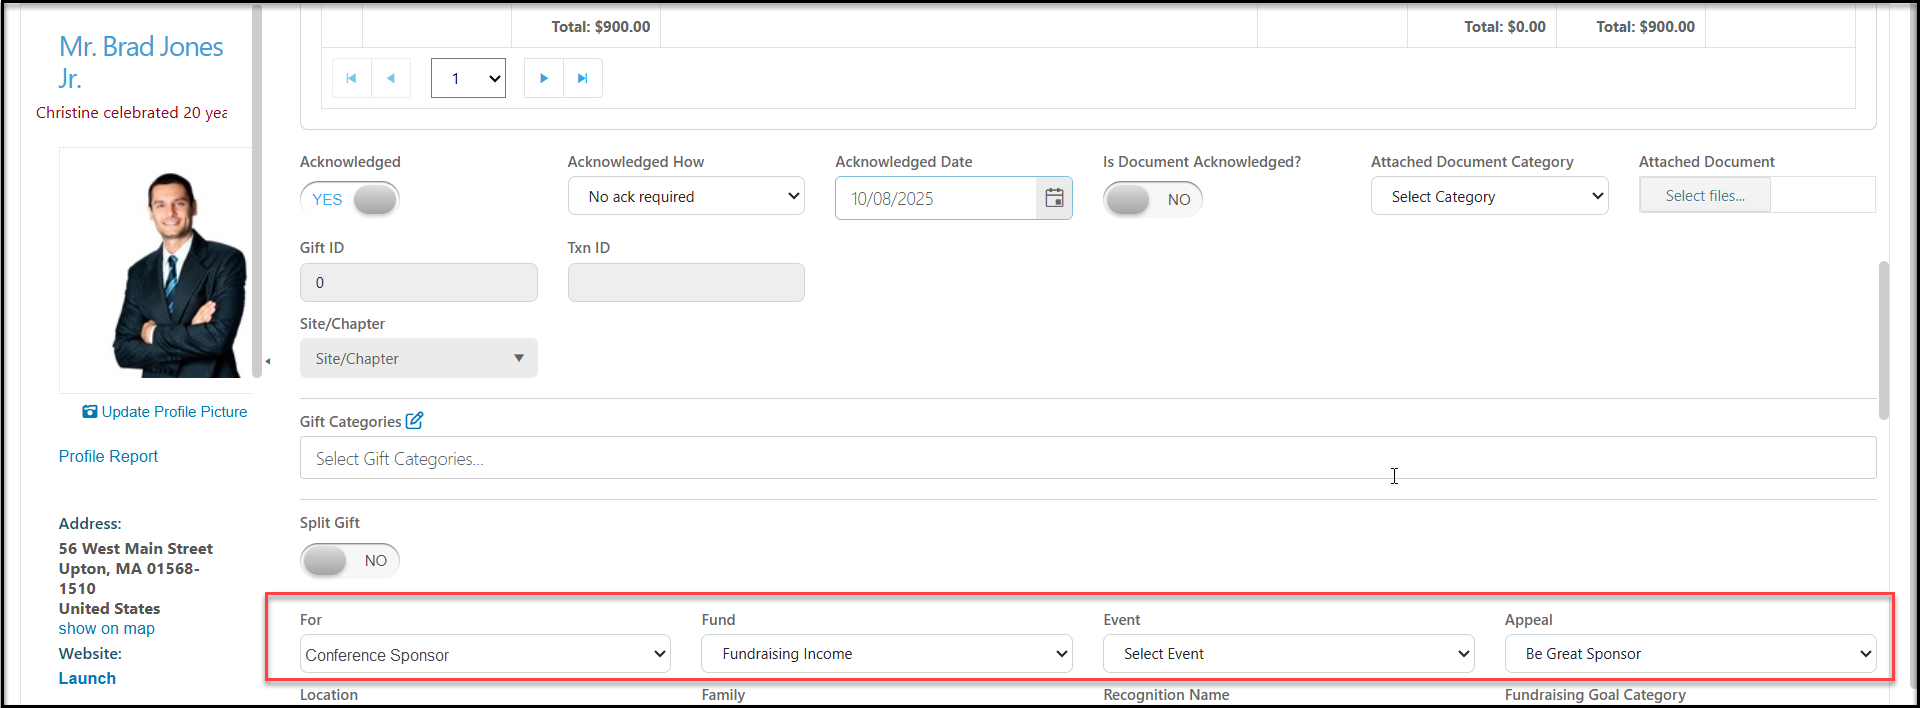
 23. Below the pledge payment schedule are the same fields found in a regular general donation entry. You can identify the pledge as already **Acknowledged** by marking it**YES** and entering the information for how and when it was acknowledged. If desired. **Save And Acknowledge**does not work for pledges. You need to use the Pledges grid and the Mail Merge Pledge Template letters to acknowledge new pledges.
24. The revenue category fields, **Transaction****Categories, For, Fund, Event, Appeal, Location,** and**Fundraising Goal Category**, that you assign the pledge will also be assigned to all future pledge payments. Every payment that is entered will have those fields auto-populated based on what was entered with the original pledge.
23. Below the pledge payment schedule are the same fields found in a regular general donation entry. You can identify the pledge as already **Acknowledged** by marking it**YES** and entering the information for how and when it was acknowledged. If desired. **Save And Acknowledge**does not work for pledges. You need to use the Pledges grid and the Mail Merge Pledge Template letters to acknowledge new pledges.
24. The revenue category fields, **Transaction****Categories, For, Fund, Event, Appeal, Location,** and**Fundraising Goal Category**, that you assign the pledge will also be assigned to all future pledge payments. Every payment that is entered will have those fields auto-populated based on what was entered with the original pledge.
 25. After completing the remaining fields as appropriate, chose **Save** to save your new pledge. As mentioned above, new pledges must be acknowledged from the Pledges grid if a letter is needed to acknowledge the commitment.
26. Beginning on the first day of the pledge schedule, the credit card will be automatically charged. These payments will not automatically be acknowledged because there is no email address to send the automated message to. You will need to send a manual thank you letter for each payment as needed.
25. After completing the remaining fields as appropriate, chose **Save** to save your new pledge. As mentioned above, new pledges must be acknowledged from the Pledges grid if a letter is needed to acknowledge the commitment.
26. Beginning on the first day of the pledge schedule, the credit card will be automatically charged. These payments will not automatically be acknowledged because there is no email address to send the automated message to. You will need to send a manual thank you letter for each payment as needed.