# How do I create an invoice manually?
> Source: https://support.associationsphere.com/how-do-i-create-an-invoice-manually | Updated: 2026-09-08T02:58:45Z
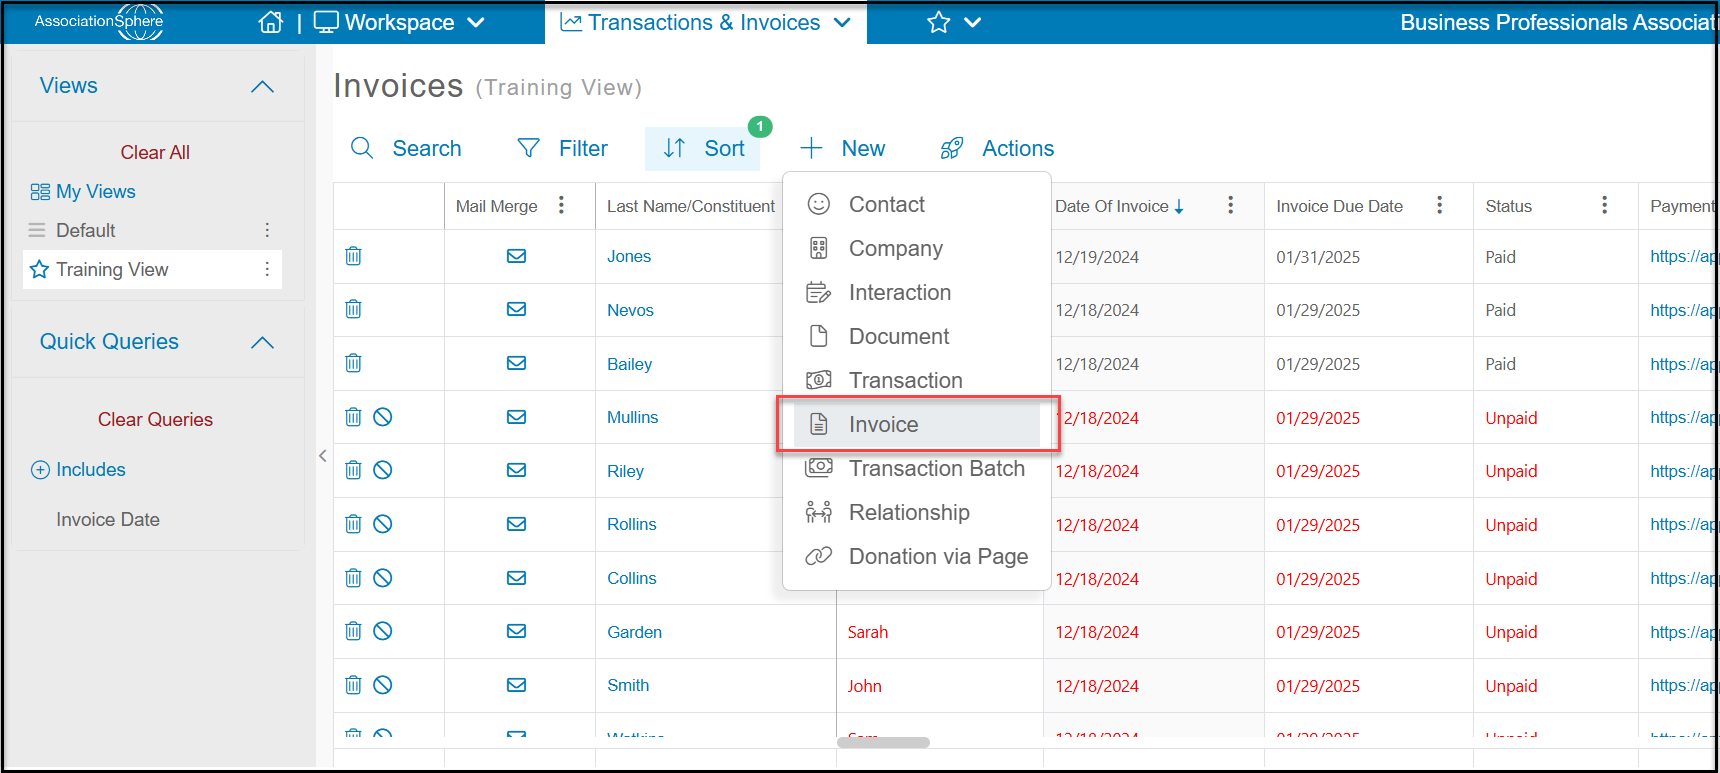
You can manually create an invoice from the main Invoice Grid in the Transactions & Invoices Module by clicking on **+New** and selecting **Invoice**.
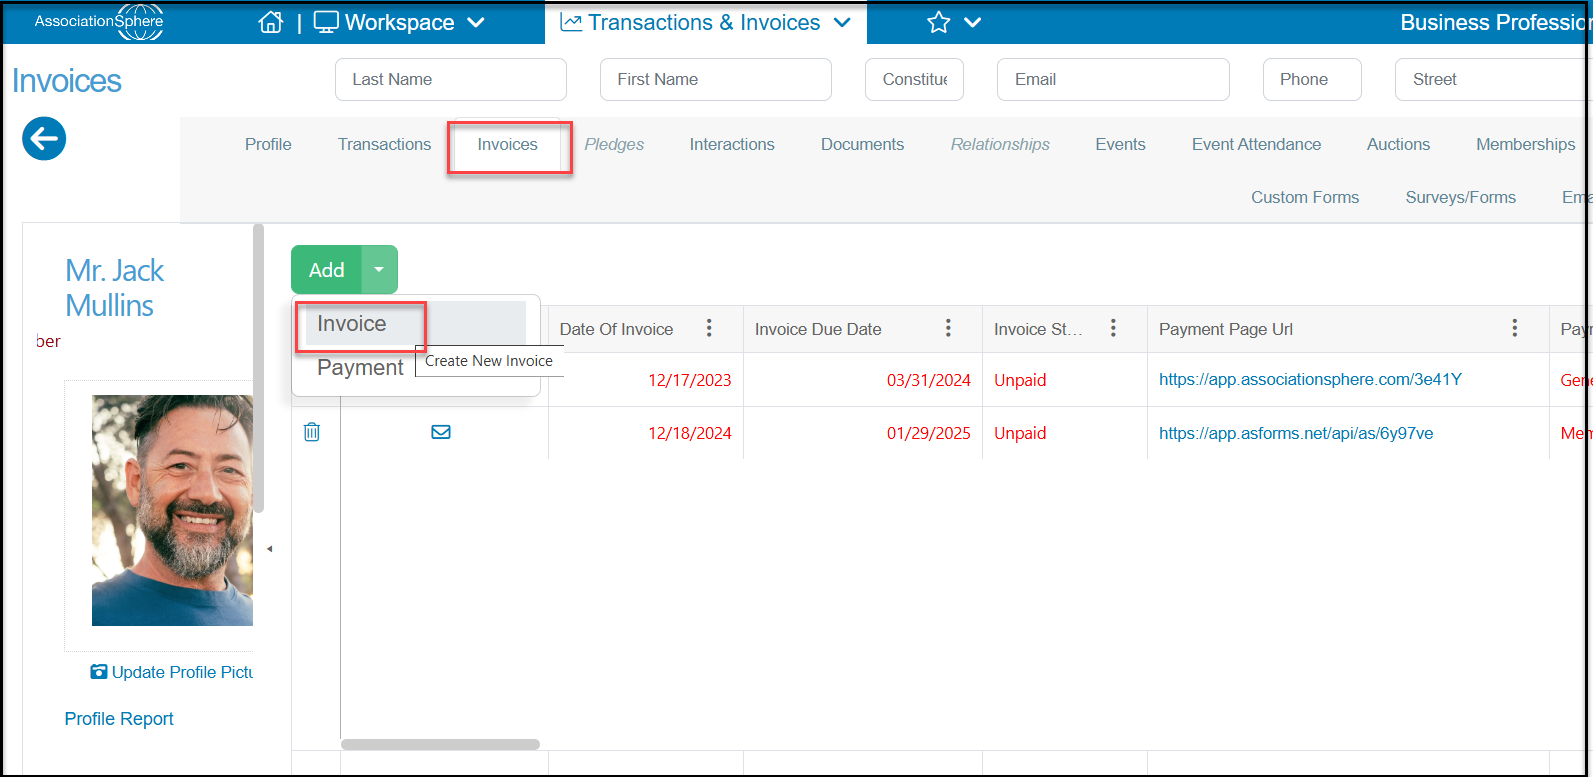
 Or you can create one from the constituent's record under their Invoices Tab. Click the green **Add** button and select **Invoice**.
./how-can-i-create-an-invoice-for-an-event-transaction href="./how-can-i-create-an-invoice-for-a-membership" target="_blank">./how-can-i-create-an-invoice-for-a-membership
Or you can create one from the constituent's record under their Invoices Tab. Click the green **Add** button and select **Invoice**.
./how-can-i-create-an-invoice-for-an-event-transaction href="./how-can-i-create-an-invoice-for-a-membership" target="_blank">./how-can-i-create-an-invoice-for-a-membership
 Note that invoices that are associated with an event or membership should be created via a pay later transaction through those pages. You can learn more about event invoices here and membership invoices here.
This example is from the constituent's Invoice Tab.
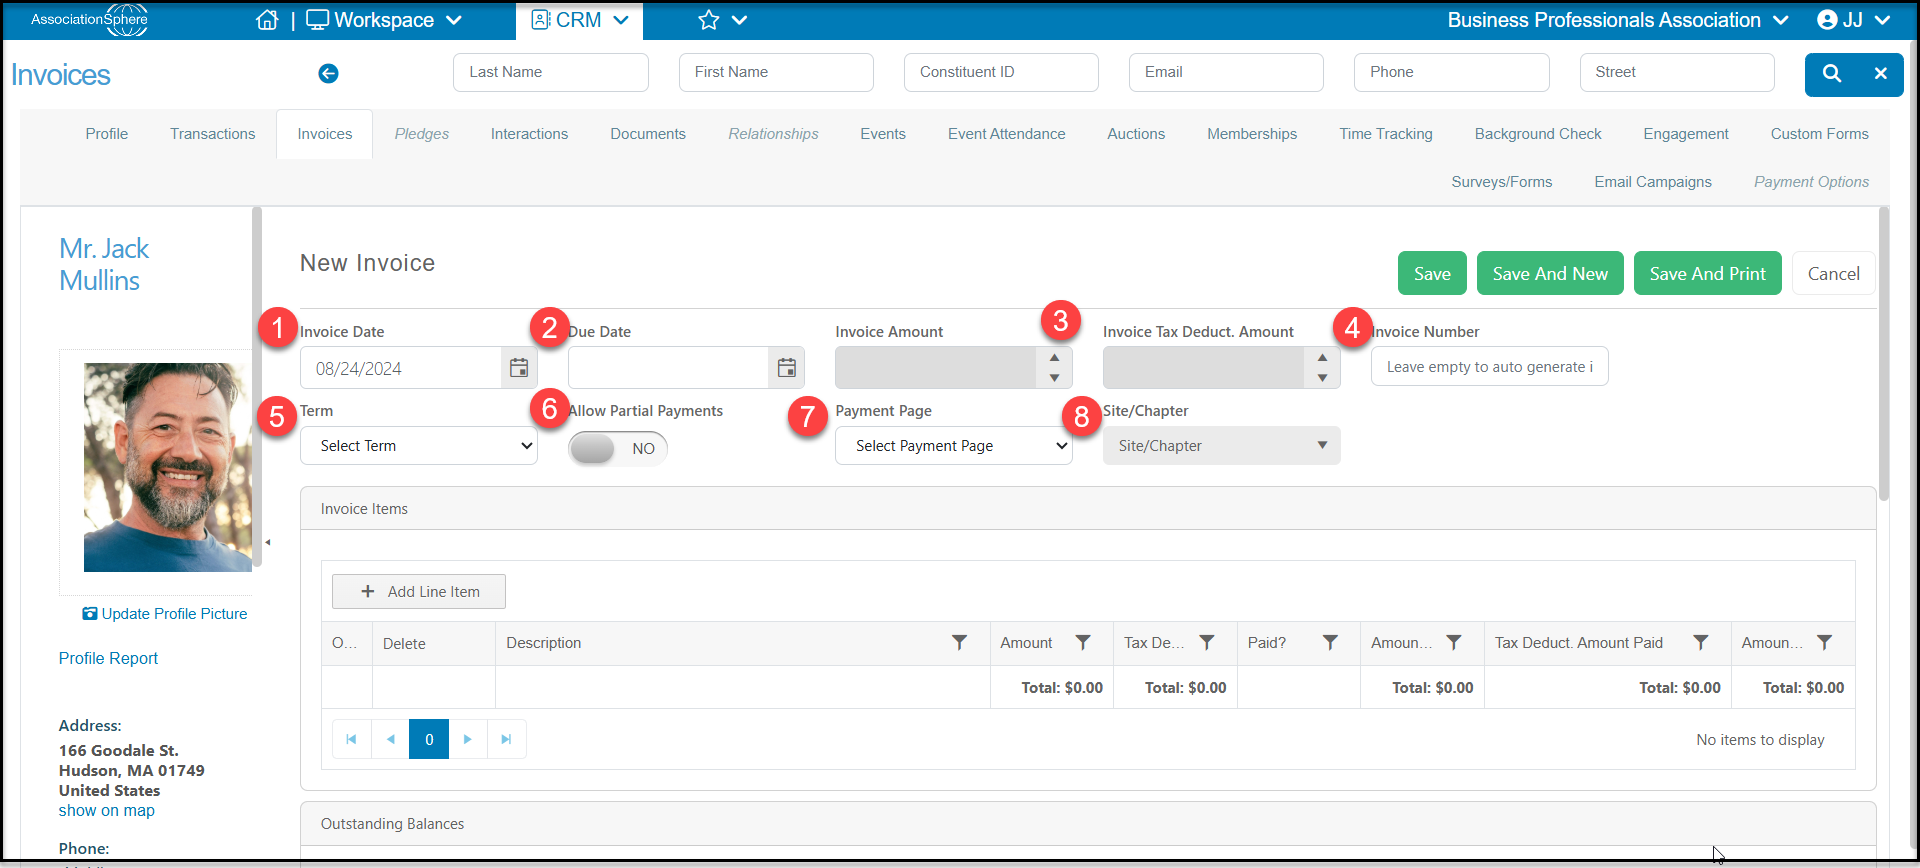
1. The **Invoice Date**will default to today's date, but you can edit it as needed. It is a required field.
2. Enter the desired **Due Date**.
3. The **Invoice Amount** and **Tax Deductible Amount**fields will be generated from the entries in the **Invoice Items** list.
4. The **Invoice Number**will be auto-generated by the software.
5. From the dropdown list in **Term,** you can select the terms of your invoice. You can also edit these terms using the from the dropdown.
6. If you wish to allow partial payments on this invoice you can change **Allow Partial Payments**to **YES**.
7. Select the **Payment Page**you wish to use for this invoice. If you have not created an invoice payment page yet, you can learn more in this article.
8. If your organization uses the **Site/Chapters**feature, you can also assign this invoice to a specific Site/Chapter from the dropdown menu.
Note that invoices that are associated with an event or membership should be created via a pay later transaction through those pages. You can learn more about event invoices here and membership invoices here.
This example is from the constituent's Invoice Tab.
1. The **Invoice Date**will default to today's date, but you can edit it as needed. It is a required field.
2. Enter the desired **Due Date**.
3. The **Invoice Amount** and **Tax Deductible Amount**fields will be generated from the entries in the **Invoice Items** list.
4. The **Invoice Number**will be auto-generated by the software.
5. From the dropdown list in **Term,** you can select the terms of your invoice. You can also edit these terms using the from the dropdown.
6. If you wish to allow partial payments on this invoice you can change **Allow Partial Payments**to **YES**.
7. Select the **Payment Page**you wish to use for this invoice. If you have not created an invoice payment page yet, you can learn more in this article.
8. If your organization uses the **Site/Chapters**feature, you can also assign this invoice to a specific Site/Chapter from the dropdown menu.
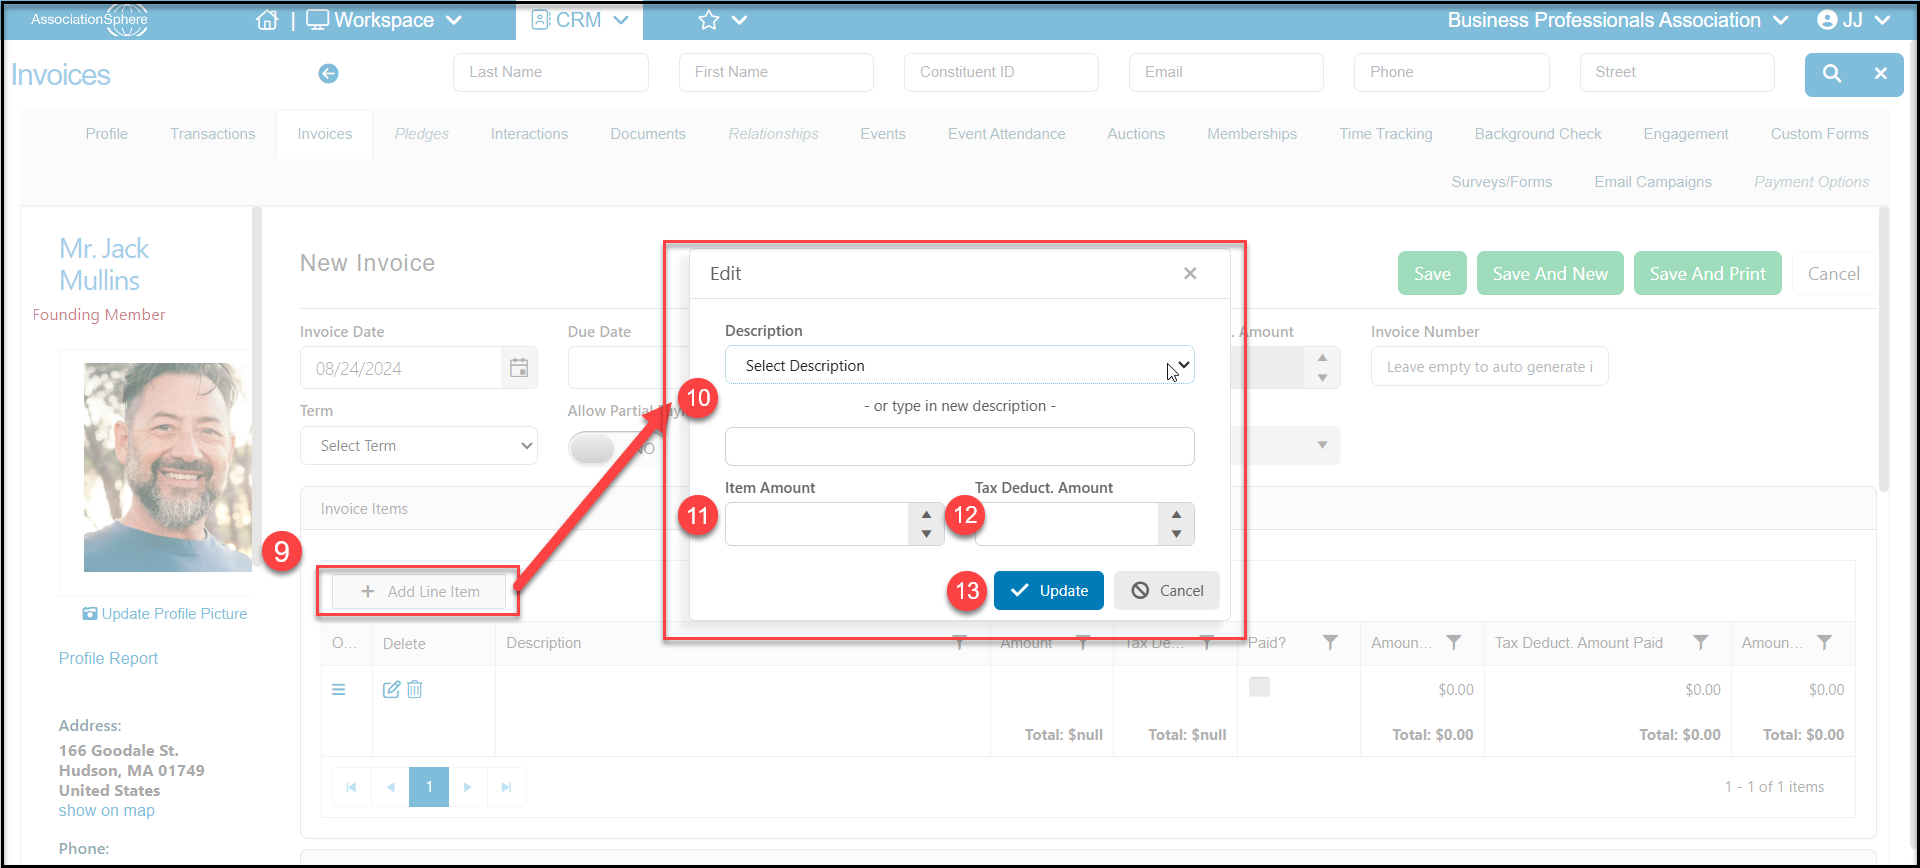
 9. You can manually add line items to the invoice or you can choose from any outstanding balances - or a combination of the two. To manually add a line item, click on the **+Add Line Item** button and a pop up window will open.
10. You can choose an existing Description (Click **Add/Edit**to modify the pull down list if desired) or type in a new description. If you type in a new description, it will NOT automatically be added to the pull down list. You will need to use the pull down list and click **Add/Edit** to add the new description for future uses.
11. Enter the **Item Amount**for the value of the line item being invoiced.
12. If any portion of the line item is tax deductible, you can enter the **Tax Deduct. Amount**.
13. Once you have entered your information, click on **Update** to save the line item and add it to your invoice. If you wish to cancel this entry or changes you have made, click on **Cancel**.
9. You can manually add line items to the invoice or you can choose from any outstanding balances - or a combination of the two. To manually add a line item, click on the **+Add Line Item** button and a pop up window will open.
10. You can choose an existing Description (Click **Add/Edit**to modify the pull down list if desired) or type in a new description. If you type in a new description, it will NOT automatically be added to the pull down list. You will need to use the pull down list and click **Add/Edit** to add the new description for future uses.
11. Enter the **Item Amount**for the value of the line item being invoiced.
12. If any portion of the line item is tax deductible, you can enter the **Tax Deduct. Amount**.
13. Once you have entered your information, click on **Update** to save the line item and add it to your invoice. If you wish to cancel this entry or changes you have made, click on **Cancel**.
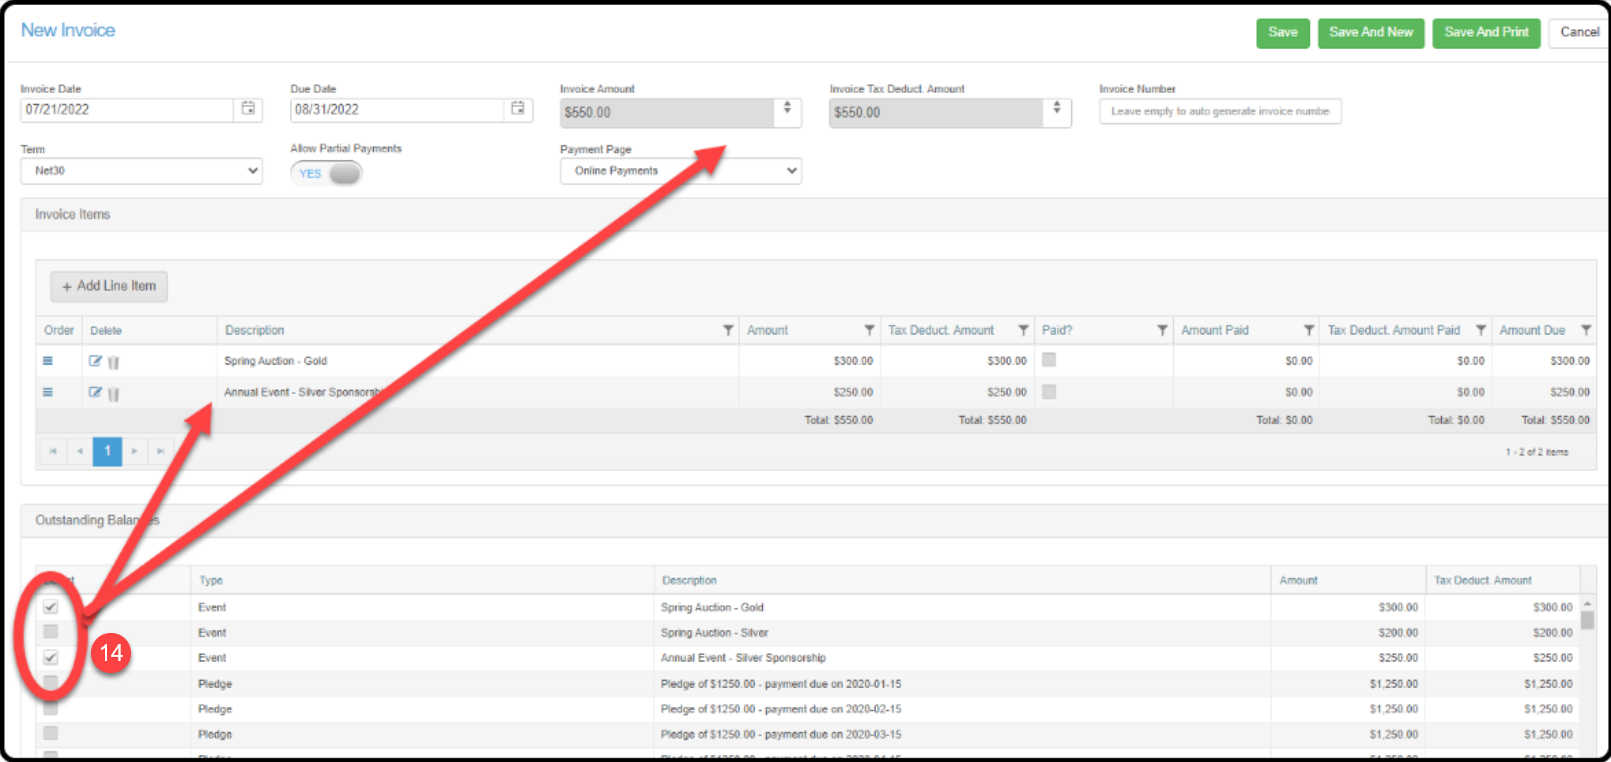
 14. You can also select items to add to the invoice by checking the boxes next to outstanding balances. They can be for memberships, events, pledges, or any other purchases. Note that as line items are added, the invoice and tax deductible amounts automatically update.
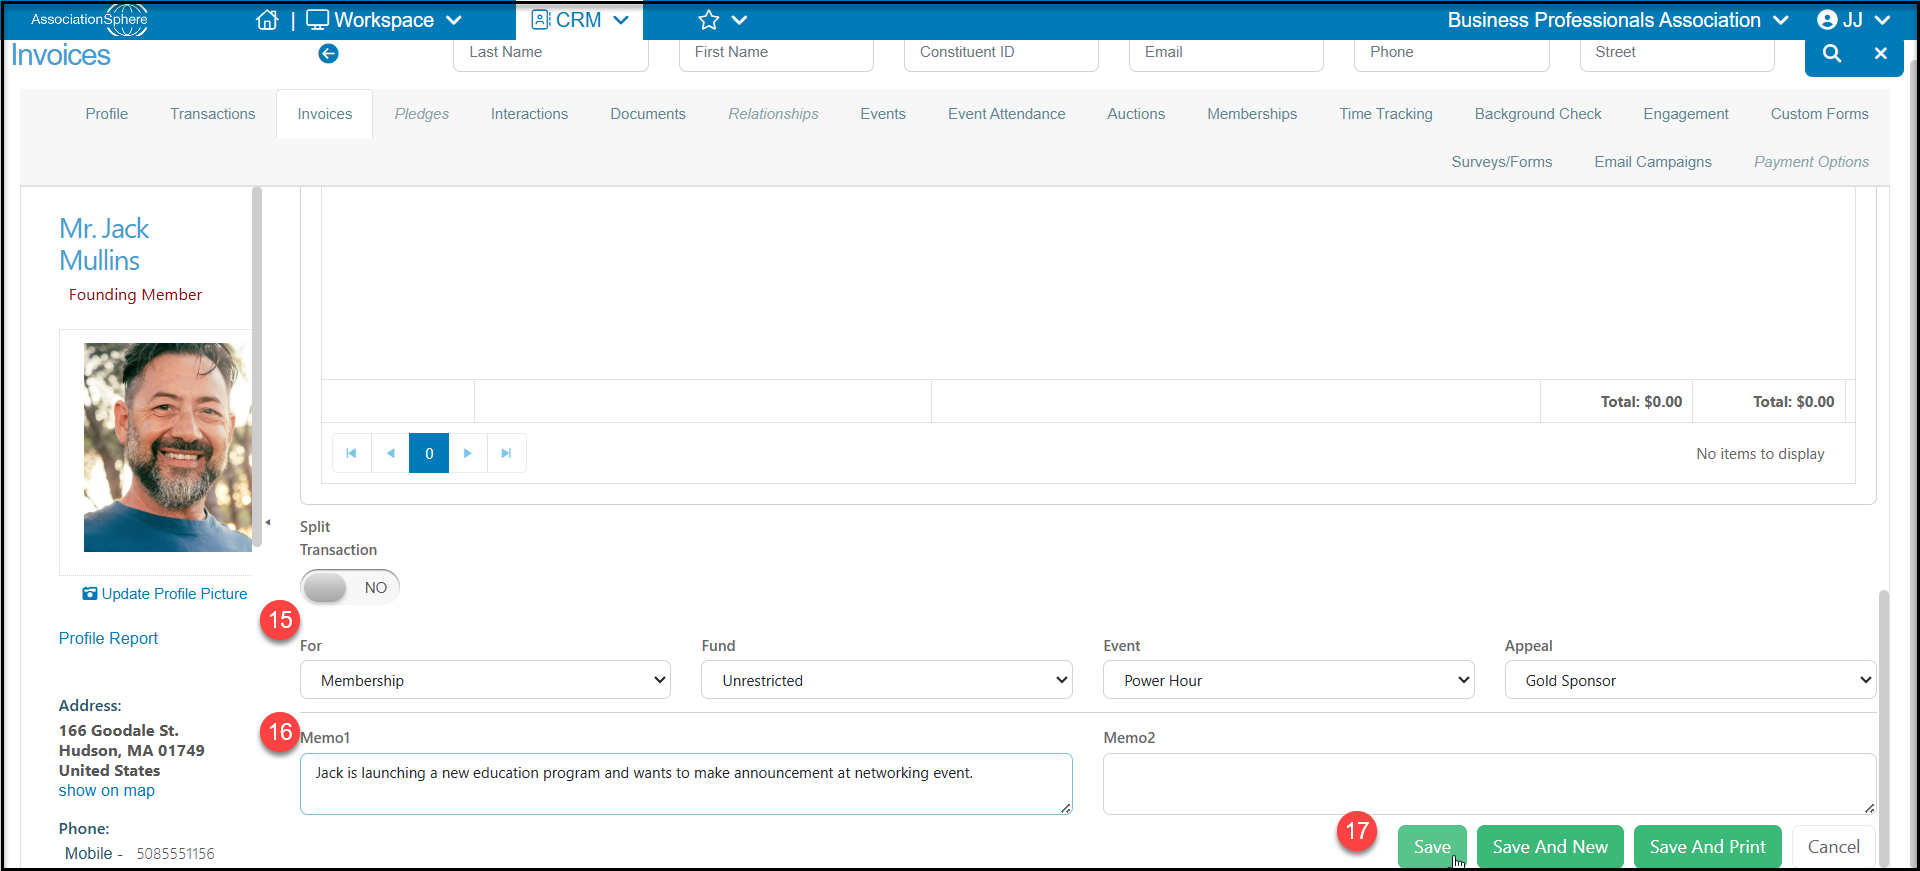
 15. Once you've finished adding in all the line items, continue to the bottom of the page to enter in applicable **For**, **Fund**, **Event**, and **Appeal** fields. These fields allow you to identify your revenue source categories for reporting from the Transactions grid.
16. There are also two memo fields you can use to add notes to the memo. **Memo 1** will show on the Invoice and **Memo 2** is an internal only field.
17. Click **Save**to complete the entry, **Save and New** to complete this entry and start another, or **Save and Print** to save the entry and print or email a copy of the invoice. Click **Cancel** to close the window and not save the invoice or any of the changes entered.
15. Once you've finished adding in all the line items, continue to the bottom of the page to enter in applicable **For**, **Fund**, **Event**, and **Appeal** fields. These fields allow you to identify your revenue source categories for reporting from the Transactions grid.
16. There are also two memo fields you can use to add notes to the memo. **Memo 1** will show on the Invoice and **Memo 2** is an internal only field.
17. Click **Save**to complete the entry, **Save and New** to complete this entry and start another, or **Save and Print** to save the entry and print or email a copy of the invoice. Click **Cancel** to close the window and not save the invoice or any of the changes entered.
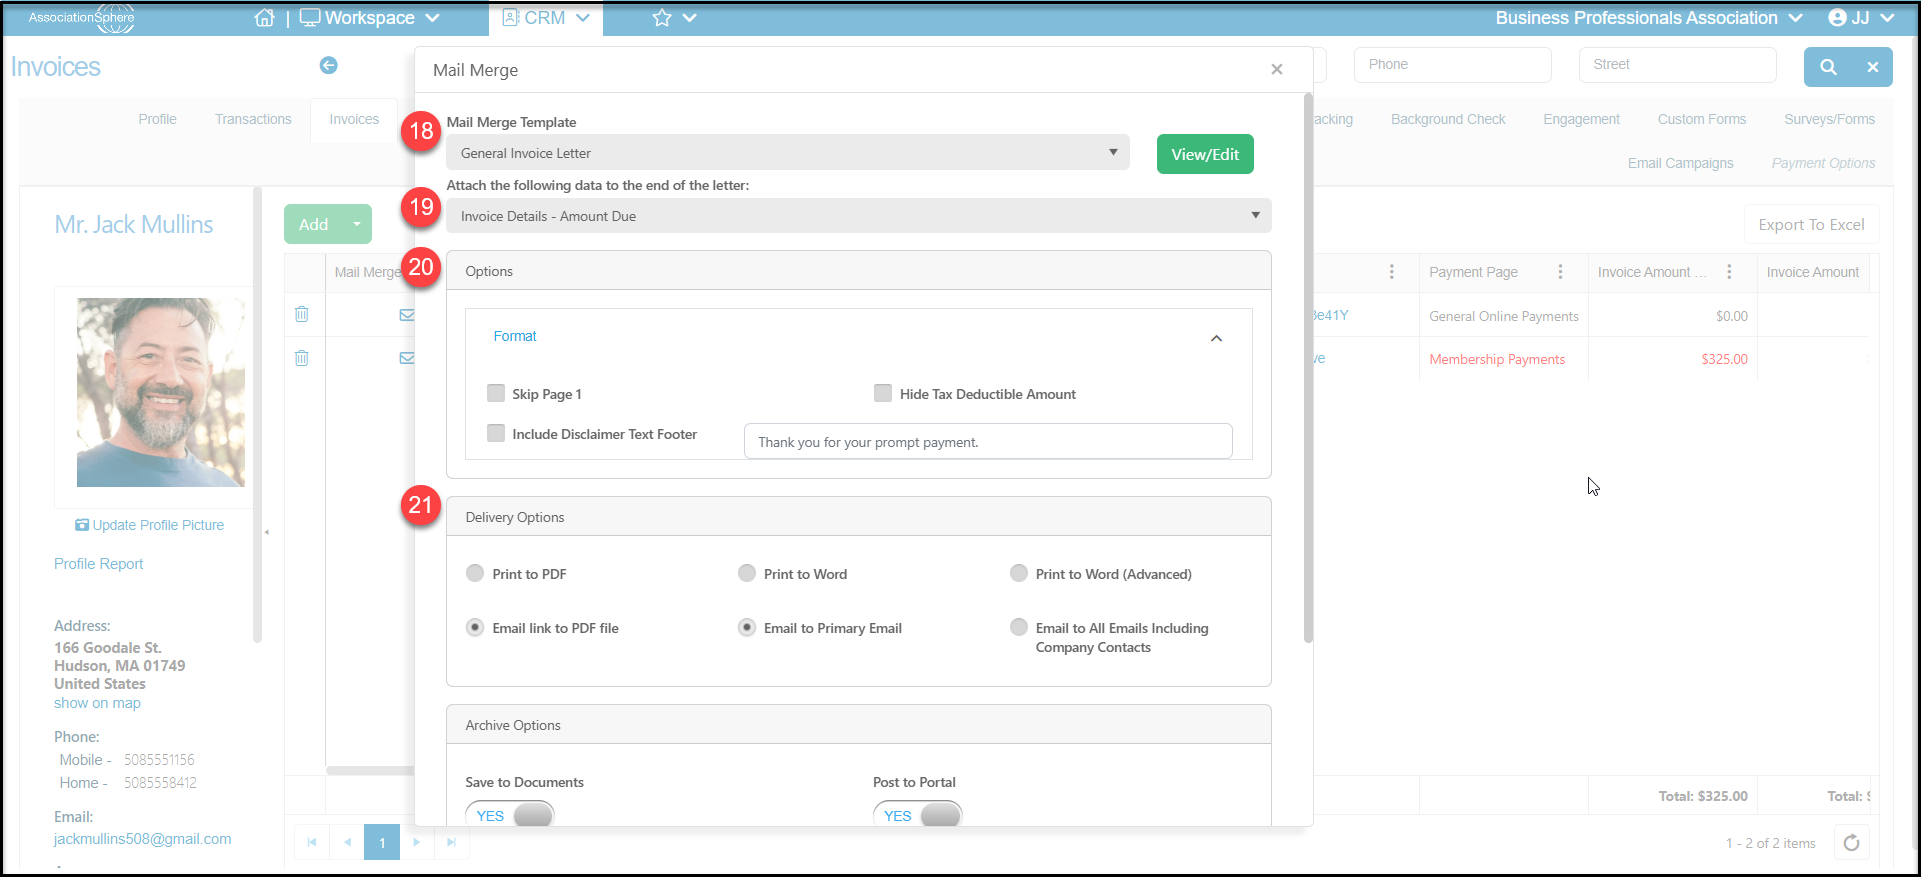
 18. If the**Save and Print** option is selected, a new print/email mail merge window opens. Choose the Mail Merge Template from the dropdown list. To learn more about creating mail merge template letters, see this article.
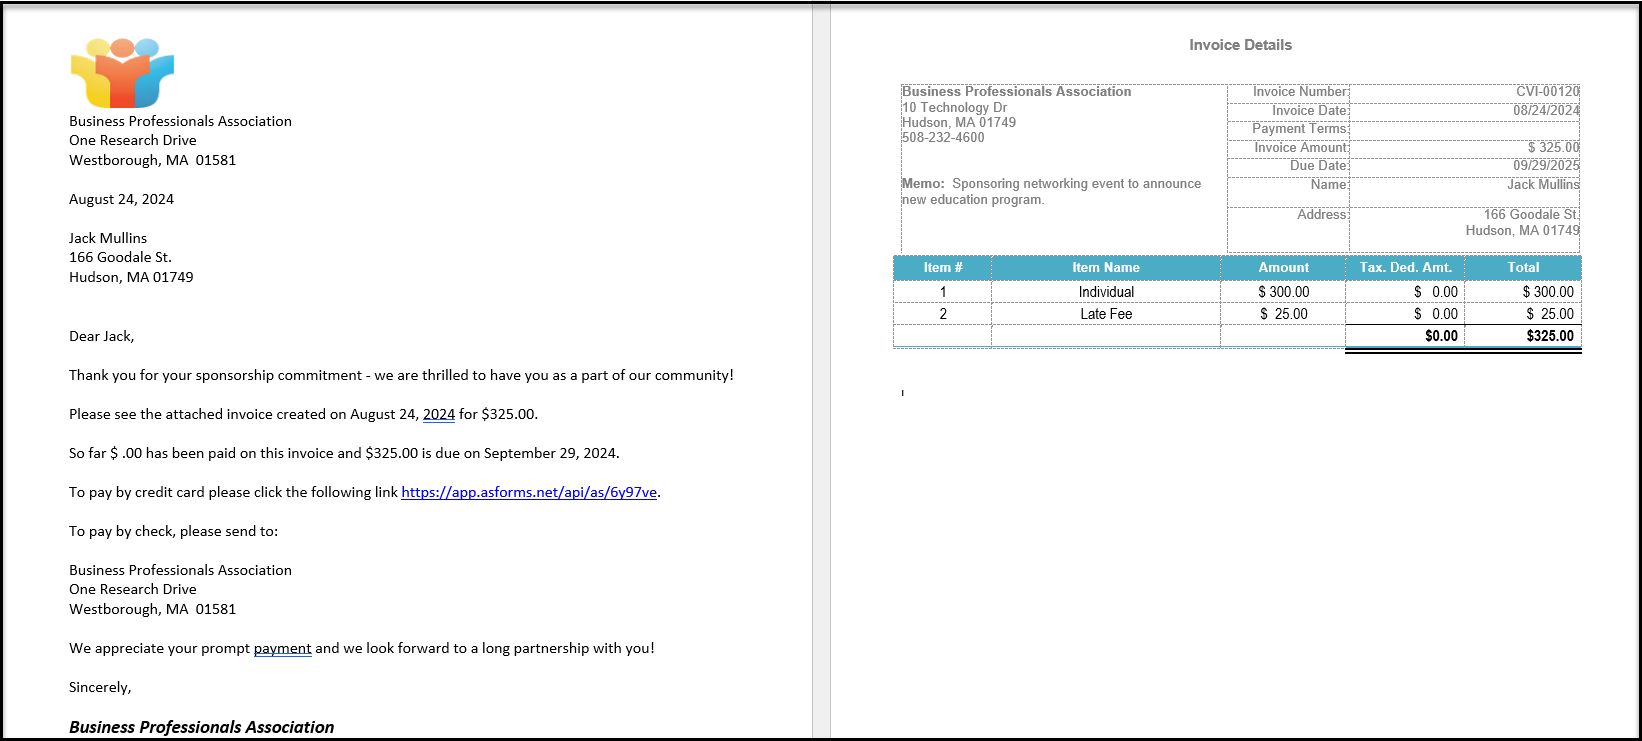
19. This will be a two part document with the first part (and pages) the Mail Merge template as the cover letter, and the second part is the invoice. There are two options for attaching the invoice under the **Attach the following data to the end of the letter**dropdown list:
- **Invoice Details - Amount Due** can be used for new and invoices which already have partial payments.
- **Invoice Details - Amount Total** is used for new invoices with no existing payments already made.
20. Once you select the type of invoice, you have several options for the format.
- **Skip Page 1** will produce just the invoice, not the cover letter.
- **Hide Tax Deductible Amount** will remove the column listing the tax-deductible amounts from the invoice.
- **Include Disclaimer Text Footer**will add a footer to the invoice. You can customize the text in the next box. It defaults to say "Thank you for your prompt payment."
21. Next you will choose how you want to produce the document under **Delivery Options**.
- **Print to PDF** - will produce the document as a pdf and open in a new window.
- **Print to Word**- will download a MS Word doc to your Downloads folder.
- **Print to Word Advanced**- is only necessary if you have complex tables or charts included in your cover letter. It will also download an MS Word doc.
- **Email link to PDF file**- allows you to send the document via email.
- The document will be available to the recipient as a link.
- If you choose to email, you can **Email to Primary Email**, which only sends an email to the constituent's primary email listed at the top of their record.
- If you choose **Email to All Emails Including Company Contact,**this will send the message to all emails on file for this constituent and, if it is a Company constituent, to anyone listed as a company contact for that organization. (See additional instructions below - step 24.)
18. If the**Save and Print** option is selected, a new print/email mail merge window opens. Choose the Mail Merge Template from the dropdown list. To learn more about creating mail merge template letters, see this article.
19. This will be a two part document with the first part (and pages) the Mail Merge template as the cover letter, and the second part is the invoice. There are two options for attaching the invoice under the **Attach the following data to the end of the letter**dropdown list:
- **Invoice Details - Amount Due** can be used for new and invoices which already have partial payments.
- **Invoice Details - Amount Total** is used for new invoices with no existing payments already made.
20. Once you select the type of invoice, you have several options for the format.
- **Skip Page 1** will produce just the invoice, not the cover letter.
- **Hide Tax Deductible Amount** will remove the column listing the tax-deductible amounts from the invoice.
- **Include Disclaimer Text Footer**will add a footer to the invoice. You can customize the text in the next box. It defaults to say "Thank you for your prompt payment."
21. Next you will choose how you want to produce the document under **Delivery Options**.
- **Print to PDF** - will produce the document as a pdf and open in a new window.
- **Print to Word**- will download a MS Word doc to your Downloads folder.
- **Print to Word Advanced**- is only necessary if you have complex tables or charts included in your cover letter. It will also download an MS Word doc.
- **Email link to PDF file**- allows you to send the document via email.
- The document will be available to the recipient as a link.
- If you choose to email, you can **Email to Primary Email**, which only sends an email to the constituent's primary email listed at the top of their record.
- If you choose **Email to All Emails Including Company Contact,**this will send the message to all emails on file for this constituent and, if it is a Company constituent, to anyone listed as a company contact for that organization. (See additional instructions below - step 24.)
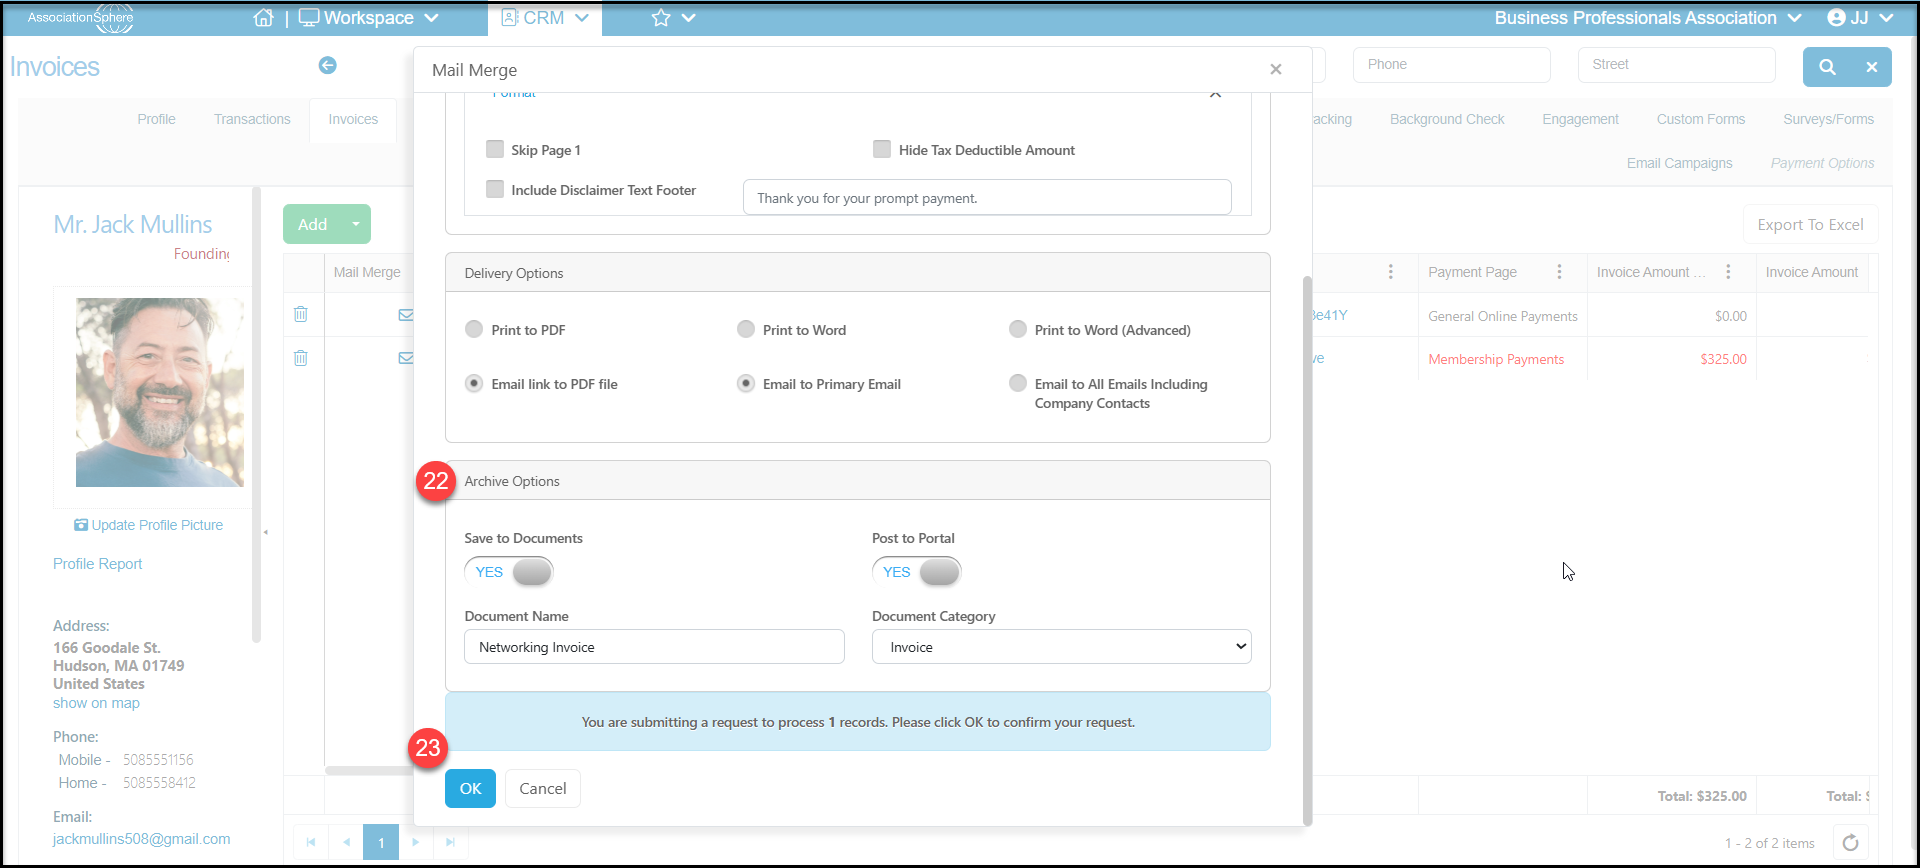
 22. **Under Archive Options**you have the ability to save this document in the constituent's Documents tab.
- **Save to Documents**will save a copy of this document in the same format it is created (pdf or doc) into the Constituent's Documents tab.
- **Post to Portal** will also add this document to the Constituent's portal account so that they can view and download the document themselves if desired.
- **Document Name** allows you to enter a name for the document.
- **Document Category**is a dropdown menu which you can select the type of document. If you need to edit or create a new document category, you can do so from the top of the dropdown options by selecting ****.
23. Once you have made all your selections, you can click**OK** to produce the document or email. You can also close the window without producing the document by clicking on **Close.**
22. **Under Archive Options**you have the ability to save this document in the constituent's Documents tab.
- **Save to Documents**will save a copy of this document in the same format it is created (pdf or doc) into the Constituent's Documents tab.
- **Post to Portal** will also add this document to the Constituent's portal account so that they can view and download the document themselves if desired.
- **Document Name** allows you to enter a name for the document.
- **Document Category**is a dropdown menu which you can select the type of document. If you need to edit or create a new document category, you can do so from the top of the dropdown options by selecting ****.
23. Once you have made all your selections, you can click**OK** to produce the document or email. You can also close the window without producing the document by clicking on **Close.**
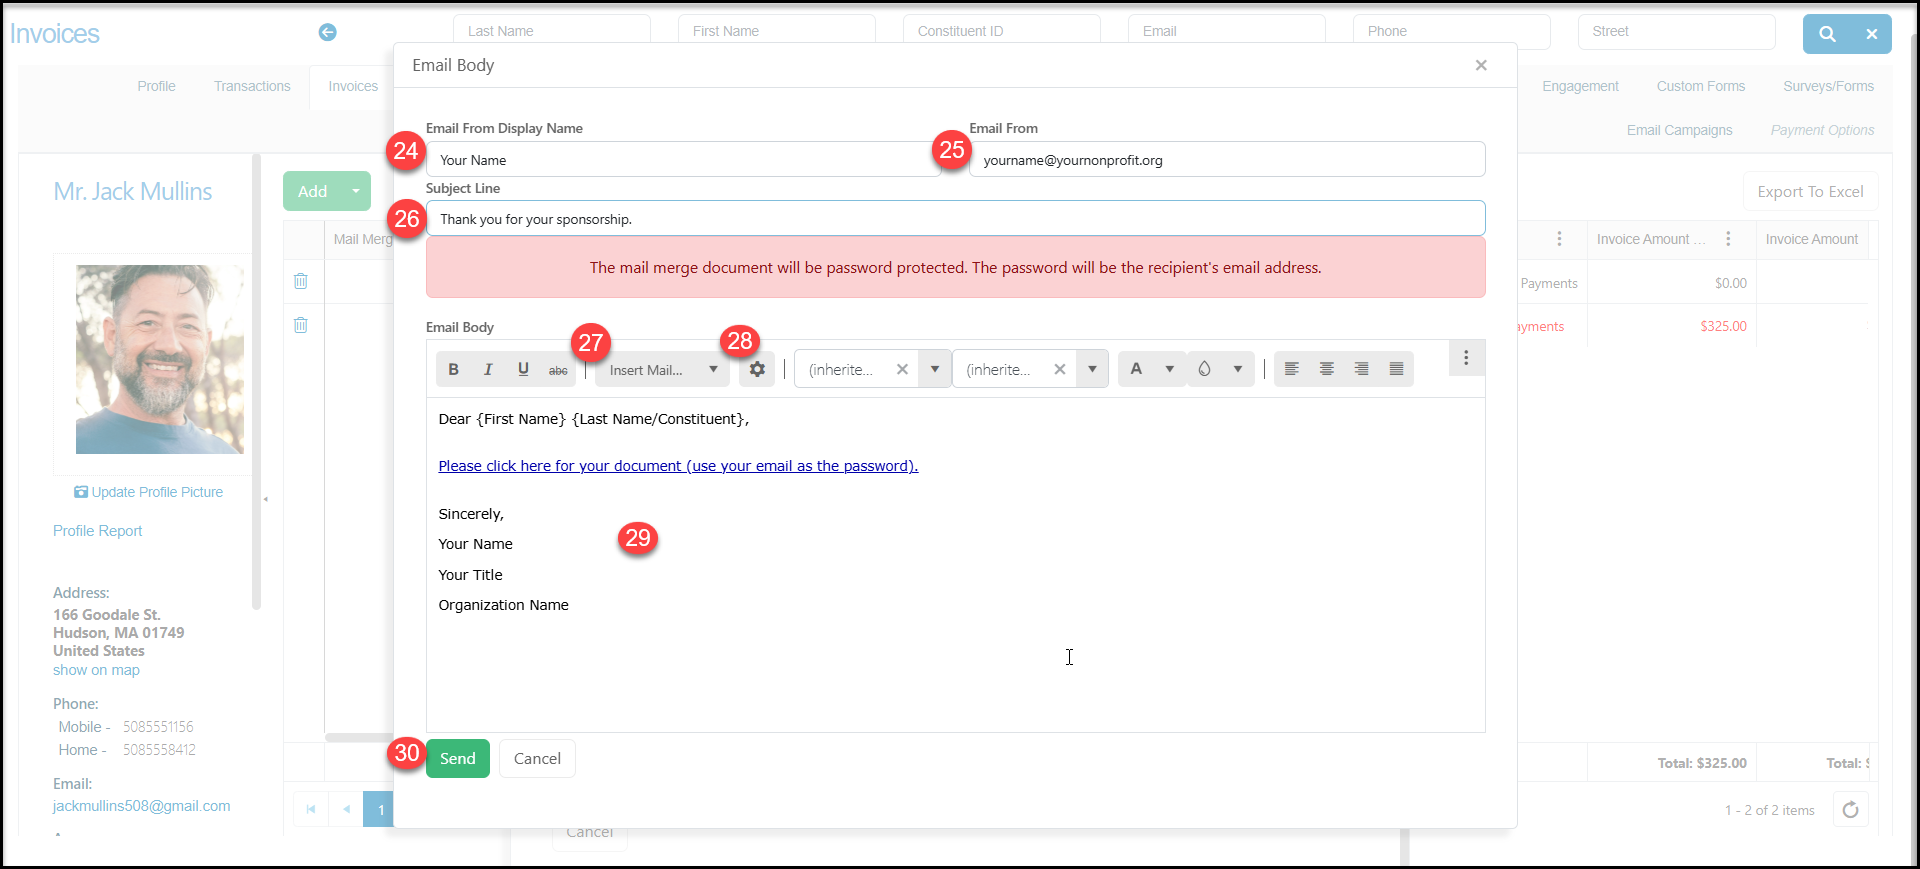
 24. If you selected **Email link to PDF file**, another window would open. By default, the software will enter your name in the **Email From Display Name** field. You can edit as needed.
25. The **Email From**field will default to the email you use to log in to the software. You can also edit this as needed.
26. The**Subject Line** will be blank, so you will want to include a clear subject for your recipient.
27. The body of the email can be formatted and you can **Insert Merge Fields** to make the email more personal and include invoice details like Invoice Page URL, Due Date or Amount Due.
28. The email will include a link for the recipient to download their document. If the link is inadvertently removed, you can restore it and edit it using the **Gear**icon.
29. The body of the email can include additional text and a signature block as desired.
30. When you have finished editing your email, you can click on **Send**to send the email or **Cancel**to close the window without sending.
24. If you selected **Email link to PDF file**, another window would open. By default, the software will enter your name in the **Email From Display Name** field. You can edit as needed.
25. The **Email From**field will default to the email you use to log in to the software. You can also edit this as needed.
26. The**Subject Line** will be blank, so you will want to include a clear subject for your recipient.
27. The body of the email can be formatted and you can **Insert Merge Fields** to make the email more personal and include invoice details like Invoice Page URL, Due Date or Amount Due.
28. The email will include a link for the recipient to download their document. If the link is inadvertently removed, you can restore it and edit it using the **Gear**icon.
29. The body of the email can include additional text and a signature block as desired.
30. When you have finished editing your email, you can click on **Send**to send the email or **Cancel**to close the window without sending.
 An example of the two part document is shown below.