# What is the Account Settings page for?
> Source: https://support.associationsphere.com/what-is-the-account-settings-page-for | Updated: 2026-09-08T02:58:44Z
To access the Account Settings page, hover over the drop-down arrow next to your organization’s name.
Next, you will see a drop-down menu that consists of “Account,” “Users,” “Portal Info,” “Billing,” and “Accounting.”
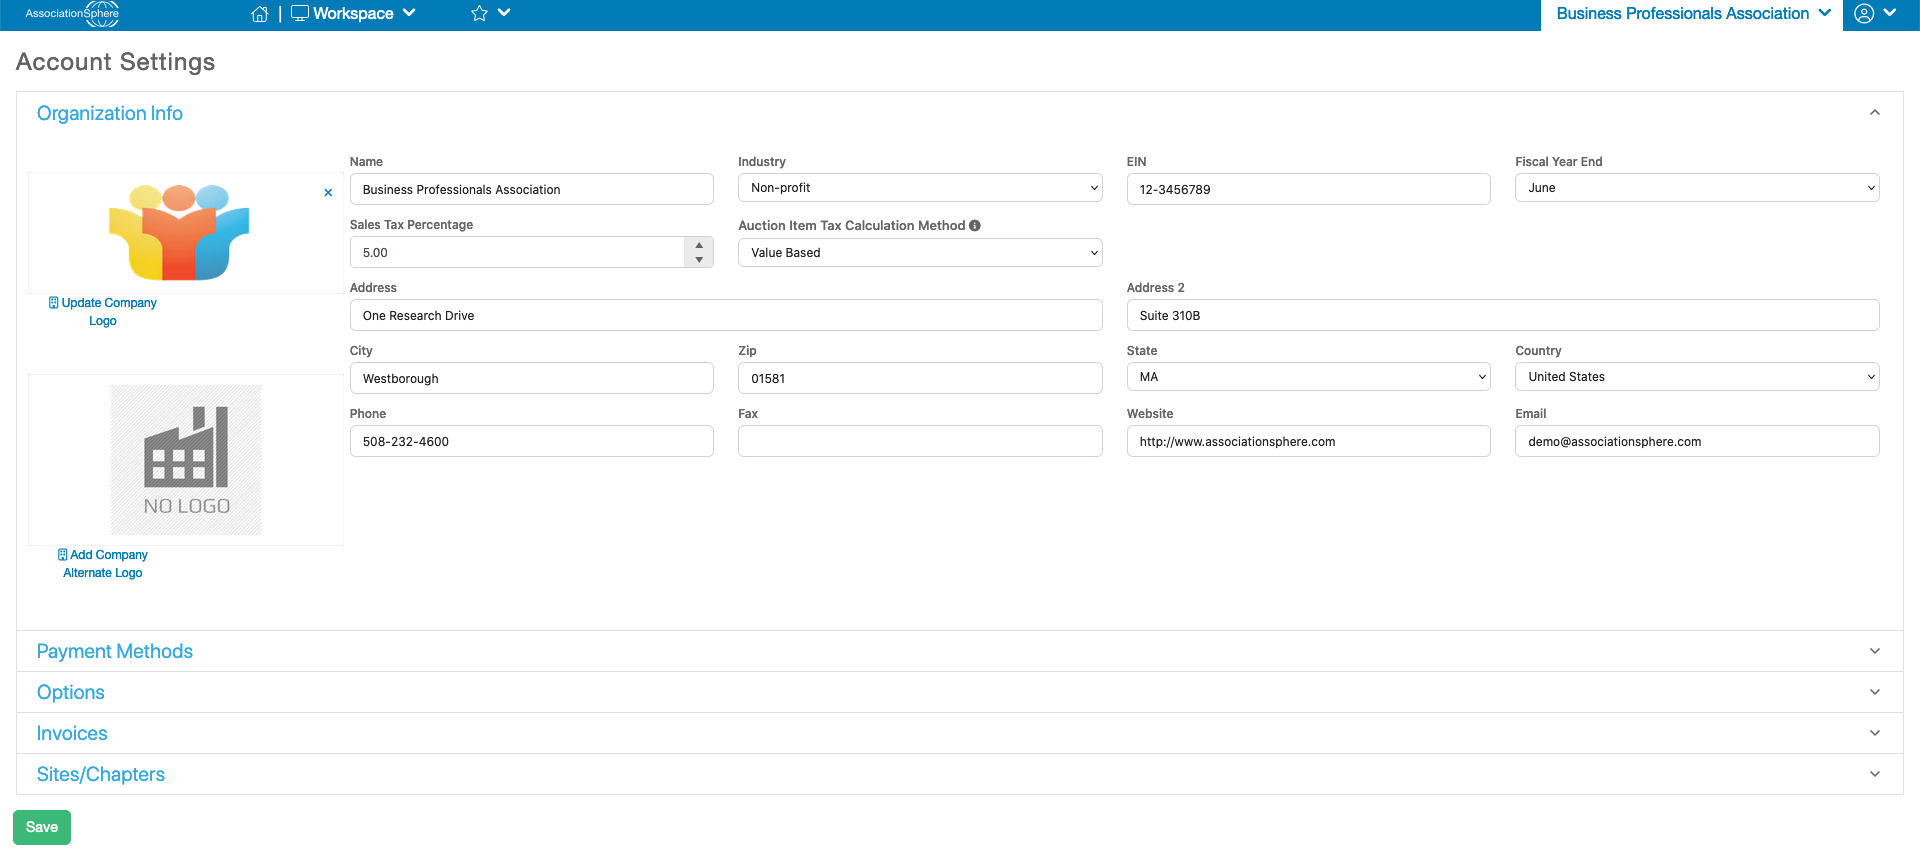
The Account submenu allows you to manage Account Settings, including **Organization Info**which includes contact information for your organization including:
- Organization Name
- Address
- Phone Number
- Fax Number
- Email
- Website
- Industry
- Logo.
- Tax ID & Fiscal Year End Date
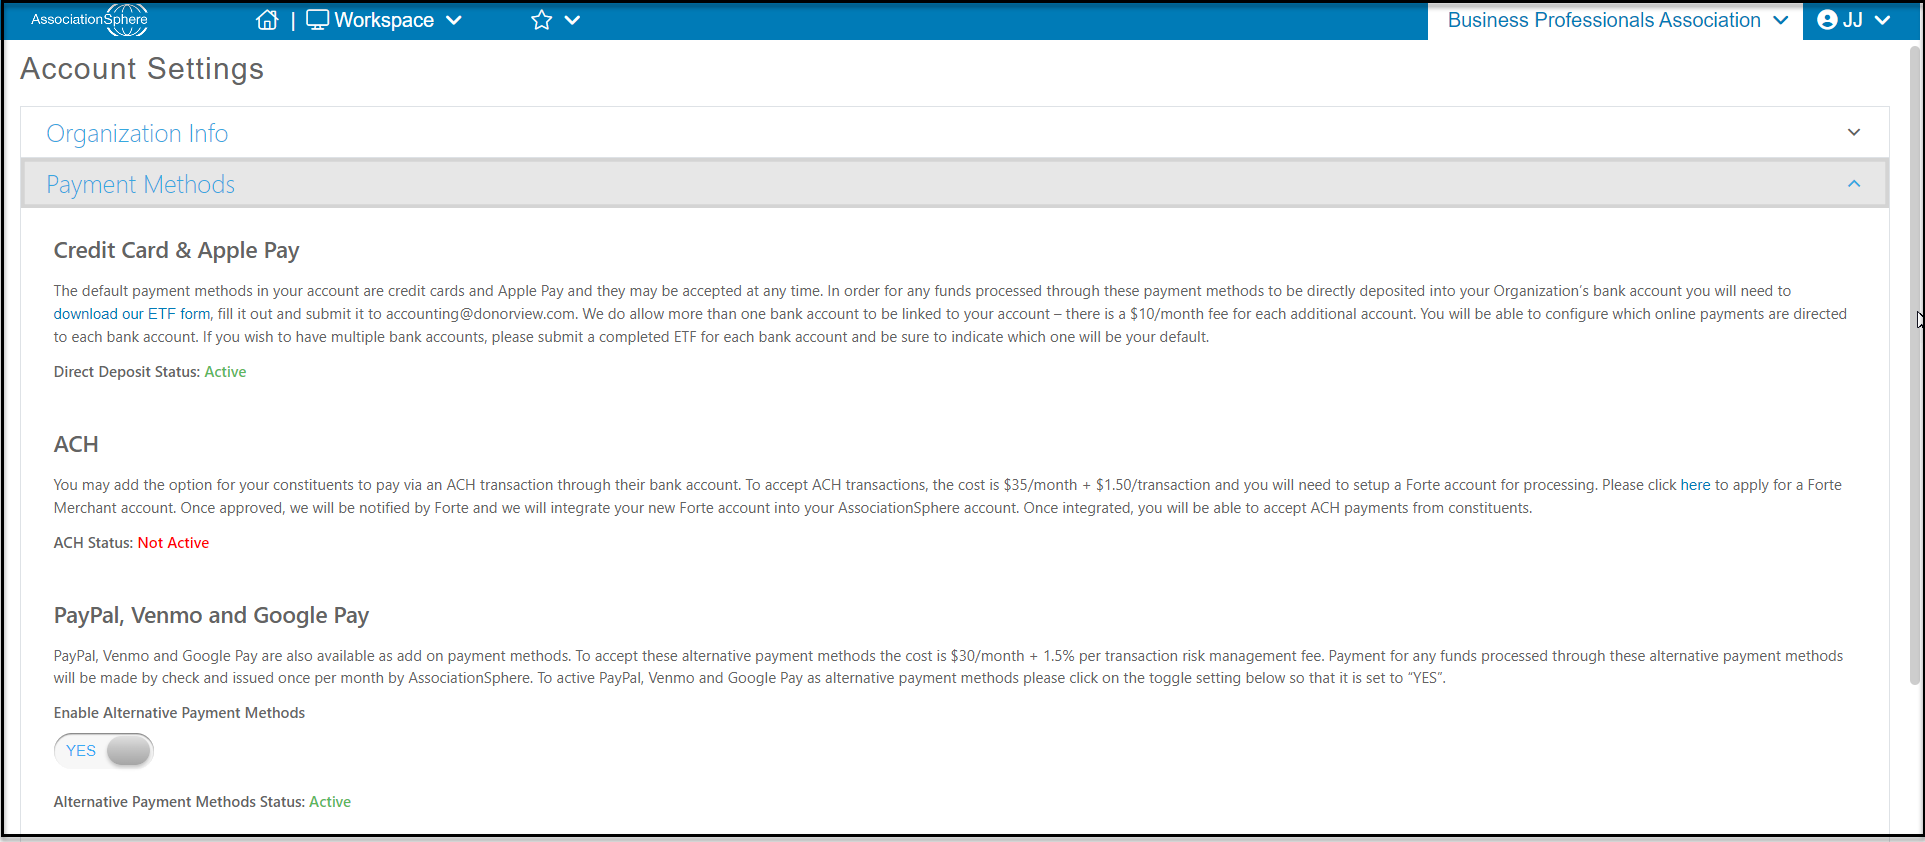
 Under **Payment Methods,** you can:
- See if direct deposit has been setup for your sub-merchant account insuring that all online transactions are directly deposited into your organization's bank account. If the status shows as "Inactive" then your organization needs to complete a ETF form and submit it to the DonorView team.
- See if ACH has been activated for your organization's account. ACH as a payment method is provided through a 3rd party vendor called Forte. To activate this method you will need to submit an application to create a merchant account through Forte. Once approved ACH will be available on your online Donation Forms.
- Activate Additional Payment Methods such as Venmo, Paypal and Google pay for use on your Donation, Event and Membership forms.
Under **Payment Methods,** you can:
- See if direct deposit has been setup for your sub-merchant account insuring that all online transactions are directly deposited into your organization's bank account. If the status shows as "Inactive" then your organization needs to complete a ETF form and submit it to the DonorView team.
- See if ACH has been activated for your organization's account. ACH as a payment method is provided through a 3rd party vendor called Forte. To activate this method you will need to submit an application to create a merchant account through Forte. Once approved ACH will be available on your online Donation Forms.
- Activate Additional Payment Methods such as Venmo, Paypal and Google pay for use on your Donation, Event and Membership forms.
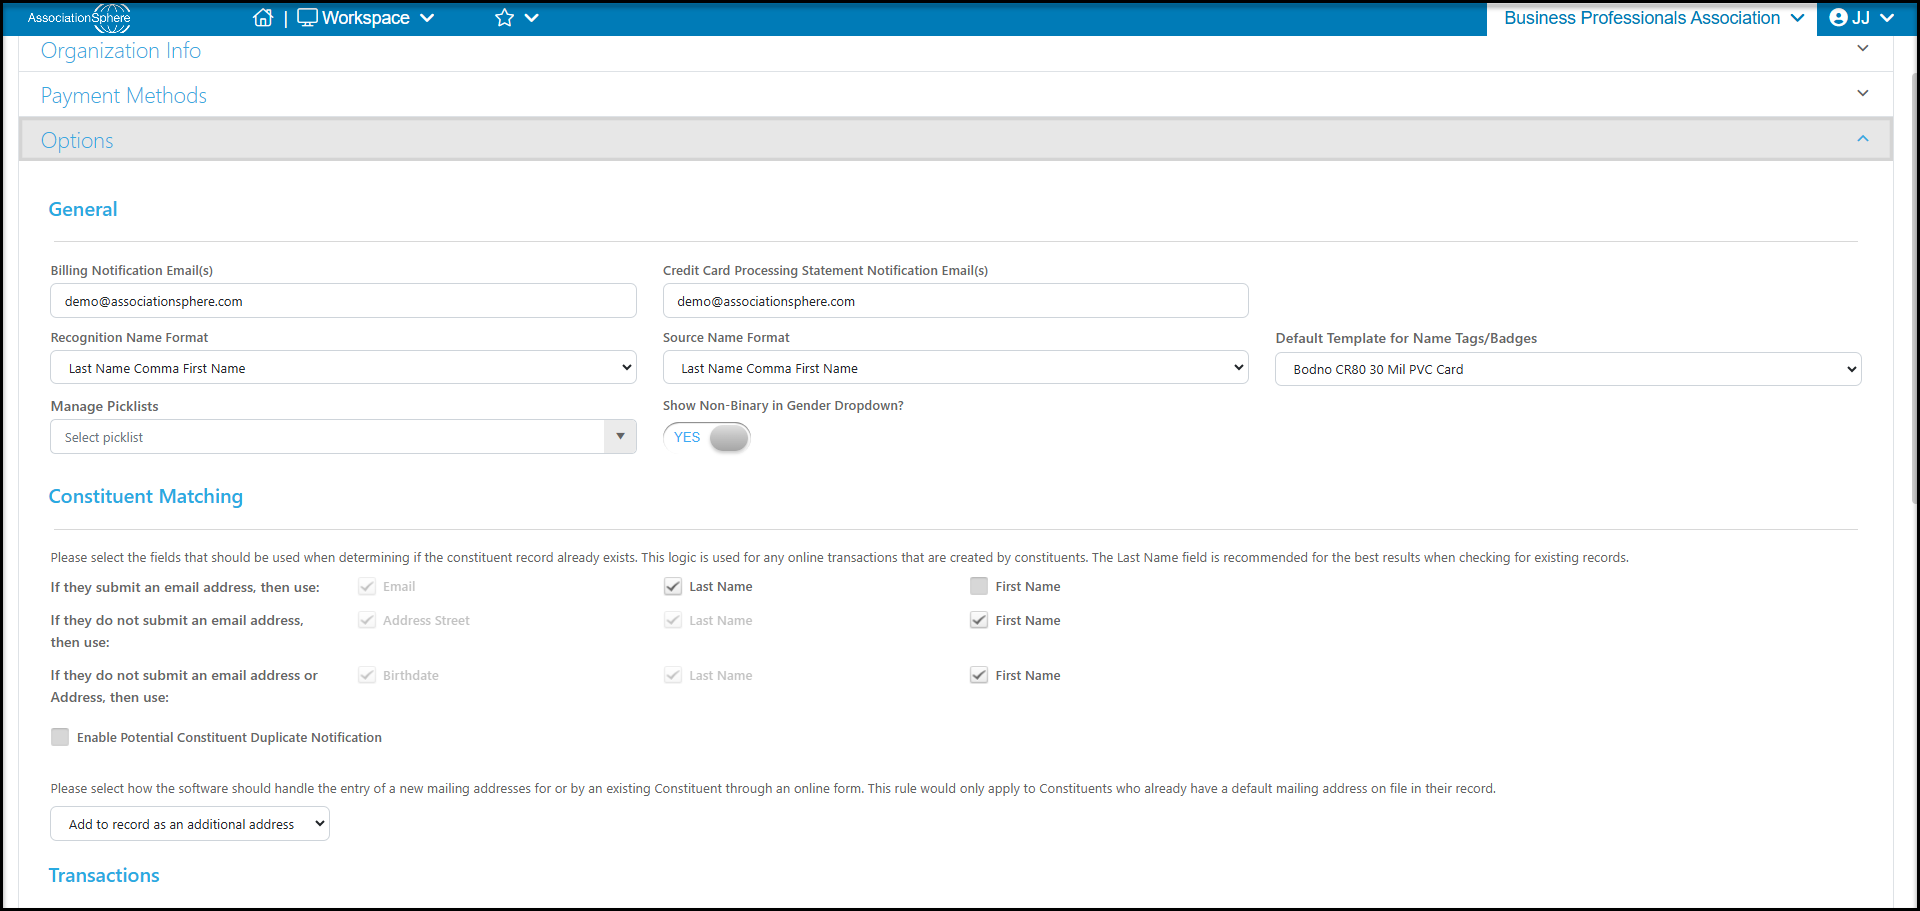
 Under **Options**, you can:
- **Manage Picklists**allows you to edit the values that appear in dropdown fields all over the software. You can select the list to manage and edit from here instead of going to the specific field in the modules.
- Enter the email addresses that should receive **B****illing Notifications** or **C****redit Card Processing Statement Notifications**. You can include up to 5 emails separated by a semi-colon.
- Update format the **Recognition Name**and **Source Name** format to either Last Name, First Name or First Name Last Name.
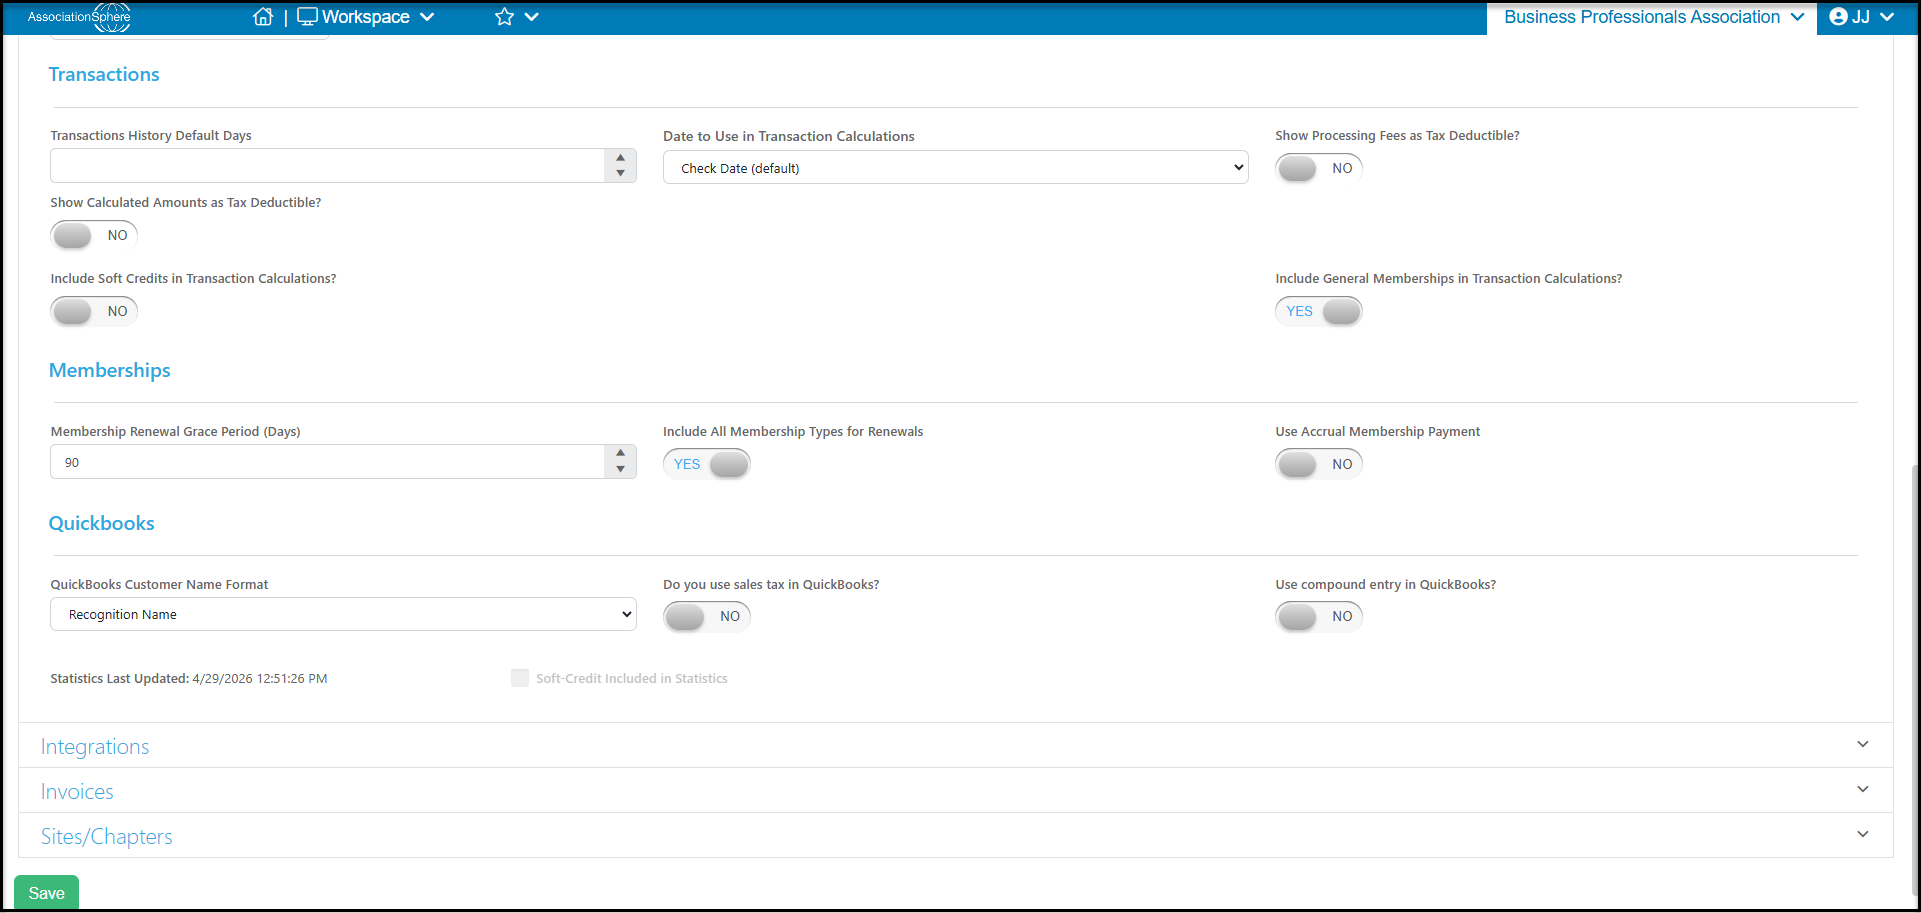
- Enter the number of days your historical gift data will display in**Gift History Default Days.** If you have many, many years of history, you may want to show only those more recent, say the last 10 years (3650 days), to display by default on the grid. The historical data is not deleted, the grid will just display the the default data which can make loading, filtering and sorting the grid quicker.
- The gift calculations are those summary fields like Last Gift Date or First Gift Date which display on the Constituents and Gifts grid. You can select which date to use here whether that is Check Date, Gift Date, Deposit Date or Postmark Date in the **Date to Use in Gift Calculations** field.
- Toggle **Include General Memberships in Gift Calculations** to **YES** is you wish to include any general membership purchases in the summary field calculations like Average Gift and Cumulative Giving Amount on the Constituents Grid.
- Toggle **Show Processing Fees as Tax Deductible** to **YES** if you would like processing fees to be shown as tax-deductible in donation records. You have the option of allowing donors to pay for processing fees when making a donation or pledge. This field only applies to donations, not to event, auction, or membership purchases.
- Toggle **Show Calculated Amounts as Tax Deductible** to **YES**if you wish all the transactions (except soft credits) to be shown as tax deductible. Leave this as NO if your transactions are not tax deductible.
- Toggle **Include****Soft Credits in Gift Calculations** to **YES** if you wish to include any soft credits in the summary field calculations like Average Gift and Cumulative Giving Amount on the Constituents Grid.
- Set the **Membership Renewal Grace Period** which is explained in more detail in this article: <./membership-renewal-grace-period
- Toggle **Include All Membership Types for Renewals** to YES if you would like any subsequent membership purchase to be identified as a Renewal status. This is explained in more detail in this article: <./membership-status-renewal-settings
- Choose the name style for Quickbooks exports in the **QuickBooks Customer Name Format** field.
- Toggle **Do you use sales tax in QuickBooks** to **YES** if necessary.
- Toggle **Use compound entry in QuickBooks** to **YES**if necessary.
- Toggle **Show Non-Binary in Gender Dropdown** to **YES** should appear under Gender and if "Pronouns" should be an available Profile field.
- Choose which fields are used when determining if the constituent record already exists. This logic is used for any online transactions that are created by constituents. By default, **Email** is used as the primary field for matching. Also, by default, **First Name** and **Last Name** are selected, so each one of those fields must match exactly in order to link to an existing record. Many organizations choose to uncheck the **First Name** field since names like Robert could be shortened to Bob or Rob, resulting in a new constituent record being created. If an email is not included, then **Address** and **Last Name**or **Birthdate** and **Last Name** are required.
- Select how the software should handle the entry of a new mailing addresses for or by an existing constituent through an online form. This rule would only apply to Constituents who already have a default mailing address on file in their record.
Under **Options**, you can:
- **Manage Picklists**allows you to edit the values that appear in dropdown fields all over the software. You can select the list to manage and edit from here instead of going to the specific field in the modules.
- Enter the email addresses that should receive **B****illing Notifications** or **C****redit Card Processing Statement Notifications**. You can include up to 5 emails separated by a semi-colon.
- Update format the **Recognition Name**and **Source Name** format to either Last Name, First Name or First Name Last Name.
- Enter the number of days your historical gift data will display in**Gift History Default Days.** If you have many, many years of history, you may want to show only those more recent, say the last 10 years (3650 days), to display by default on the grid. The historical data is not deleted, the grid will just display the the default data which can make loading, filtering and sorting the grid quicker.
- The gift calculations are those summary fields like Last Gift Date or First Gift Date which display on the Constituents and Gifts grid. You can select which date to use here whether that is Check Date, Gift Date, Deposit Date or Postmark Date in the **Date to Use in Gift Calculations** field.
- Toggle **Include General Memberships in Gift Calculations** to **YES** is you wish to include any general membership purchases in the summary field calculations like Average Gift and Cumulative Giving Amount on the Constituents Grid.
- Toggle **Show Processing Fees as Tax Deductible** to **YES** if you would like processing fees to be shown as tax-deductible in donation records. You have the option of allowing donors to pay for processing fees when making a donation or pledge. This field only applies to donations, not to event, auction, or membership purchases.
- Toggle **Show Calculated Amounts as Tax Deductible** to **YES**if you wish all the transactions (except soft credits) to be shown as tax deductible. Leave this as NO if your transactions are not tax deductible.
- Toggle **Include****Soft Credits in Gift Calculations** to **YES** if you wish to include any soft credits in the summary field calculations like Average Gift and Cumulative Giving Amount on the Constituents Grid.
- Set the **Membership Renewal Grace Period** which is explained in more detail in this article: <./membership-renewal-grace-period
- Toggle **Include All Membership Types for Renewals** to YES if you would like any subsequent membership purchase to be identified as a Renewal status. This is explained in more detail in this article: <./membership-status-renewal-settings
- Choose the name style for Quickbooks exports in the **QuickBooks Customer Name Format** field.
- Toggle **Do you use sales tax in QuickBooks** to **YES** if necessary.
- Toggle **Use compound entry in QuickBooks** to **YES**if necessary.
- Toggle **Show Non-Binary in Gender Dropdown** to **YES** should appear under Gender and if "Pronouns" should be an available Profile field.
- Choose which fields are used when determining if the constituent record already exists. This logic is used for any online transactions that are created by constituents. By default, **Email** is used as the primary field for matching. Also, by default, **First Name** and **Last Name** are selected, so each one of those fields must match exactly in order to link to an existing record. Many organizations choose to uncheck the **First Name** field since names like Robert could be shortened to Bob or Rob, resulting in a new constituent record being created. If an email is not included, then **Address** and **Last Name**or **Birthdate** and **Last Name** are required.
- Select how the software should handle the entry of a new mailing addresses for or by an existing constituent through an online form. This rule would only apply to Constituents who already have a default mailing address on file in their record.
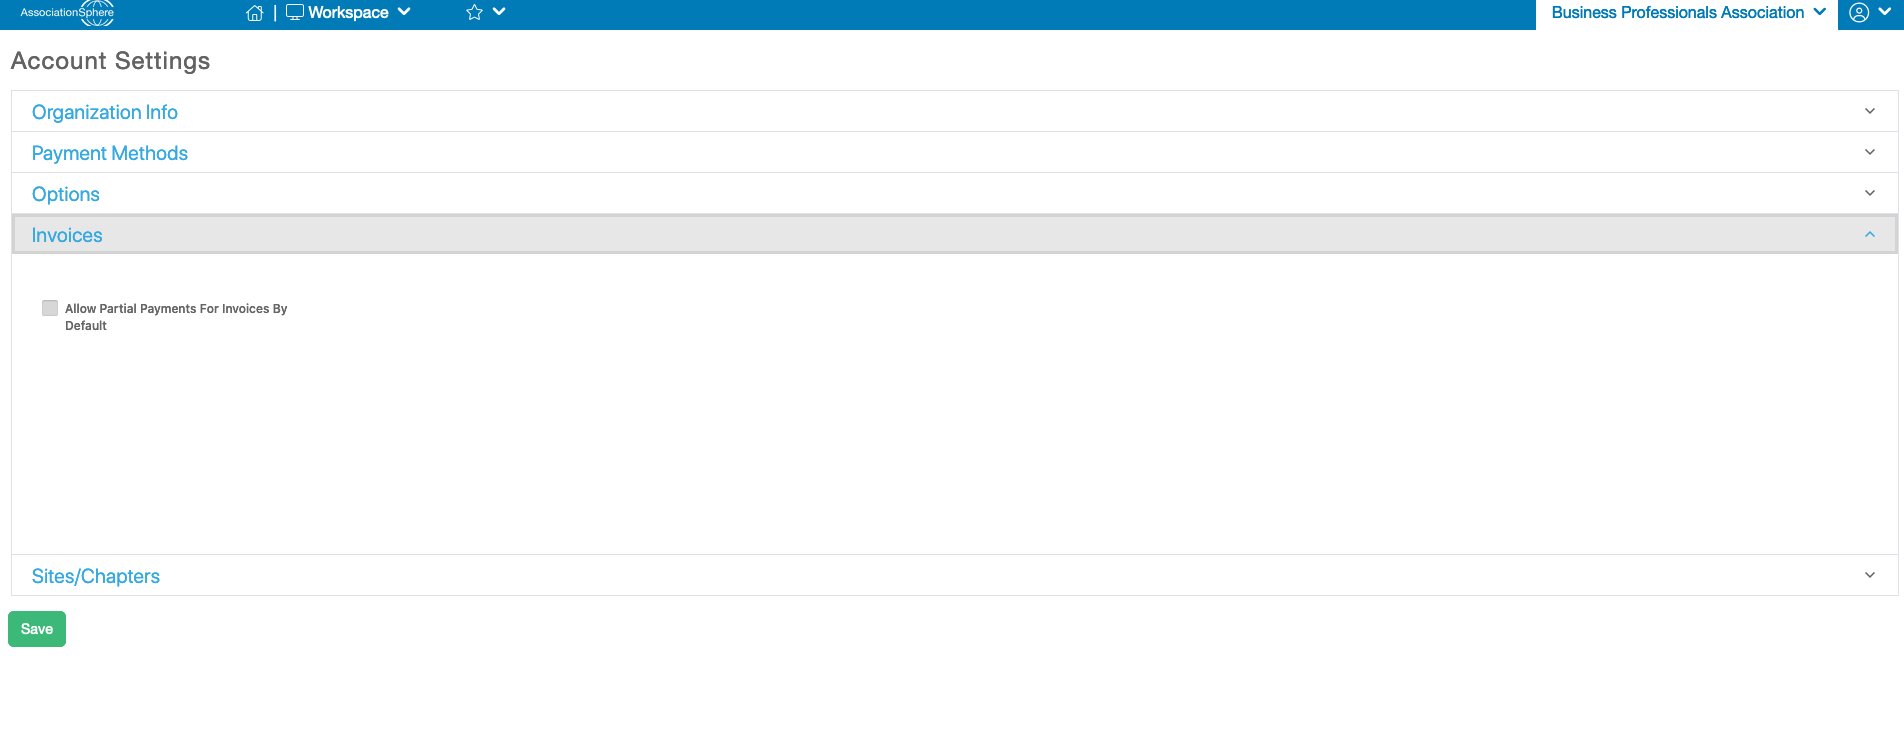
 Under **Invoices**, you can:
- Check the box **Allow** **Partial Payment for Invoices By Default** if you wish this to be the default setting on all Invoices.
Under **Invoices**, you can:
- Check the box **Allow** **Partial Payment for Invoices By Default** if you wish this to be the default setting on all Invoices.
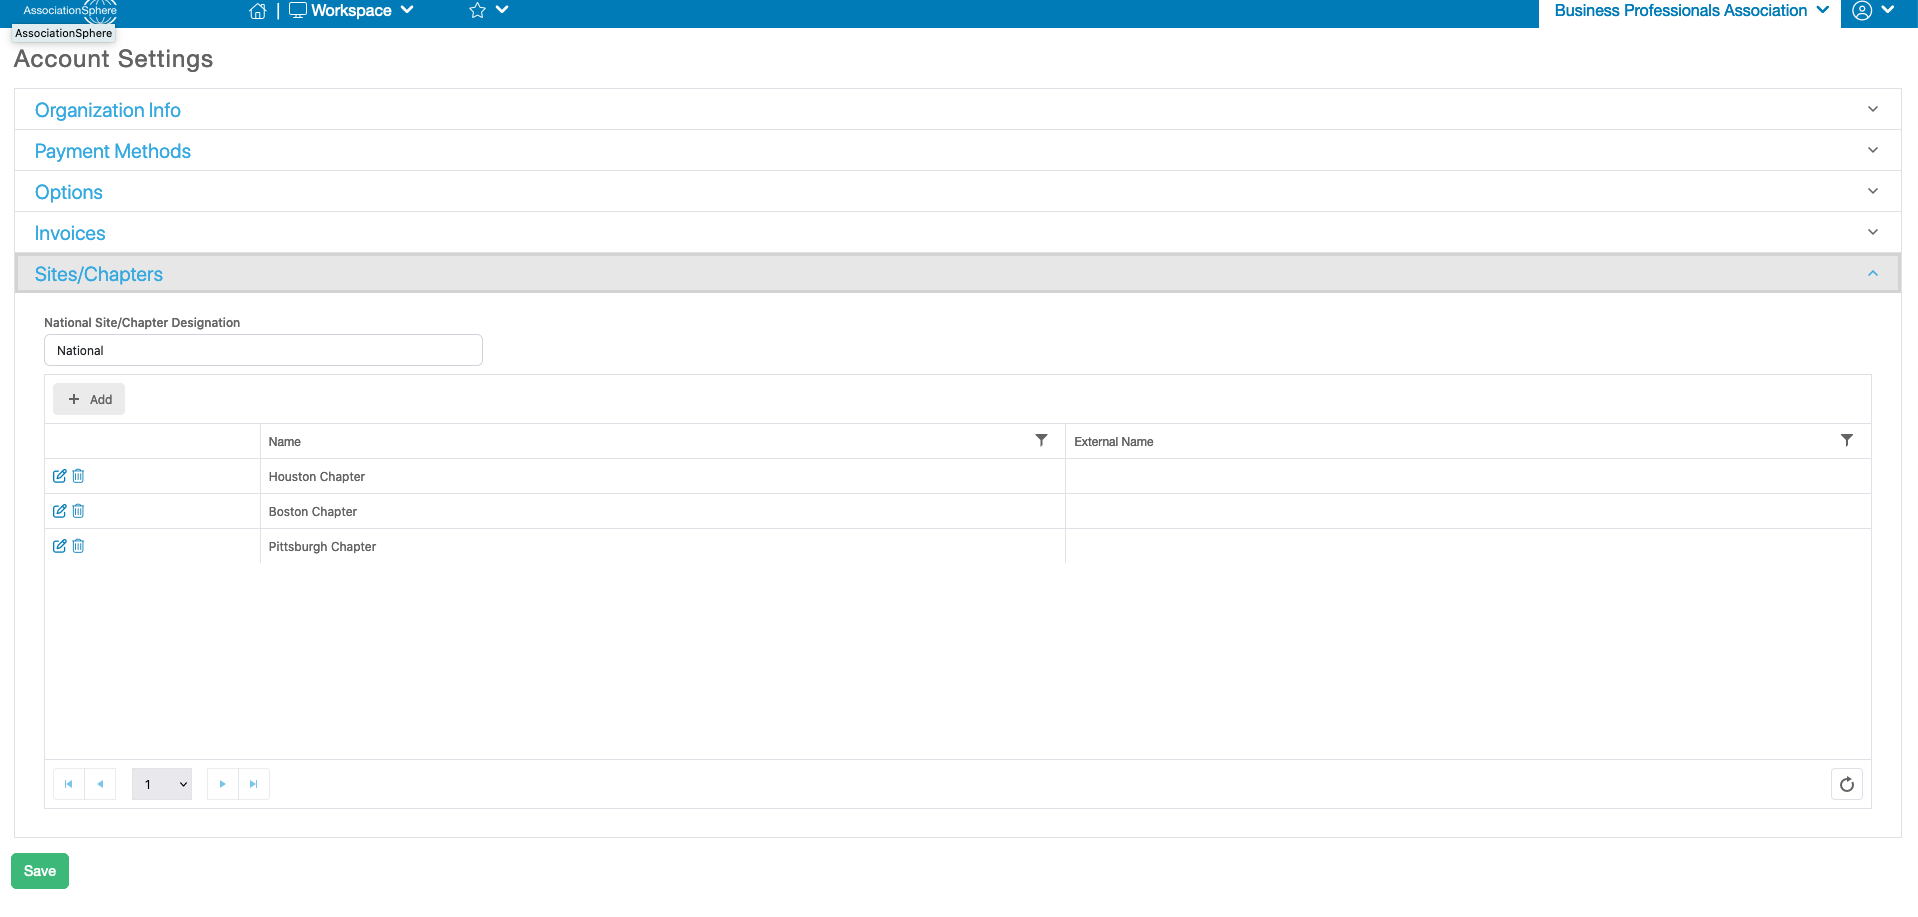
 If activated for your organization, you can manage your **Sites/Chapters**.
- You can name the **National Site/Chapter Designation**
- Click on **+Add** to add new Sites/Chapters. If desired you can have an internal Sites/Chapter **Name** and a different **External Name**.
- Sites/Chapter names can be edited with the Edit icon on the left of the row or deleted with the Trash can icon.
If activated for your organization, you can manage your **Sites/Chapters**.
- You can name the **National Site/Chapter Designation**
- Click on **+Add** to add new Sites/Chapters. If desired you can have an internal Sites/Chapter **Name** and a different **External Name**.
- Sites/Chapter names can be edited with the Edit icon on the left of the row or deleted with the Trash can icon.
 When making any changes, be sure to click on the green **Save**button to complete the action.