Batch Renewals allow you to renew groups of memberships at once. This feature is most often used by organizations which send invoices to all their memberships for renewals.
Please note that Batch Renewals assume the membership will levels and secondary members will the be same as the previous membership. Batch Renewals do not include add-ons or one-time fees. Renewals that change each year or include add-ons or fees check out some of the other options for membership renewals in this article "What options are available for setting up membership renewals?"
To send invoices for batch renewals, you must have at least one Online Payment Page and Mail Merge Invoice Template. To learn more about setting up these features, see these articles:
What is the Online Payment Page and how do I create one?
What is the Mail Merge Invoice Template?
Instructions:
1. Once you have your invoice online payment page and mail merge template, go to the Memberships - Summary grid.
2. Batch renewals can only process one membership level at a time, so add a filter for the first membership level you wish to start with. For example, if your membership page has three levels, Bronze, Silver, and Gold, start with just the Bronze level for the first run.
3. After filtering the grid, under the Actions menu you can select the Batch Renewal option. This will launch a prompt window that allows you to make all the selections for the membership level, dates and payment options.

4. Complete the following fields:
Membership Name – Select which Membership page the new Membership Level is connected too. If you have hard expiration dates, be sure to choose the correct page year if you use a new membership page each year.
Membership Level – Select which Level is the renewal for.
Renewal / Run Date – Enter the date you wish to have the renewal process run and appear as the date of the transaction. This date must be a future date (tomorrow at the earliest), it cannot be set for today or a day in the past.
Expiration Date – Enter the date this membership will expire.
Payment Type – If the transactions are to show as paid you can enter the Payment Method that will be shown on the Memberships. This is typically only used if you have already collected payments for all the memberships you are going to renew. If you have not collected payment yet, leave this as 'Select Payment Type."
Pay Later – If the transactions are to show as unpaid change this setting to Yes and do not enter a Payment Type.
Automatically Generate Invoice – If the renewals are unpaid you are able to have Invoices generated that can later be sent to the membership owner. Set to Yes to generate the invoice for the renewed membership balance.
Invoice Payment Page – Choose the online payment page connected to the invoice to create a unique link for each member to pay their invoice with a credit card or print their invoice and mail a check.
Number of Days Invoice Due – Select how many days from the Renewal/Run Date date this invoice will be due.
Allow Partial Payments – If set to Yes, the member will be able to make multiple smaller payments at their discretion.

5. Batch Renewals will be shown in the Membership Renewal Queue grid in the Membership Module. It takes approximately 12 hours to complete the batch renewal process.

6. Once the renewal process is complete, if invoices were generated you will find them on the Invoices grid with an Invoice Date the same as the Renewal/Run Date.
7. Repeat the steps above for each membership level.
8. Once you have completed all your batch renewals and they have been run, the final step in the process is to send the invoices to your members.
9. Begin by filtering the Invoices grid for the desired invoices, usually using the Invoice Date to identify all the invoices in your batch renewal. You can also add filters for the Payment Page column or Status column as desired.
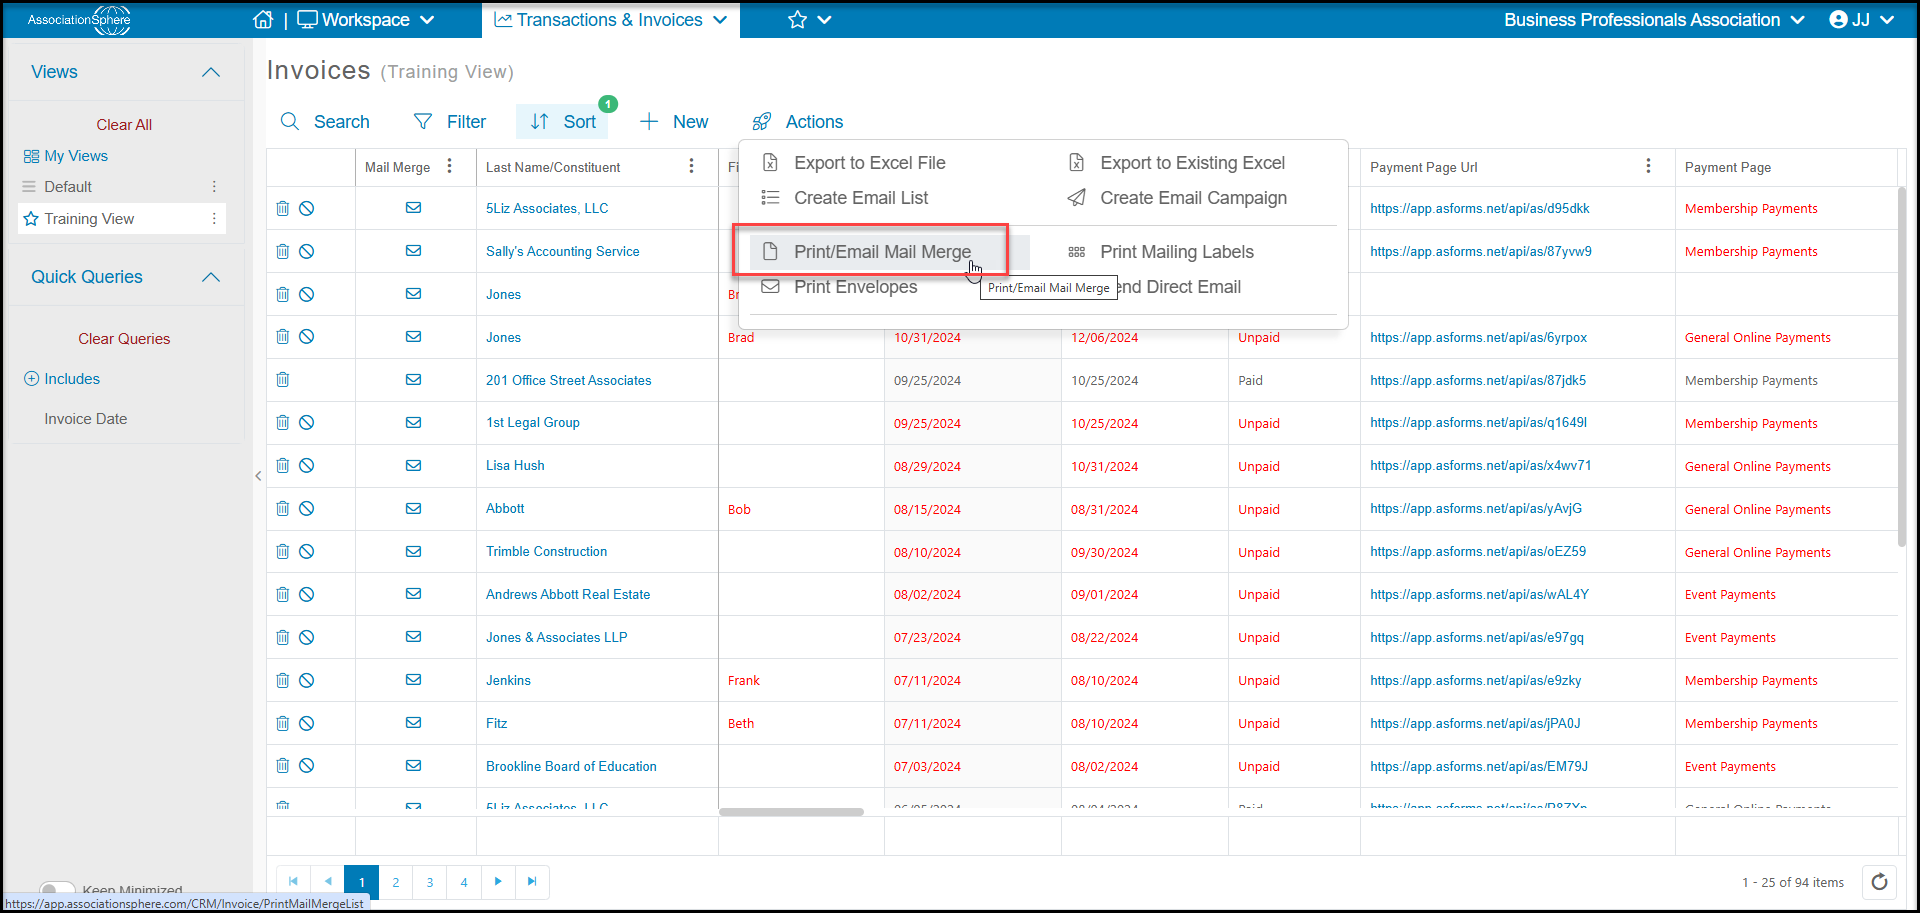
10. Once you have created your view with the appropriate filters, use the Actions menu and select Print/Email Mail Merge.
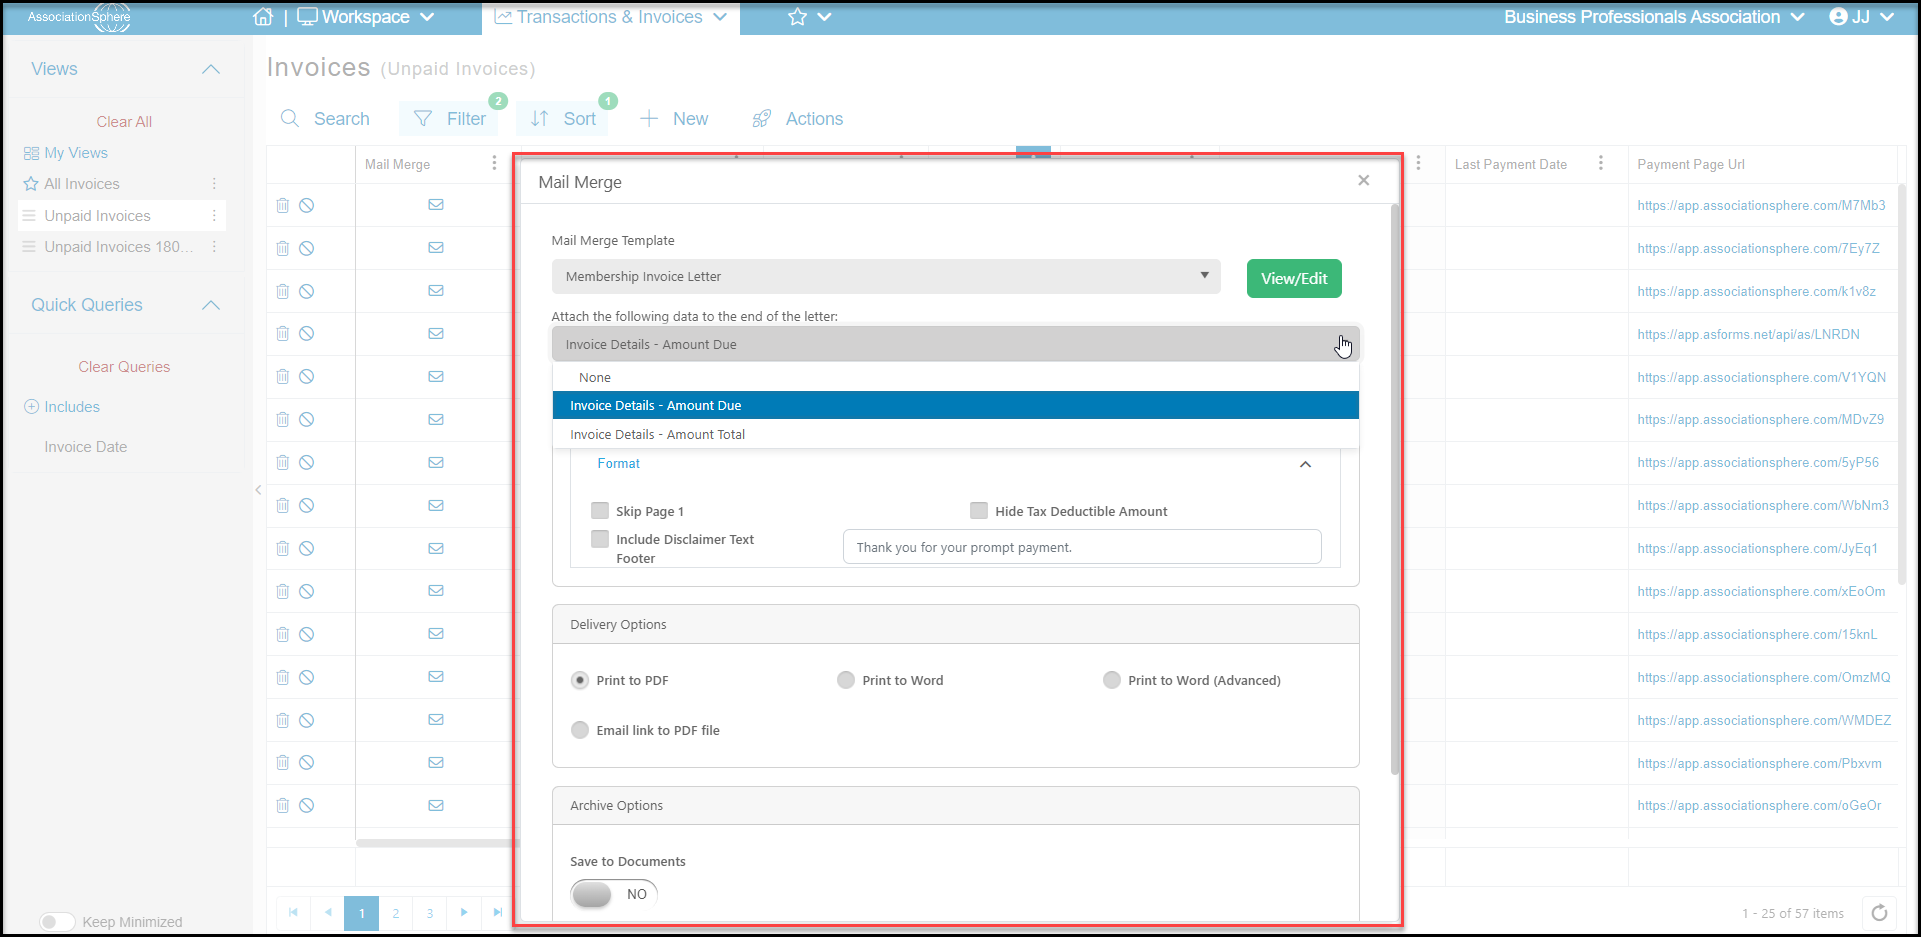
11. In the new window, you will select which letter template to send and customize the options including:
Mail Merge Template – Select which template from your Mail Merge Invoice Template Library you wish to use for this letter.
Attach the following data to the end of the letter - You have the option of selecting:
None - which will not add the invoice to the letter
Invoice Details - Amount Due - this will include a copy of the invoice and only show the amount due
Invoice Details - Amount Total - this will include a copy of the invoice and show the total original amount of the invoice, if you allow partial payments, use the Amount Due option instead.
Options - Lets you choose formatting options
Skip Page 1 - this will not print the cover letter, just the invoice
Hide Tax Deductible Amount - this will remove the column for tax deductible amount from the invoice
Include Disclaimer Text Footer - you can customize the message to appear at the bottom of your invoice in the text box. It defaults to "Thank you for your prompt payment."
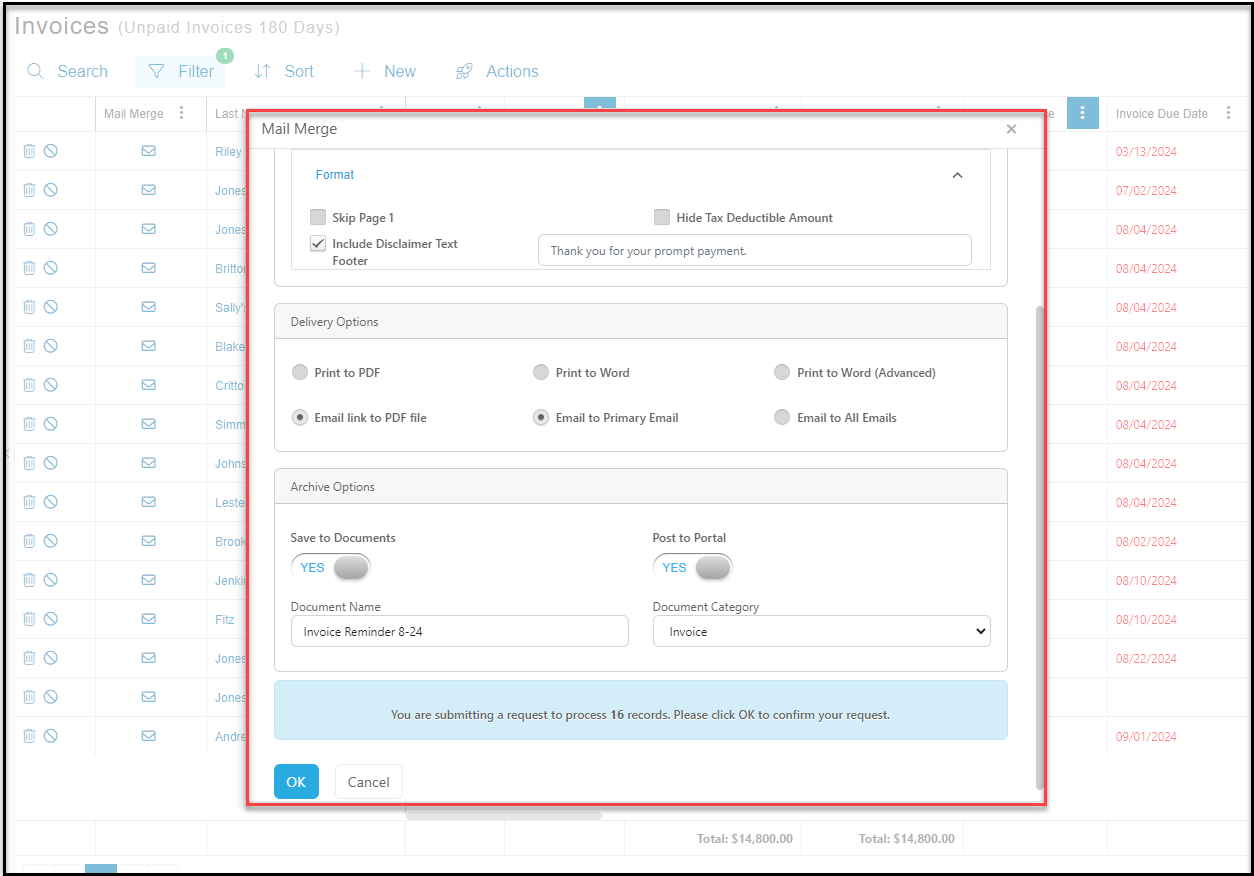
Delivery Options – How would you like the mail merge letter to be delivered/generated?
Print to PDF – The letter will generate/download to your device as a PDF.
Print to Word – The letter will generate/download to your device as a Word document.
Print to Word (Advanced) – The letter will generate/download to your device as a Word document. (You can use this option if the template doesn’t look correctly formatted with the standard Print to Word option.)
Email Link to PDF File – Generates an email to send to the constituent (membership owner) containing a link that will allow the email recipient to download a PDF of the letter. Be sure that everyone in your filtered list has an email address when selecting this method of delivery.
Email to Primary Email – Send the email only to the constituent’s default email address.
Email to All Emails – Send the email to all the email addresses on file within that constituent’s record.
Archive Options – Options for saving a copy of the letter.
Save to Documents – Save an internal copy of the letter in the constituent's record in their Documents tab.
Post to Portal – Allow for that saved letter to be accessed by the constituent within their portal account (must have the Advanced Portal feature activated.)
Document Name – Enter the name that will be displayed as the name of the document.
Document Category – Select which category should be assigned to the saved document record.
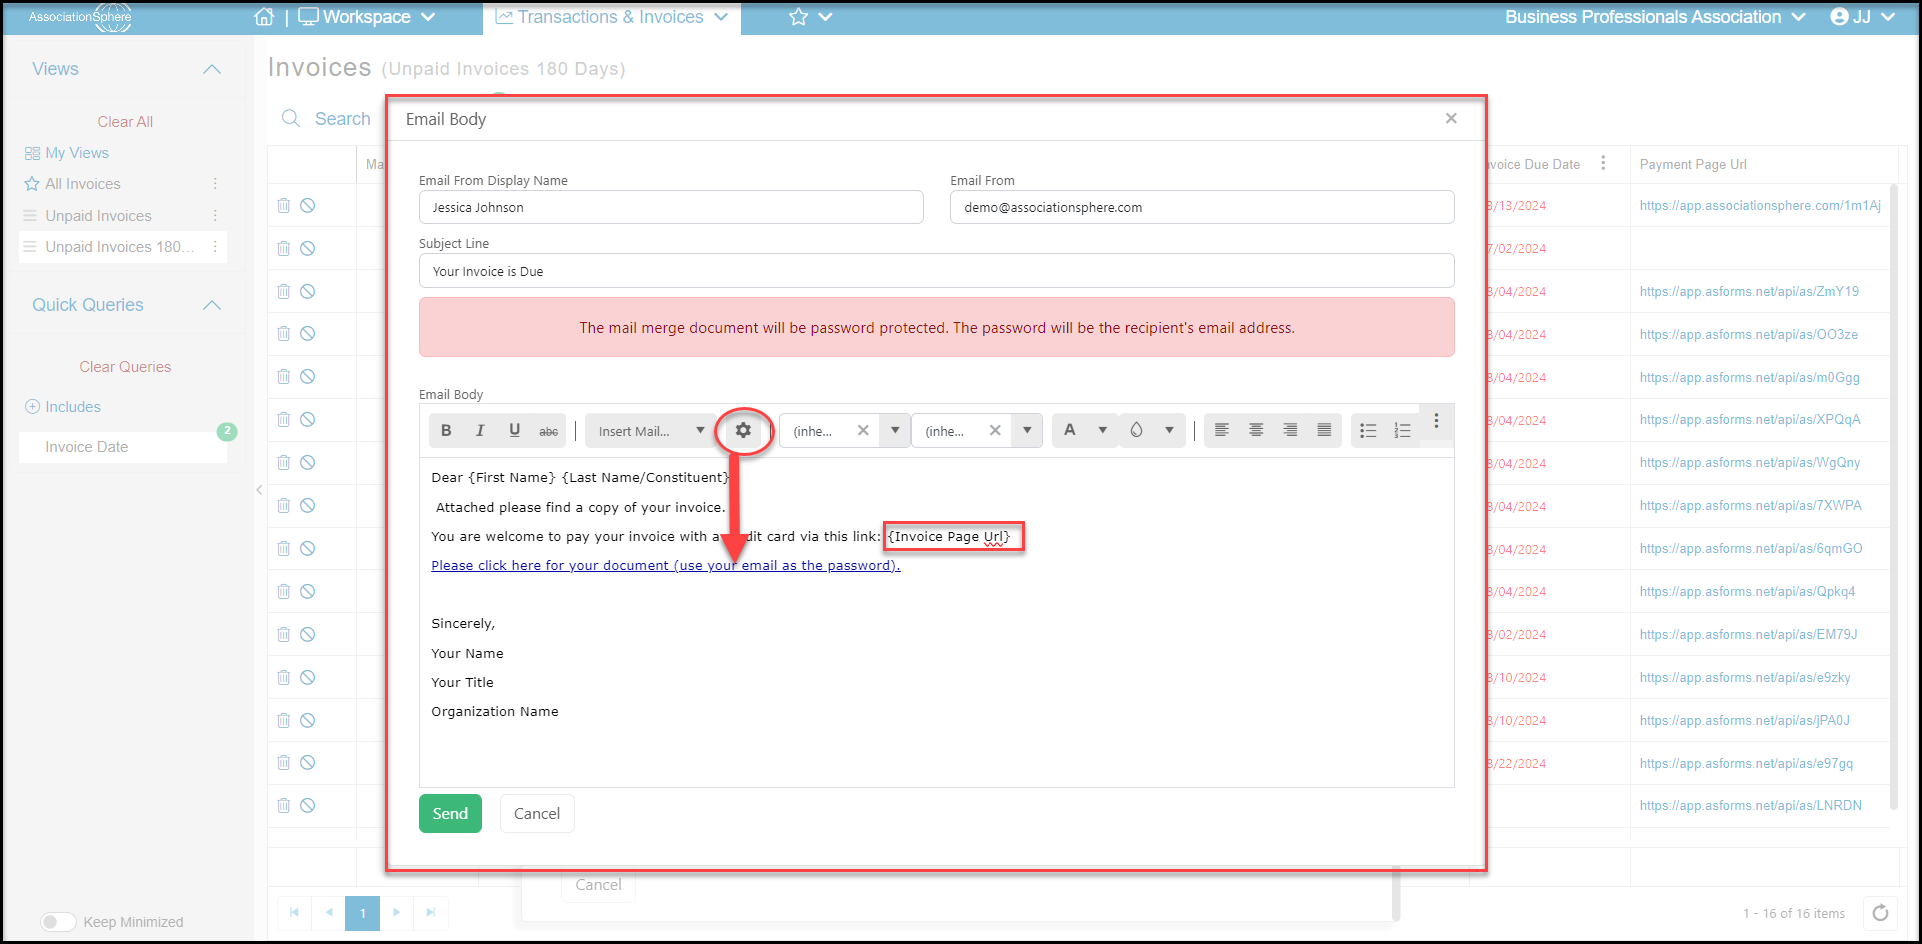
12. If you choose to send the email version of the mail merge letter, below are descriptions of the additional fields you will need to complete.
Email From Display Name – Enter the name that will show as the sender of the email, by default this is the user's name.
Email From – Enter the email address that will show as the sender of the email, by default this is the user's email.
Subject Line – Enter the text you wish to display as the subject Line of the email.
Email Body – Enter the content you wish to display within the body of the email. Note you can also insert in mail merge fields so the email will contain specific information about the membership transaction and constituent. It is recommended that your message include the Invoice Page URL mail merge field which provides a direct link to the invoice to pay with a credit card.
Note: If you accidentally delete the link for the Mail Merge letter, click the Gear icon next to the Insert Mail Merge Field dropdown. This will allow you to re-insert that link.
The attachments are password protected and the constituent (recipient) will need to enter their email address to open and view the attachment. There will be a notice that pops up indicating this for the recipient. This is intended to provide an extra layer of security and privacy protection for the recipient.
When you are ready to send the message, click the green Send button.