How do I enter a payment for an invoice?
Credit Card
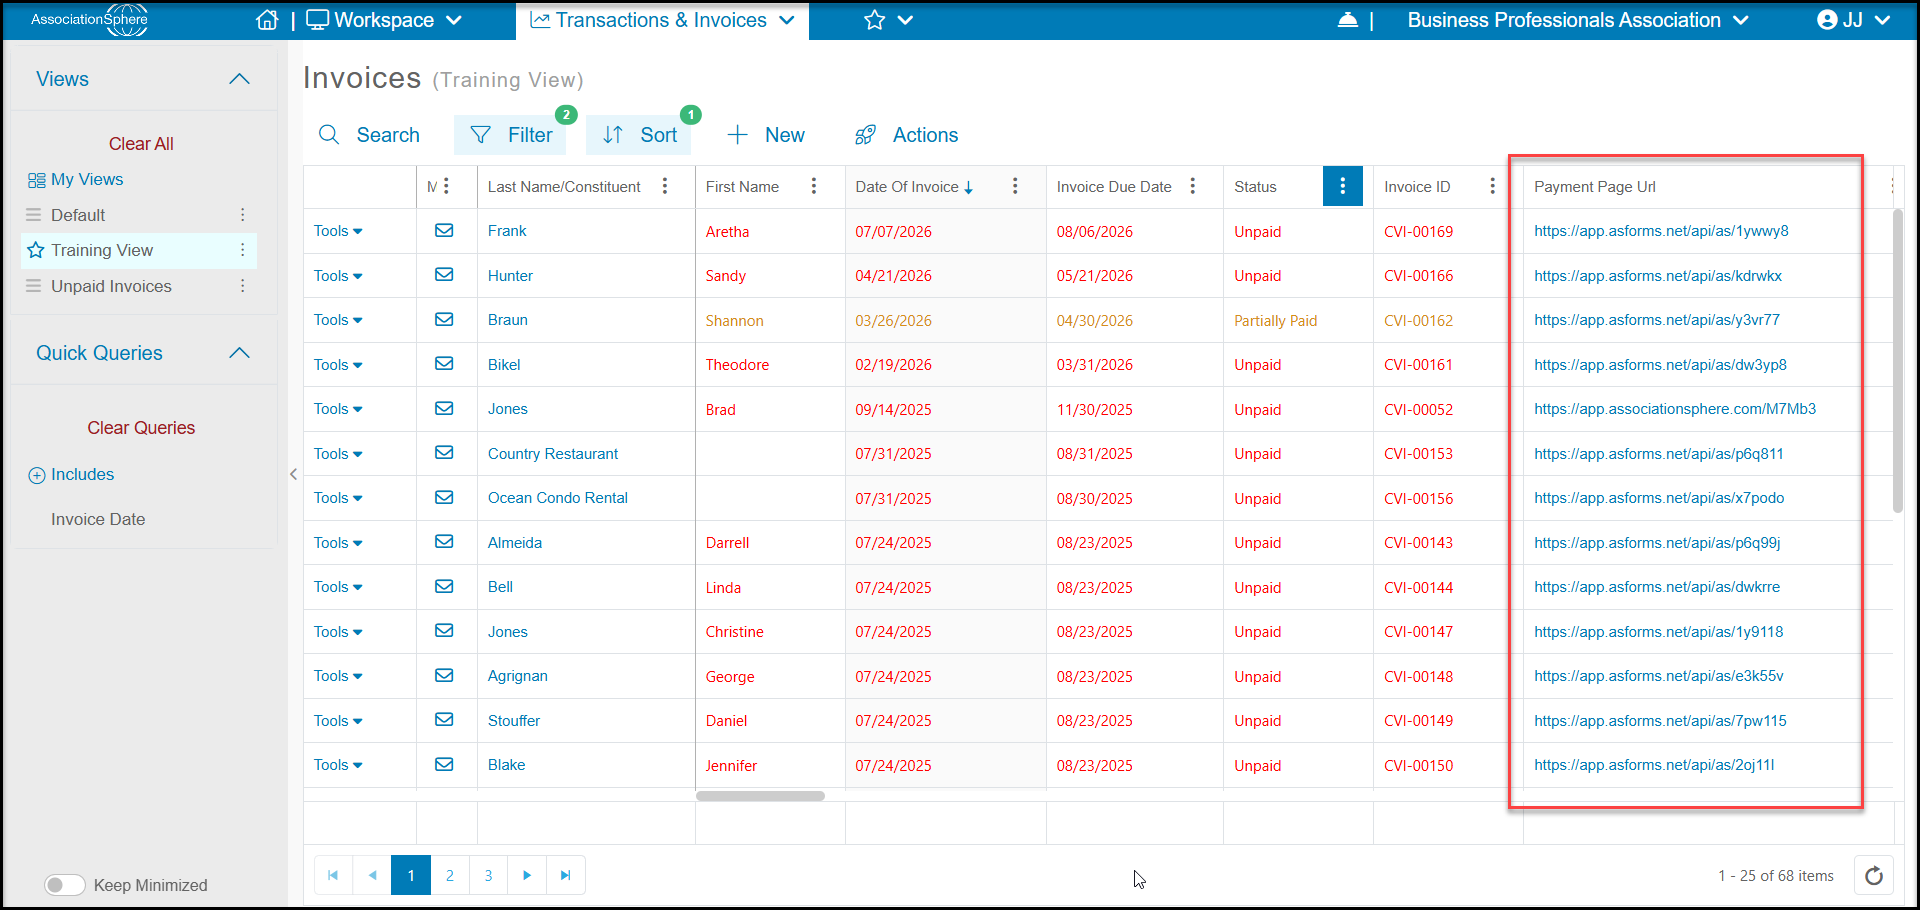
If paying by credit card, you or the constituent can click on the link to the invoice's Payment Page URL to enter the payment information. Invoices that have been fully paid are shown in blue on the main Invoices Grid as well as the grid in the constituent's Invoices Tab. Invoices that have not been paid are shown in red and partially paid invoices are shown in orange.
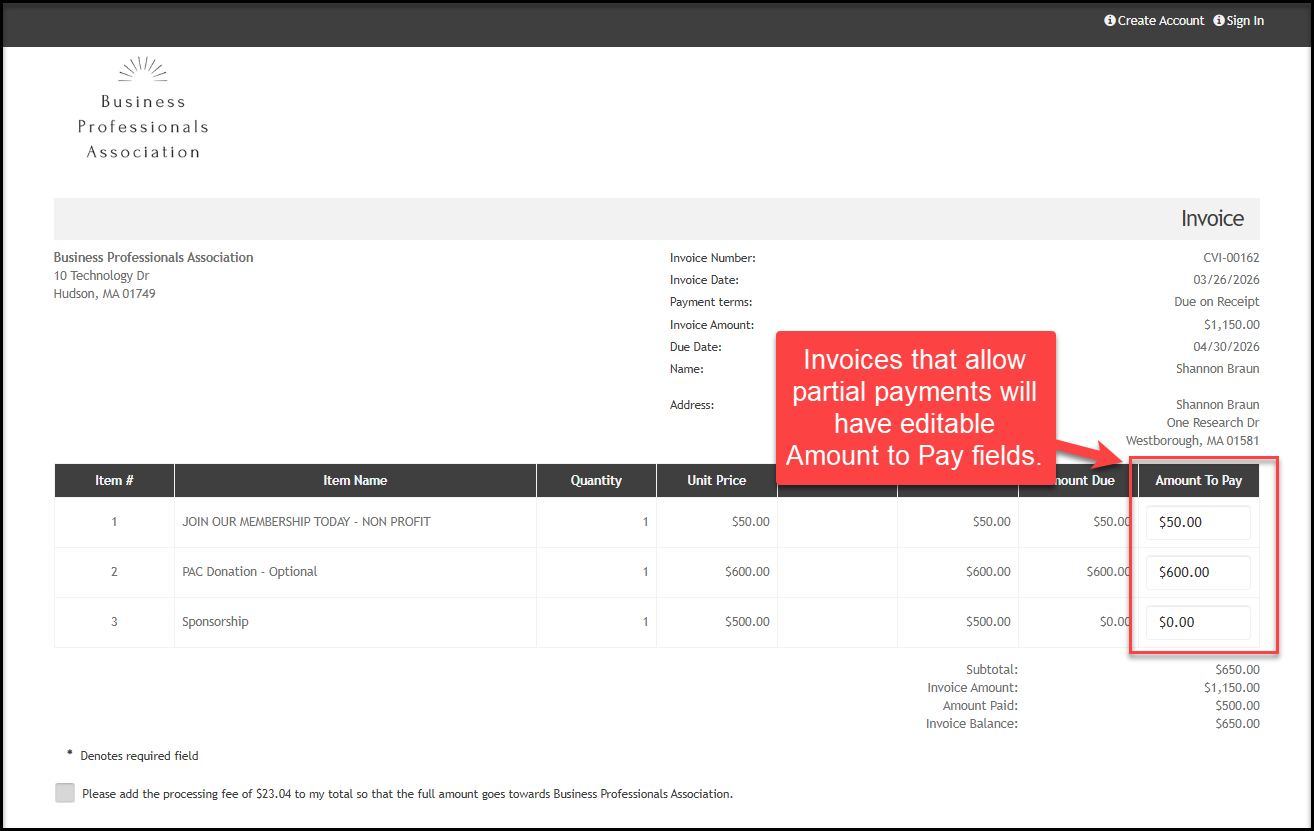
After clicking on the link, the invoice will open. If partial payments are accepted the amount being paid can be entered in the Amount to Pay box.
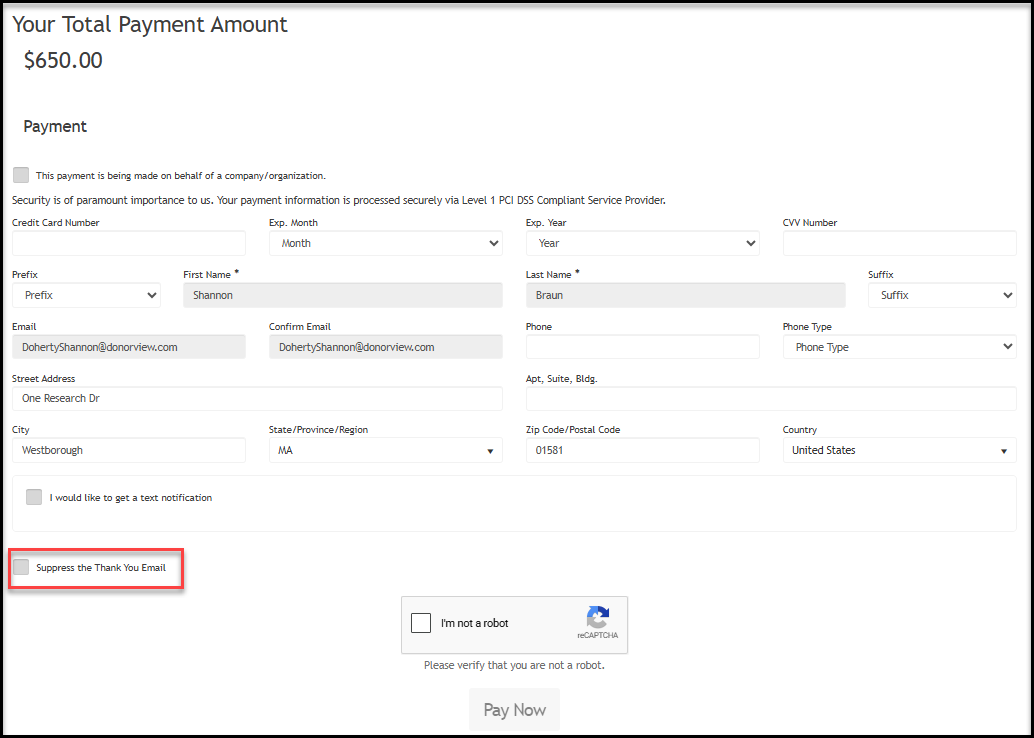
Invoices that do not accept partial payments will not have this option and only show the amount due. If no credit card is on file for this constituent, you can enter it.
The contact information will be auto-populated and the constituent linked to this invoice cannot be edited. If the invoice and transaction should be assigned to a different constituent, you will need to delete the invoice, then delete the transaction and enter it correctly.
If you are recording the payment via credit card, an automated thank you message will be sent. If you do not wish the thank you message to be sent, you can check the box Suppress the Thank You Emailso that no automated thank you message will be generated.
When all the necessary information is entered, check the CAPTCHA box and click Pay Now to complete the transaction.
Check or Other Payment Method
If paying by check, cash, or payment method other than credit card, you will need to create a invoice payment transaction. The new transaction can be initiated from several locations including both the main Transactions and Invoices grid by clicking on +New and then selecting Transaction.
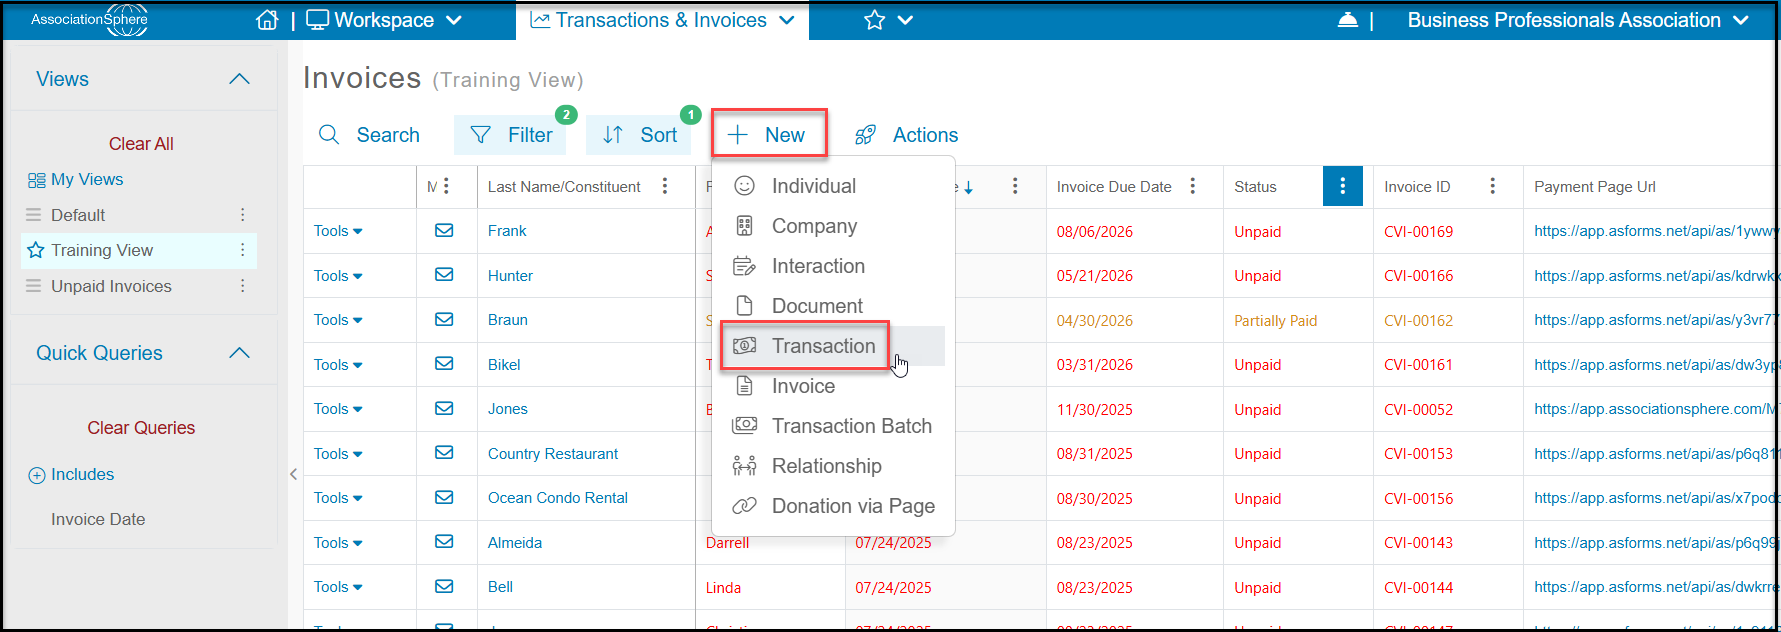
If you did not have a specific constituent selected from the Invoices grid, you will need to choose the constituent from the Constituent dropdown menu in the top left.
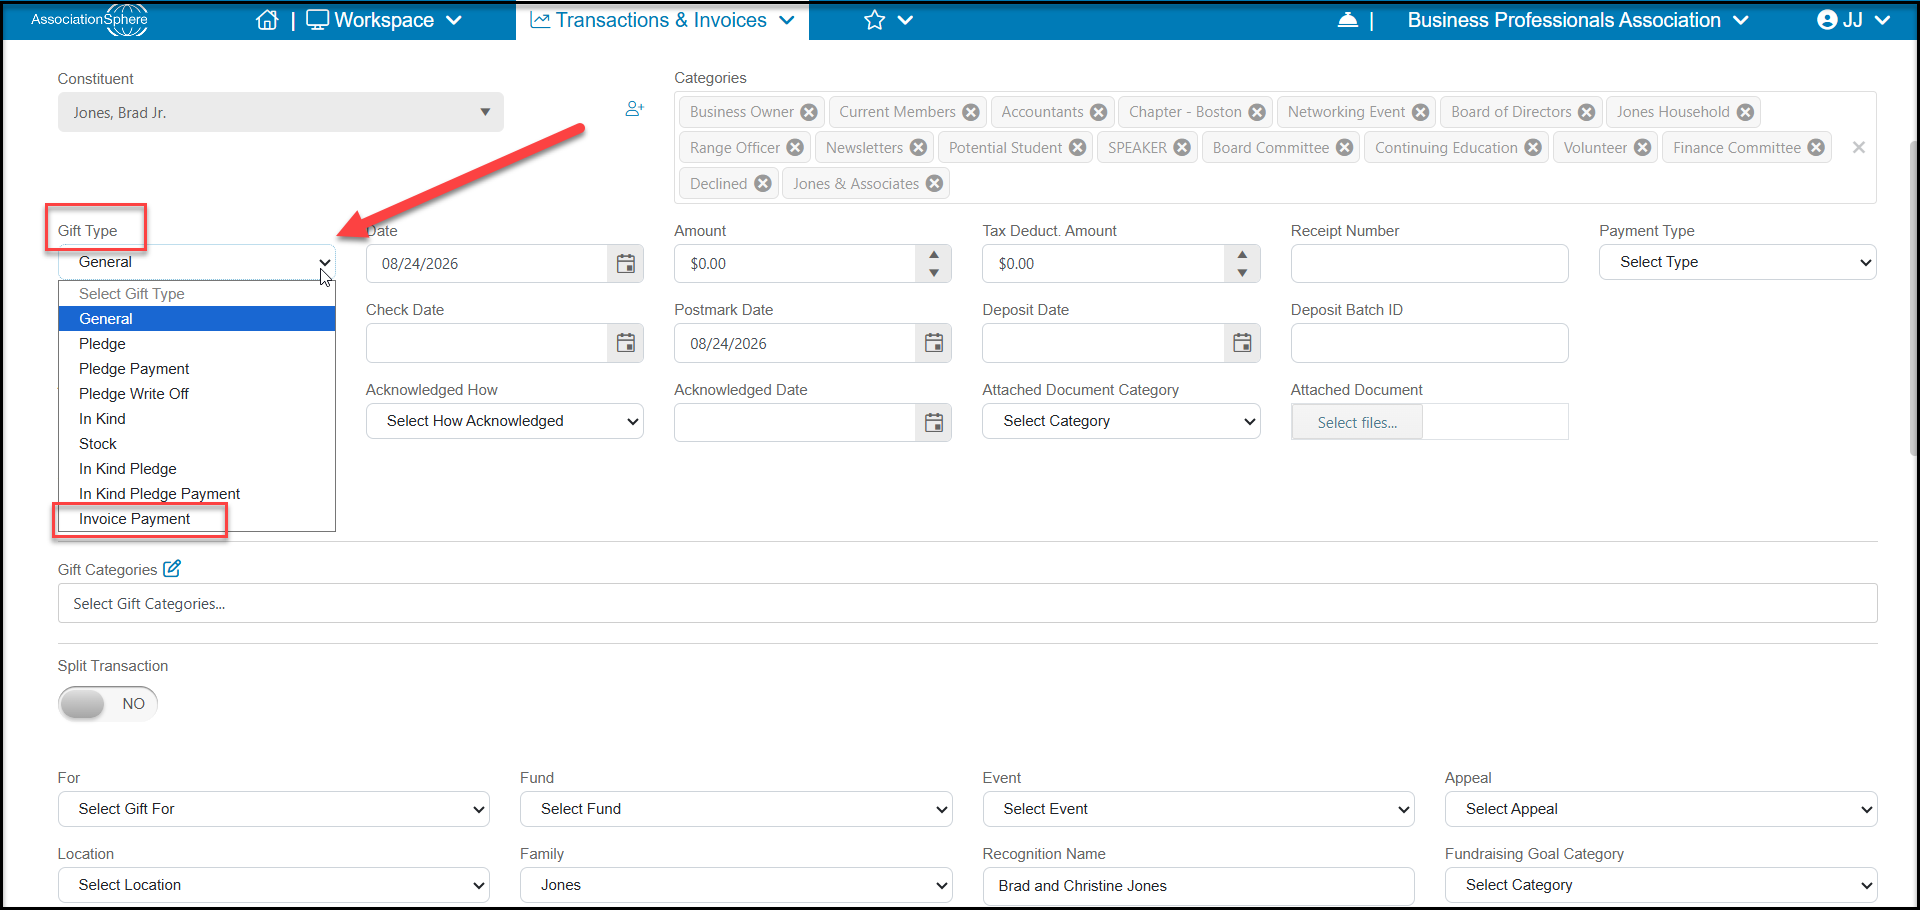
The transactionType will default to General, so you must change this to Invoice Payment to link this payment to the invoice.
You can also add a new transaction from the constituent's Transaction Tab, click Add, then Transaction. Or, from the Invoice Tab, and click Add, then Invoice Payment.
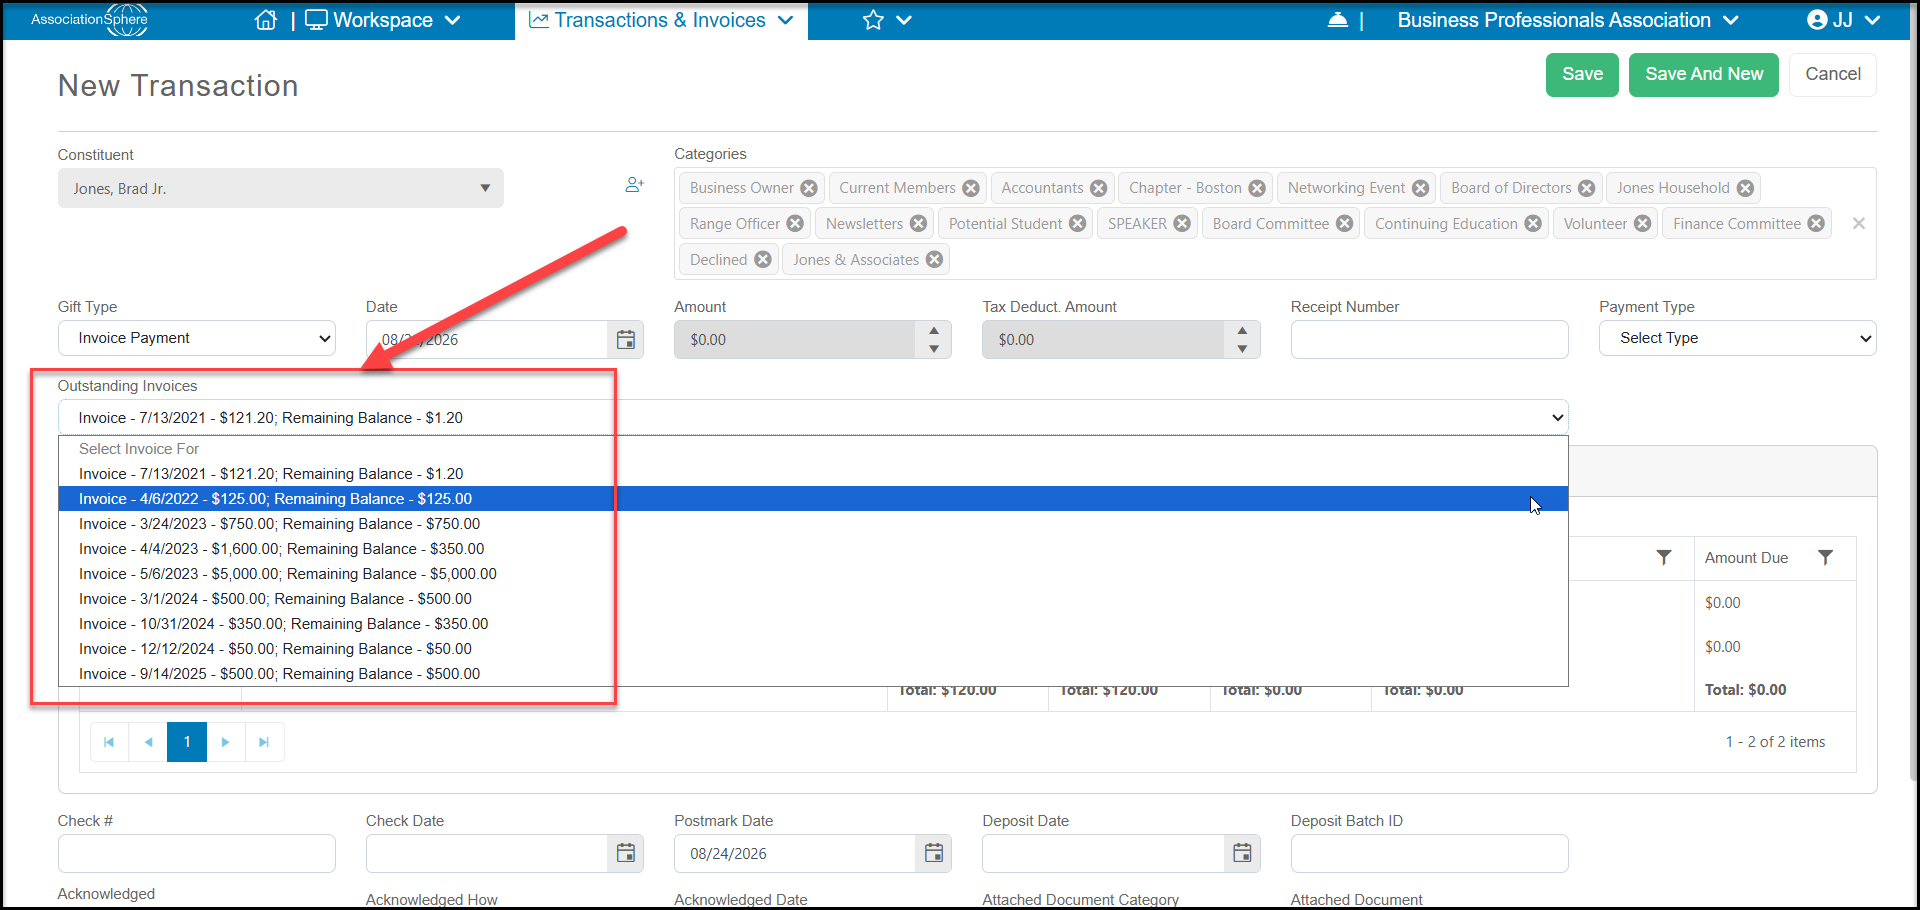
Select the invoice to be paid from the pull down list **Outstanding Invoices.**Check the appropriate boxes for each line of the invoice to pay.
If partial payments are allowed, the Amount to Pay box will show on the right side of the grid. If partial payments are not allowed, only Amount Due will appear.
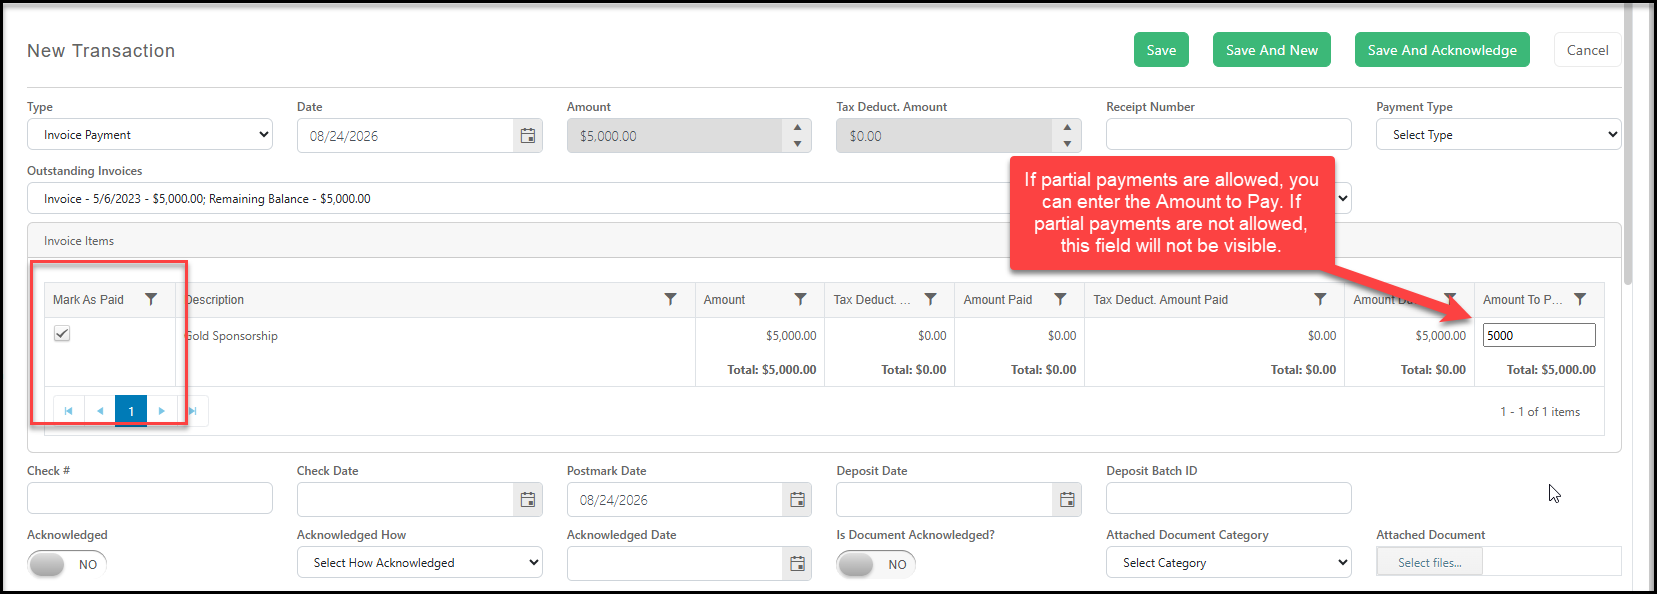
Once the selections are made, complete the remained of the form and click Save to complete the transaction or Save and New to complete and start another without sending a thank you message.
If you wish to send a thank you message, chooseSave And Acknowledgeto generate the thank you message.
In the new window you can select which letter to send and how to send it:
Mail Merge Template – Select which template from your Membership Mail Merge Library you wish to use for this letter.
Acknowledged – If the transaction record should show that it has been acknowledged.
Acknowledged How – How should the transaction record show it was acknowledged?
Acknowledged Date – What date should show for when the transaction was acknowledged?
Tribute Acknowledged - Set to NO as this is only used to send tribute notifications
Combine Split Gift Amounts - If the payment was a split across different For-Fund-Event-Appeal categories, the amounts will be combined in one letter when set to YES.
Delivery Options – How would you like the mail merge letter to be delivered/generated?
Print to PDF – The letter will generate/download to your device as a PDF.
Print to Word – The letter will generate/download to your device as a Word document.
Print to Word (Advanced) – The letter will generate/download to your device as a Word document. (You can use this option if the template doesn’t look correctly formatted with the standard Print to Word option.)
Email Link to PDF File – Generates an email to send to the constituent (membership owner) containing a link that will allow the email recipient to download a PDF of the letter. Be sure that everyone in your filtered list has an email address when selecting this method of delivery.
Email to Primary Email – Send the email only to the constituent’s default email address.
Email to All Emails – Send the email to all the email addresses on file within that constituent’s record.
Archive Options – Options for saving a copy of the letter.
Save to Documents – Save an internal copy of the letter in the constituent's record in their Documents tab.
Post to Portal – Allow for that saved letter to be accessed by the constituent within their portal account (must have the Advanced Portal feature activated.)
Document Name – Enter the name that will be displayed as the name of the document.
Document Category – Select which category should be assigned to the saved document record.
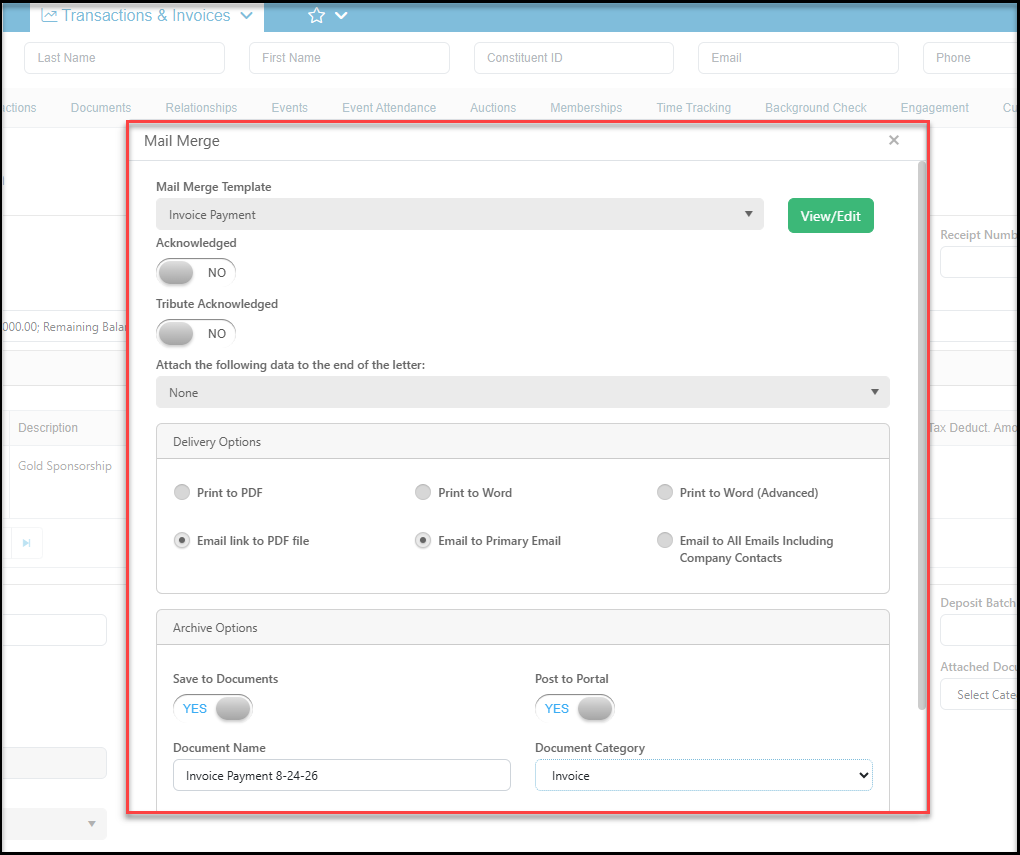
If you are printing your letter(s) click OK to generate. PDF letters will open in a new browser window and Word will download to your computer. If your documents do not download, be sure you do not have on a Pop Up Blocker that prevents the document from downloading.
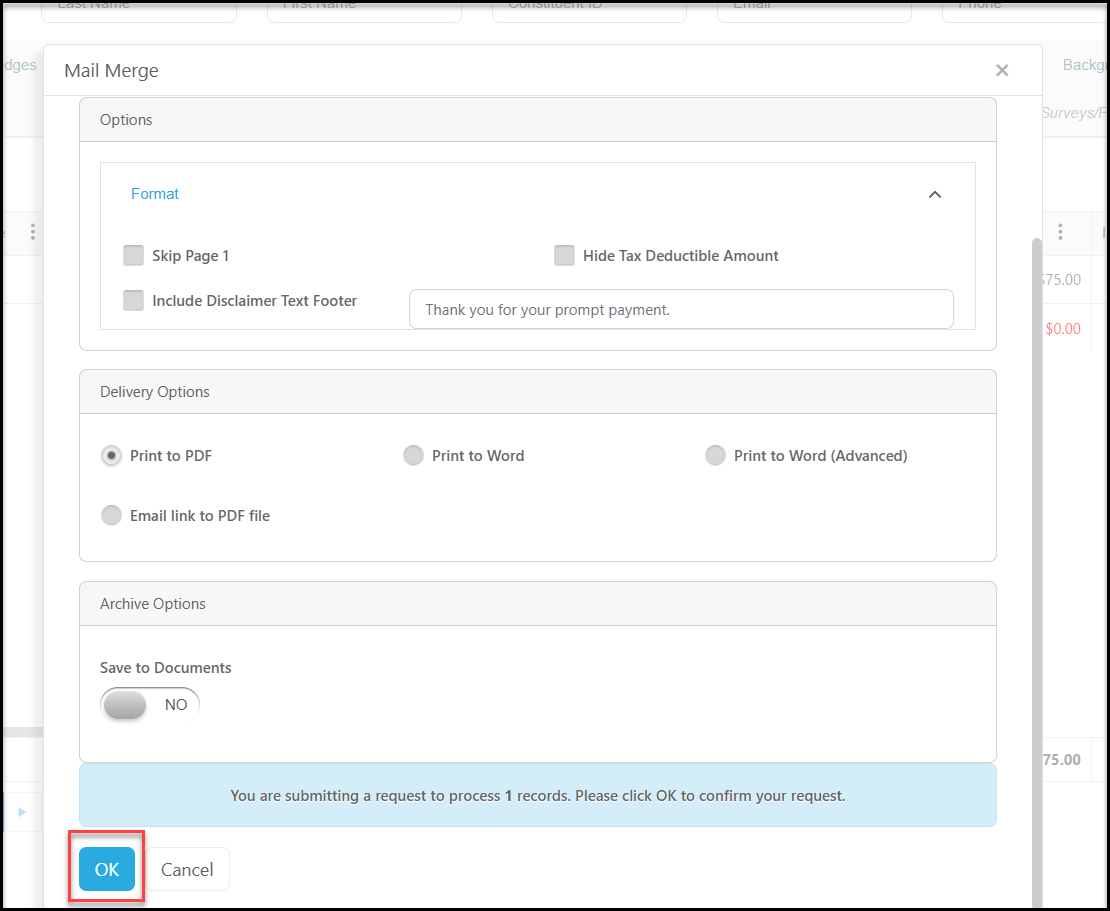
If you choose to send the email version of the mail merge letter, below are descriptions of the additional fields you will need to complete.
Email From Display Name – Enter the name that will show as the sender of the email, by default this is the user's name.
Email From – Enter the email address that will show as the sender of the email, by default this is the user's email.
Subject Line – Enter the text you wish to display as the subject Line of the email.
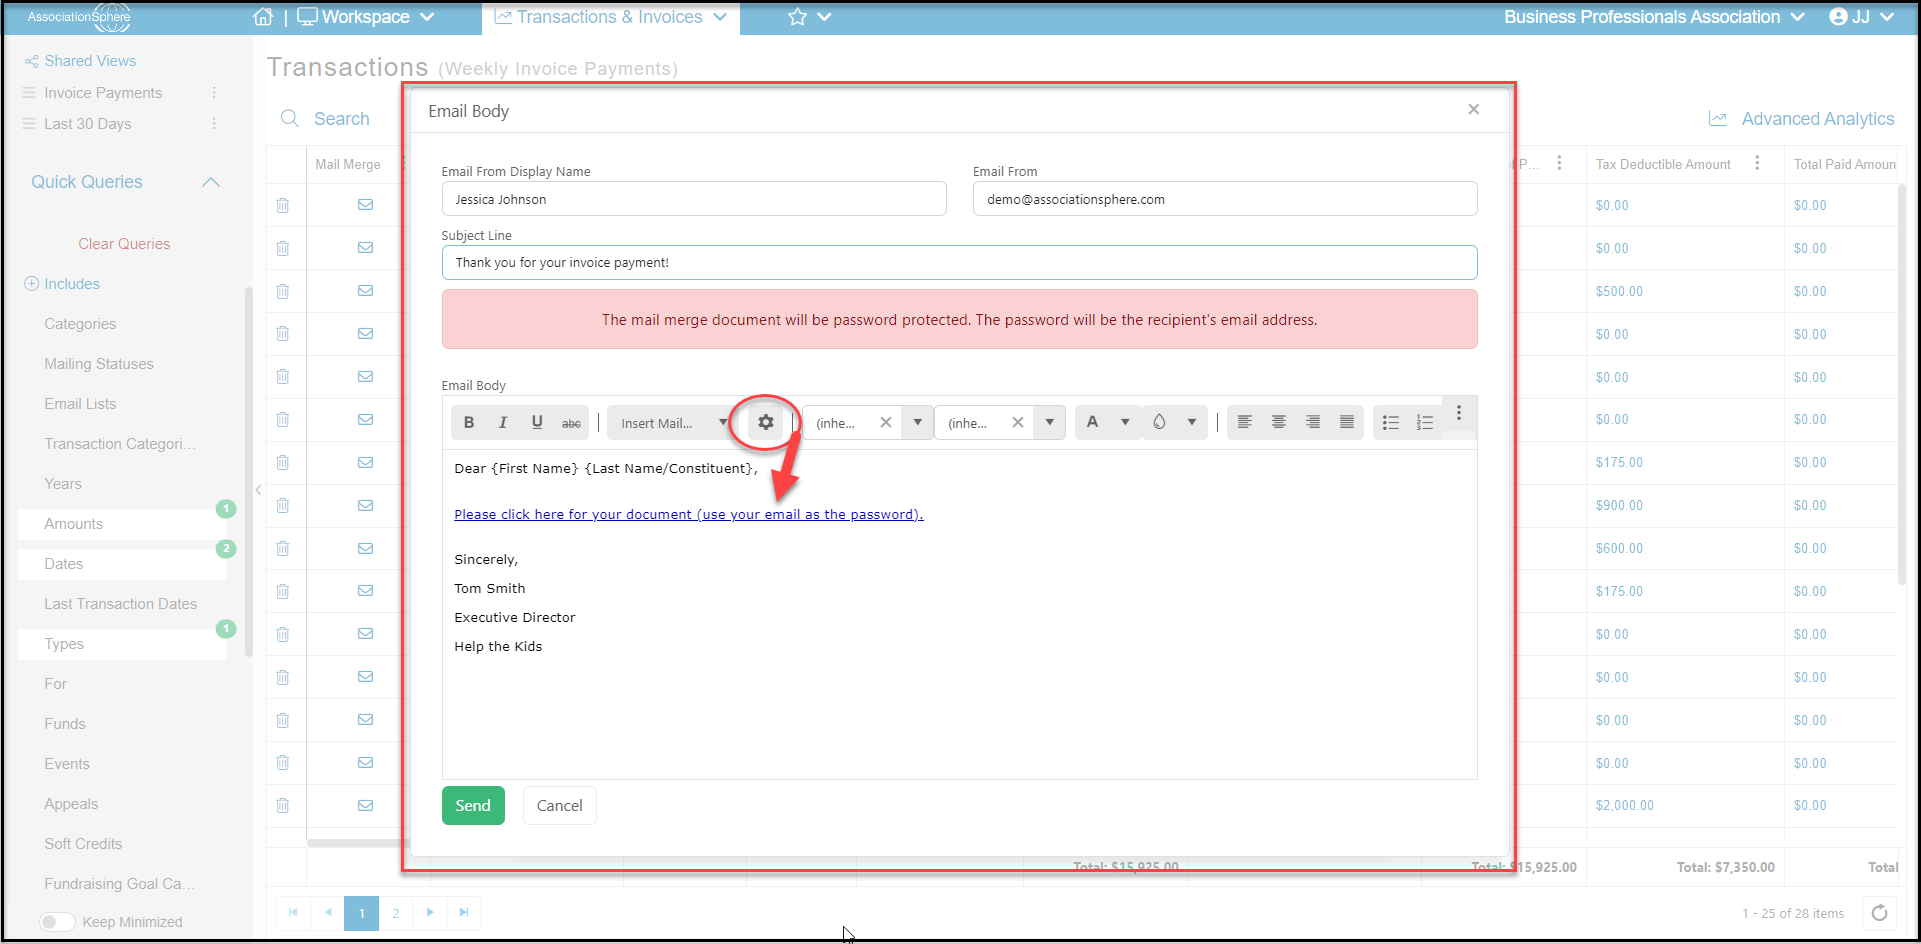
Email Body – Enter the content you wish to display within the body of the email. Note you can also insert in mail merge fields so the email will contain specific information about the membership transaction and constituent.
**Note:**If you accidentally delete the link for the Mail Merge letter, click the Gear icon next to the Insert Mail Merge Field dropdown. This will allow you to re-insert that link.
The attachments are password protected and the constituent (recipient) will need to enter their email address to open and view the attachment. There will be a notice that pops up indicating this for the recipient. This is intended to provide an extra layer of security and privacy protection for the recipient.
When you are ready to send the message, click the green Sendbutton.